It's about exploring and sharing my creative adventures (mostly sewing these days) ~
~those activities that sometimes obsess, usually inspire, occasionally frustrate
~and always provide a delightful maze to wander through.

Wednesday, June 27, 2012

Oversew the environment, the neck and the stocking

Oversew the environment, the neck and the stocking on in front of the piece on in front of right (law)....  That was translation #1 (You just gotta love all of the online translation programs out there!).   It really wasn't terribly helpful, so I went for translation #2:
Blend before left 2 and right 1 before using the tags A and B.  Maintain with a surpiqure fantasy....
What?  You still don't understand, you say?  Me neither.  On to #3:
Superimpose two front left and right front one by using the reperes A and B.  Maintain with fancy stitching...
Now we're talking!   Sort of.  I think....   Or maybe I could just toss the directions in the trash and wing it...

Thankfully, this delightful Au Bonheurs des Petites Mains (The happiness of small hand) pattern is easy enough to figure out without going through too many "Huh?" moments in translation. My high school French ("la plume de ma tante...") was rather lacking in helpfulness here.   It helped a LOT that Dorothy and shams had gone before me, with their beautiful versions and supremely helpful reviews.  Dorothy K's review  and Shams' review.  Seriously, I could NOT have done this without their help!  Actually, I really, seriously could not have done this without them, since Au Bonheur (hereinafter known as ABdPM) has gone out of business, and the only way I could get my mitts on this pattern was because Shams generously traced off my size for me (hugz!).   And she got her copy from Dorothy.  So if you  like this pattern, grab any copy you find!  Actually, that holds true for ANY ABdPM pattern.


The bad stuff:  I spent a ridiculous amount of time tweaking the fit, piecing together my too small bits of material scraps, futzing with serged edges (I really need some practice at that...), and wandering off in my own direction & trying to figure out where I was going.  The good news is that I was able to muddle through it all, and I ended up with a top I really love!

It's wonderful to have pictures of this top as it really looks made up, because the illustration with the pattern looks a bit different than the finished top, and the line drawing doesn't look even remotely like the finished product!
This version shows the front seam angled; it is not - it's straight up and down.
The overlay is a little angled - on my version the overlay looks more angled than it really is on the pattern; mine ended up like this because I needed to take it in more at the side seams in order to get it to lie flat.  (It's called artistic license.  Or correcting a stupid mistake.   Take your pick)  ;-)
I made SO many fitting tweaks on this pattern that I'm sure I can't remember them all.  And even after I was sewing my altered pieces, I made more changes, so my pattern pieces are totally marked up, and I'm sure I'll need to correct them some more when (yes, when, not if) I make it again.   My usual forward, sloping, and narrow shoulder adjustments.   I raised the armscye (which is quite low), and did heaven-knows-what-all to the side seams.   The pattern (I think) calls for overlapping the front & back halves & doing a "fancy stitch" to join them.  I took a seam, because I didn't want to mess it up royally on step one.


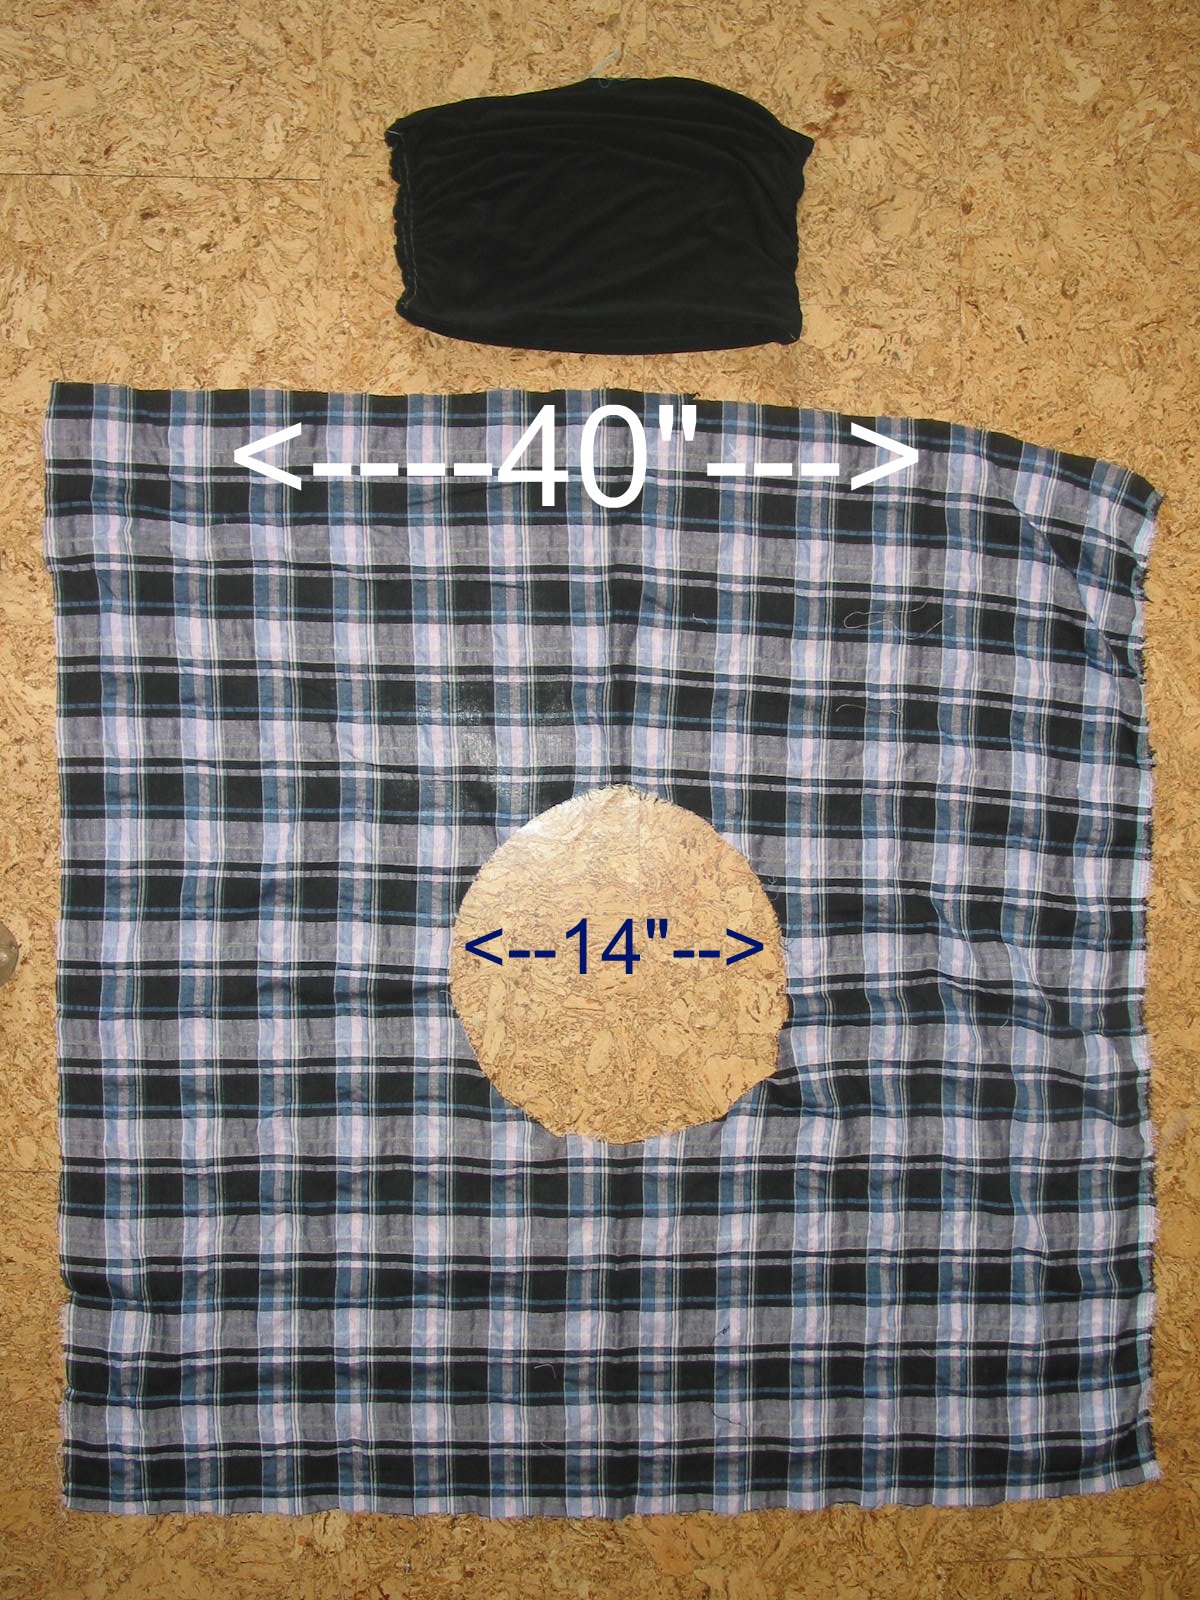
One of the really wonderful aspects of this pattern is that the pieces are all quite small, and you can raid your scrap bin and use up all of the pieces you love too much to recycle elsewhere.  I actually pieced together both the front and back pieces of the print in order to get large enough pieces of fabric.
See the seam?   :)
My next issue showed up when I realized that my knits were too flimsy to hold the asymmetric bits that extended at the neckline - they just flopped over!   Dorothy had the same problem with her first tee; she underlined everything, I decided to simply interface the top portions of each piece with fusible interfacing:
It did the trick :)
My next issue came with the serger.  First I had to put an order in for more serger thread.  I ordered a TON when I first stocked up, but since turquoise is not really one of "my" colors, that wasn't in the pack.   I'm expanding my palette these days.  (No more red hair & all....I'm willing to try anything now.   "When I am old, I shall wear purple...and turquoise, and teal, and....whatever I feel like) ;-)  Once I settled on the colors to use, I still had (have) my issues with neat finishes on the ends of a serged edge.  An hints or tips to help me practice this?  I've seen tips that involved pulling the thread through with a crochet hook, but I just don't get it :(.  I'm going through the Fray Check in the meantime.


Of course, I didn't make it any easier on myself when I decided, on a whim, to add this little square on the top tag after it had already been sewn & serged.  Y'all know, I'm sure, how tricky it can be to merge a new serged edge over a previously serged edge.
It's a little messy, but not so bad that
I can't live with it.
You will rarely see me in a cap sleeve, but when summer hits, short sleeves & even sleeveless are almost necessities sometimes (even in our naturally air conditioned Bay Area weather), so I decided to make the sleeves just a little longer & go with.  Besides, the sleeves on this pattern are  just so darned cute!    I extended the sleeves both in length and width, but they ended up being not nearly wide enough to give enough comfortable movement.  Since I was also at the tail end of my black fabric, I opted to cut an additional piece for the center of the sleeves, rather than re-cutting the two-piece sleeve.  Here are the original pattern pieces (plus my new center piece) laid over the 3 pieces of fabric that I ended up with (You may need to biggify to see the pattern pieces):


This means I ended up with a harlequin look on the sleeves - I like it :)


Bottom line?  I really love this pattern, and can see using parts of it over and over in other patterns.    It was definitely worth all of the tweaking :)


Do you have any ABdPM patterns hiding in your stash, yet to be sewn?  Time to drag them out, sew them up and share!

Sunday, June 24, 2012

Name That Skirt!

The Basklecloth Skirt?
The TableStArc Skirt?
The BobbieShams Skirt?


Here's the back story:  I was cleaning up the sewing room, after the multi-project flurry of late, and came across my first (failed) attempt at shams' Tablecloth Skirt.  I had cut the waist hole too large.  WAY too large.  It was sort of throw-away fabric; I'm not sure where it came from, but I think it might have been part of a free FabricMart bundle.  It's a very light weight crinkle plaid - almost a voile.

I looked at the black in the plaid, and looked at the black modal knit I've been working with, and one of those oddly shaped light bulbs in the brain started flickering...and I found myself thinking "Frankenpattern!"

Here's my review of the Style Arc Bobbie Bask Skirt.
And my review of the Tablecloth Skirt
And a link to shams' Tablecloth Skirt Tutorial

I took the pattern pieces for the bask from Style Arc's Bobbie Bask and sewed it up using the black modal, and then married it to my failed tablecloth plaid.  Since I was combining a stretch with a woven, I wasn't sure how well it would work, so I wanted to get those two pieces together before deciding if a) it was worth continuing, and b) if rectangles of the modal would work on the bottom edge or if I should find another option.
The Bask, sewn, and the cut "tablecloth" square.
For reference, I'm about 5'4"; hips at the widest point are about 38",
and the Bobbie Bask pattern is a 10.
This slides easily on and off.


Here's the skirt before adding the bottom rectangles:
Looking good so far!
Since the circle of the center hold in the plaid is mostly on the bias, it was easy to give it a bit of a taut hold while sewing it to the stretch modal, so the seam blends together quite nicely.  As an afterthought,  I wanted to add a hidden pocket.  If I had planned this ahead of time, I would have given the modal more stretch in the pocket seam area, with less plaid fabric, because I had a bit of a baggy result at the top of the pocket.  I solved this by adding a snap:

The pocket is nicely hidden under the folds of the bask 
Just big enough for a cell phone or some necessary odds 'n ends :)
Everything was working well, so I went ahead and added a strip of modal at the bottom.  The rectangles are 40" long, matching the width of the plaid square, and the finished depth is 5.5".  This makes the "points" at the corners of the skirt less pronounced....I do like them a bit more dramatic, but this skirt was an experiment, and I didn't want it to be any longer than it is.

Sewing the modal to the cotton at the bottom edge was a bit tricker than the circle above.   By using "taut sewing", giving the cotton a bit of a tug while feeding it through, and placing the modal on the bottom, above the feed dogs, they went together quite well.  I'm loving working with, and wearing, modal!  It has a good amount of stretch, but I would consider it a fairly stable knit, and it has great recovery.  So far it's behaved itself very nicely when marrying it to other fabrics, both knits and wovens.   A good press took care of any waviness.

All in all, a successful experiment!


I even have a lovely periwinkle blue raw silk that's a perfect match for the blue in the skirt, so it's destined to be a matching top :)

So....what DO I call this concoction?  Have you Frankenpatterned lately, and was it good for you too?

Saturday, June 23, 2012

Civil War Bloomers? Who, Me?

I got a little sidetracked from my "me" projects by a request from a friend.   For bloomers.  Yeah, historical bloomers.  Like this:

Some time after joining Pattern Review I discovered that there are people out there - LOTS of people, who are really into sewing historical costume items.  And wearing them.  It's fascinating, and I love the folks who really get into the historical accuracy of the hand sewing and all that.  Jolly good stuff.   For them.  Corsets and boning and stuff?   Fascinating.  Just not my cup of tea.

So what am I doing right now?  No no...NOT a corset...just a simple pair of bloomers.   For a friend who needs them for a folk dance show  (she was invited to perform in a troupe that will be traveling in Europe next month - you GO girl!)

All of my friends know that I really haven't been interested in sewing for others, but when a Good Friend (hereinafter known as GF), who doesn't sew, asked for a pair of simple bloomers....well, hey, it sounded fun to me, so I said I'd be delighted.   She said they were already all cut out.  (No tracing!  No cutting!)  She thought it should take about an hour.  Did I mention that she doesn't sew?
I think I need this clock.....
So she brings over the pattern and the fabric, already cut.  Two pieces.  Two one-seam legs.  I drape them on her body...I'm a little concerned about the sizing, but this was all given to her by someone who is familiar with the pattern, so I trust that all is well.   Except the legs seem just a tad tight, but I figure I can just make a small seam.   I'm also a bit concerned about the waist & the fact the crotch seems like it might be a bit high & tight.   Just sew a seam at the waist & I'll put in a drawstring, she says.   Did I mention that she doesn't sew?   Still, I figure 2 hours, tops.


Step 1 is to sew up the leg seams.   French seams it calls for.  I need every bit of width I can get in the legs, so that ain't gonna happen - I'll just take a small seam and serge it.  Of course, I had black thread in the serger, and I'm sewing on white lace.   I can be lazy about changing serger thread, but it's no biggy.   Really.  It just means I need to kind of rush through the project that I need the black thread for.  


OK, black serging is done.  (That project will be reviewed soon - and I like it!  It's yet another skirt, and I think it's time to take back everything I said before about not liking skirts.)  Here's a teaser....
There are lots of clues here.... };-)
Back to the bloomers.


I did my usual quick read through the instructions (VERY quick, this time), and jumped right in.  The pieces made no sense to me, but did I take the extra time to read the pattern carefully and figure them out? nooooooooo.......   I also jumped around a bit as I was working, because of not having the real body nearby to fit.


Step 2 (my step 2, not the pattern's) was to sew up 6" of the crotch seam, then fold the edges of the rest of the crotch seam over twice and stitch the folded edge.   Huh?   The whole crotch seam has 6" that's sewn together & the rest of it (another 2+ feet) is WIDE OPEN?   


I think I'd best not write out loud what I'm thinking here....


Is this not the very image of sweet, demure, and very well-covered?
Deceptive, folks.   Very deceptive.
At this point I'm thinking it's time to decipher the pattern & try to get a sense of just what these things are really supposed to look like, because I'm still not really getting the picture.


This is when I discover that there's supposed to be a waistband.   Aha!  That explains my concern about the rise being too short.   So I dig out the pattern pieces, wade through all of the corset bits, and finally find the waistband parts.  And dig through stash to find some appropriate white cotton, which, thankfully, I had in my muslin stash.   Cleared it with GF that it's OK to use an old sheet.  "I don't care what it looks like, don't worry about anything, it'll be fine, keep it simple.  I'm only going to be wearing this for 8 days" says she.   


Did I mention that she doesn't sew?  Have I also mentioned, somewhere along the line, that it's basically not in my gene makeup to leave a seam unfinished on the inside?


How about if I just skip over all of the parts about the seam ripping I did whilst I figured out which was the front, which was the back, where the tie was going to be, which end had the pleats, where the tie started and ended, how to finish the seams.....


Now, this is NOT the fault of the pattern.   Really, the instructions are excellent.  If I had actually seen a completed pair of bloomers before I started I would have finished in half the time.   But I also did not get the gene that allows one to visualize the written word as a 3D item.  I need to touch and feel it first.   


And I guess I just couldn't get over that non-existent crotch seam.


Eventually I got the waist band on, and got GF over for a quick fitting.  The goddesses were smiling on us, because it looked like the fit was just fine!   Except that she wants the tie to be in front - not that she wants me to change the pattern, she just wants to wear the blooming bloomers BACKWARDS.  Quick costume changes between numbers, you know.  YOU CAN'T HAVE ME SPEND THIS MUCH TIME SEWING SOMETHING AND THEN WEAR IT BACKWARDS!  I'm pretty sure I did not shout that, but I'm also pretty sure I said something close to it.   She'll get a lot of practice pulling them on and off, so I'll just have to wait and find out what she does.


GF is telling me tales of how she usually does drawstrings for her costumes (safety-pinned on if/when something breaks), and the rips that frequently happen (again, safety-pinned together...if it's even necessary to do a repair...), and it's beginning to sink in that it's really OK if the costume falls apart, and I really don't need to be spending time finishing all the seams.

But does that stop me from finishing them anyway?

Of course not.

Now I was expecting nothing but a "thank you" for this (I already owe her, as far as I'm concerned - she was one of the friends who spent some time with Mom to give me a break), but she brought me this exceptionally beautiful cut of silk dupioni:
It's a golden yellow, with a rich purple warp -
hard to capture the 3D color, but you get the idea.
Lushness!
And the completed bloomers:
Front
Back.
Ummmm, yeah.
Close-up of the 6" crotch seam and the, um, gap.
So that was fun!   Really, it was.  I would even sew another pair.  If you paid me.  ;-D

Update:  Woohoo!  GF just picked them up, so I got a couple of shots of her wearing them:

Saucy!


In the meantime, another friend asked if I would be willing to sew her a bustle.  No pattern, just total creative freedom!  This project I relish.  Here are the goodies she sent me to play with:

She wants wild and funky, tattered bits, and she trusts me to do whatever I want.   Once I figure out the basic construction logistics (famous last words = "How hard could that be?") it should be nothing but fun!


What's your take on sewing for friends?   Fun?  Won't do it?  Will do it if you're paid?  Will only do it if you're not paid?


My brain is beginning to accept the possibility that sewing for dollars might be a fun thing to do....if I can find the right niche......we'll see........

Monday, June 18, 2012

A Chance Meeting -The Sewist and The Thief

My favorite local sewing haven, Stonemountain and Daughter, was on the route home from a client visit today, which means that I just had to pop in, of course.   I also happened to have some fabric swatches that I needed to match with me...just in case...and was determined to keep my eye on the goal and not get distracted by bright shiny objects.

It almost worked.   But they had a couple of inches of this on display:

Now, if you've seen Mary's fabulous version of Marcy T's jacket, you will understand why I stopped dead in my tracks, turned around & shouted out "Where do you have this????"  It actually took a little while to find it, but with the help of one of the Stonemountain ladies, we finally spied what precious little there was left...and it was HALF OFF!  Now, this is pricey stuff folks, imported from France, and at $24.00 yard, even at half off it still ain't cheap.  I eyed the length, knew it was more than enough, but figured I would take it ALL home and hoard what I didn't use on the jacket.   Just because.

Per Stonemountain protocol, I placed it lovingly on their counter & put one of their order pads on top of it.   This is the equivalent of a she-wolf marking her territory, and as I wandered through the store, I  returned to check my markings and add to my pile....and all was well in my she-wolf world.

In my wanderings, I struck up a conversation with a friendly woman, who was there with another friendly woman, and wouldn't you know it, after a bit we realized that we already knew each other!   In the online sense, that is.  The creative and talented Patti B, who is definitely one of my sources of inspiration, had driven up with sew2little (who does need to sew more, because she's made some delightful items!).   So we giggled a bit & chatted about fabrics & patterns & all those things that sewists tend to chat about, and I must say that Patti SEEMED to be as delightful as her big smile in her pics indicated.

"Seemed" being the operative word.  (Note:  I'm allowing my inner selfish seamstress to emerge; normally I hide her well, but she's there, lurking....)

So I'm all done shopping, I've done a pretty good job of not being distracted by bright shiny objects (My Precious, above, being the one understandable exception), and I go to my pile on the counter......and.... there is NO HOOK AND EYE TAPE!)   Now, I did a double take, staring in disbelief, but you should have seen the look on the face of the employee who had helped me find it earlier.  This woman, trust me, is a formidable presence, and she was ready to go into attack mode to find out what happened to My Precious!
Seriously.  You had to be there.  She was frightening me!

What ensued happened very quickly.  Stonemountain uses clear plastic bags.  The sweet and innocent Patti B was also at the counter.  With her clear plastic bag in front of her.  Filled with fabric.  And.....you guessed it....MY PRECIOUS!!!!   Well, only part of it....my sharp eyes could tell that she, unlike me, was not being greedy and only cut off what she needed.  Meanwhile, my helpful cutter found the remaining bit of My Precious, which, thankfully, was enough. Just barely. Even so, she was ready to pounce on Patti's bag & reclaim My Precious to return it to its rightful owner.   Patti B begged forgiveness, CLAIMED she didn't know the aforementioned protocol, and pretended to be all embarrassed and remorseful, but I knew better....   Still, I chose the high road, and opted to be my usual gracious public self and pretended like I believed her.  In a fit of generosity,  I even let her maintain her dignity and keep her cut.

Especially since she really DOES have fabulous creative taste.  And we both wanted that tape for the same reason (Mary should be getting commissions on this!).  And there really was enough.

OK, ok....it's time to shove my inner selfish seamstress back inside...  And the truth is, it really was delightful  meeting Patti and sew2little, and I'm glad that we BOTH got our tape.   We parted with hugs & smiles, and I hope we get to meet again!

But if we do, I'm keeping my eye on any precious notions I might have with me ;-)

Here's my mini-haul for the day:
Golden silk charmeuse w/ lycra, a copper silk dupioni,  
and a textured, sheer silk from the half-off floor.
I'm SO proud of myself, because all of the fabric was bought
specifically to match something I already have - I'm learning to control myself!

I hope you had a day that was filled with enough for you, and everyone around you :)


Saturday, June 16, 2012

I'm Wearing Skirts! And Liking it! Style Arc Bobbie Bask

Sometimes even a die-hard pants person has to admit that skirts can be...well....kind of fabulous.   Especially on a hot summer day.   And cooler weather too, worn with boots.   And as I sew more, and age more, and become a bit more body and fashion conscious, I'm finding that skirts are starting to have more of an appeal.

One of my all-time favorite articles of clothing just happens to be a skirt, in fact.  This one:
This is a cotton batik that is SO soft, and SO comfy to wear.
It's missing a button, and has a few small stains, but it's true love,
and imperfections can be glossed over, right?
I don't really wear it all that often any more, but it once was my go-to travel skirt, beach skirt, knock-around-the-yard skirt, so it has stayed in my closet for a very long time.   Last year I bought Style Arc's Bobbie Bask skirt pattern:
because it reminded me of this beloved skirt, and finally...finally!...I made it up.
Seeing it on the hanger gives an idea of the drape and construction,
which definitely looks different on the body.

And now I want more!

It's a bit shorter than I usually like (short leg syndrome = needs longer skirts, + aging legs syndrome = vanity, + knees that have never ever been an attractive feature on me = more vanity), but I thought it might make a good biking skirt:
And it does!  Here I am with Matilda Joplin, a bit windblown after a jaunt to the pet food store :)
The knit actually clings to the knees in the wind, and it's a good length,
not long enough to get caught up in anything.  
Success!
Not only that, if I ever DO want to dress it up with heels (not likely, but still....), I can:
I know, the shoes are not the best choice,
but it's what I have.
Truth be told, this is playing dress-up games for me.
It was fun for the 10 minutes it took to put this look together & snap a few pics ;-D
Close up of the bask.
The pattern suggests that you can take a few hand stitches
to hold the folds where you want.
Side view showing the gathered seam
I would have made the skirt longer, but I used every cm of length I could squeeze out of what fabric I had left.  And now I'm fine with the length, since I discovered it's so good for biking!  I left it unhemmed, again, to keep every mm of length, but I may hem it now.  Because I have this "thing" about unfinished edges, and it'll drive me batty sooner or later.

Pattern and Construction Notes:

  • This is not quite a circle skirt, and made up in a drapey knit it has wonderful movement and a lovely soft fall.   The gathered midriff hugs the body, but in a much more flattering way than a single layer of knit.   Well, flattering to those of us who no longer have youthful, fit and firm tummies.....
  • As is the case with most Style Arc patterns, instructions are minimal.   Even the pattern pieces gave me a pause - instead of saying "cut 2", they say "1 Pair", and my feeble brain needed to take a good look at all of the pieces to make sure "cut 2" was what was meant.  The basic information is all there in the instructions, (thank the sewing goddesses for drawings - I would truly be lost without them!) and it's a fairly simple pattern, so you can figure out the details even if the instructions don't quite make sense.
  • There is an inside and outside "bask" (the gathered midriff section).   The outer one is gathered at the side seams, then you match the seams to the seams on the inner bask.   I gathered the seams by sewing a long stitch, pulled and gathered the stitches to length, and tied the ends to hold the gathers in place.  Next time I'll do the classic 2 rows of stitching, and backstitch at one end so that I don't have any slippage while I'm gathering, then pull the threads to create the gathering.   Then stitch down the center to secure it, using a smaller stitch.
  • There is elastic at the waist - you sew this on to the inner bask, at the waistline seam.  I meant to take a picture of this, but I conveniently forgot; it's not my proudest moment in the neat sewing category....  In my defense, I made a teeny tiny seam here (trying to eek every mm of length from the fabric), & trying to keep that seam folded under the elastic was not an easy task!  
  • The only tricky part of the skirt (for me, anyway) (well, other than the aforementioned elastic...), is matching the seams of the outside and inside bask pieces and sewing them together along the gathered seam.  I think that if I do my gathers as mentioned above, and WAIT to pull out the 2 rows of gathering stitches until after I've sewed up this seam, it will be easier, and have a neater finish.
Slow Sewing Required Here
This pattern really has a lot going for it - there is virtually no fitting required; just start with the right size & it pretty much stretches to fit.  It's fairly quick & easy to sew up, & even forgives some sloppy mistakes because of all the gathering.  There is a lot of hemming - I guess I have to admit to myself that I am now a confirmed Lover of Knit Sewing, so one of these days I'll justify a coverstitch machine....maybe.   And a felting machine.  And a straight stitch industrial.......

Maybe.

Did you ever convert from skirts to pants or vice versa?  Are you an equally bi-pantskirt wearer?  What do you love or hate about either one?

For me, it's really all about comfort.  I cannot imagine that I would ever be comfy in a tight pencil skirt, nor would I want to go anywhere in a big poofy conflagration that would brush both sides of any doorway I passed through.   Just let me breathe deeply, and walk freely.  What's different for me now that I've started sewing again is that I want to feel that I look my best while doing it :)

Friday, June 15, 2012

Two Terrific Tilton Tees

Katherine Tilton's Vogue 8793, the one with the fabulous double collar with zipper trim.  Love!

 I love every version I've seen of this top!  You can see a plethora of beauties posted at Pattern Review, where several of my favorite sewists have posted their wonderful versions.   I already had fabrics interviewed and hired, and was just waiting patiently (uh huh) for the next Vogue sale to bring it home.

As soon as I started on it - this long-sleeved top with a fairly hefty collar - the weather decided to hit the 80's and 90's around here, which meant I worked up a sweat just trying it on.  But hey, it's an SF Bay Area summer, where cool nights are the norm, and warm  weather may or may not last (if it ever happens at all), so I forged ahead, knowing the weather would change any day.

Worth it!  LOVE this pattern!  UBER love that collar!  And sure enough, although the days have been hot, at least some of the evenings are cool enough to wear my new tops.
I'm happy with both of them!
Top #1:
I had a scrap left over of the print fabric, and inspired by 
shams' homage to Au Bonheur, I used every bit of the avilable scraps in this split-front version.
I simply added the seam allowance when I cut the pieces,
serge-finished the edges and sewed up the seam.

I opted to leave the back one solid color.
Because I can. (my new favorite phrase, given my new-found freedom)
I waited until it was all put together before deciding on the sleeve length and cutting the cuffs,
 and ended up opting for 3/4 sleeves.
Because I can.
The pattern calls for lapping each of the collar pieces the same way
(i.e., left side over right side...or vice versa...),
but I liked them lapped Left over Right, then Right over Left.
It just provides more visual interest, imho.

Note:  The narrow, outer collar is cut on the crosswise grain,
the wider inner collar is cut on the lengthwise grain.
And Version #2:

(Sharp-eyed footwear fashionistas might note those shoes.....)
I LOVE the print on this fabric - it's very Klimt-like; one of my favorite artists :)
The sleeve bands on the blue/orange top are all folded back - I forgot to take a pic with them fully extended.  I cut the sleeves a bit shorter (they're long!), but for some reason decided I wanted longer bands.  Maybe when the weather cools off again I'll leave them long, 

or maybe it was a "what was I thinking?" moment.  ::shrug::
The collar was basted together here - I decided I wanted it to have a bit more structure, and I didn't like where the zipper ended, so....
I pulled the ends of the outer length of each collar piece down below the seam line,
so that the zipper teeth met the seam.
This gave a nicer visual to the zipper, and also gave the collar a bit more structure.

Pattern Notes:
  • Pattern sizing runs a bit large (usual for the Tilton patterns, imho).  My measurements called for a Medium; I cut a Small.  (with lots of adjustments, some of which I noted in detail on my previous post)
  • The sleeves are quite long.  I advise that you wait to cut out the sleeve bands until you've decided on the length of the sleeves; otherwise you might cut them too narrow.  
  • The sleeves are also a bit slim, considering the usual over-sized Tilton patterns.  It's not that my arms are large, it's that most patterns have skinny arms.   That's my story and.....you know....
  • I really like the curve of the side seams - worked well on my body, especially since I'm consciously trying for more form-fitting clothes.
  • I used a standard metal zipper for my muslin, but I ordered the lightweight molded YKK zippers recommended by Katherine from Zipperstop.  Lightweight zippers really are a MUST for this pattern, imho!  Be careful of color selection - if you don't have a color chart, or a local place to see the actual colors, it may be really hard to match your color to your monitor (mine was WAY off!)
  • The pattern calls for a 28" zippers and some people have said that was too short.  For a Small, 28" is sufficient, even if you extend the zipper all the way to the seam.  Anything larger than a Small, I would order a 30" zipper, and if you want a lower neckline, the zip should be longer still.  (Note:  you need one zipper.  Half of it is used on the inner collar; half on the outer collar)
I cut a muslin, both for sizing and to have a good understanding of the collar construction.  I'm very visual and hands-on touchy-feely; when it comes to 3D construction of any sort, if I just see the words, even with good pictures, I don't always "get it" until I've done it myself...muslins have probably been my best and biggest ally since I re-entered the Wonderful World of Sewing.  I'm also on a quest for the Perfect Basic TNT Knit Top Pattern, so I ended up making a bunch of fine-tuning adjustments on this one, mostly on the shoulders, armscye, and sleeves, as noted in my previous post.

Construction Notes:

I kind of followed the pattern instructions (which are very good, imho).  KT calls for double stitched seams; I serged most of mine.   Except on the second top, which had thinner fabric, so I double stitched the armholes to eliminate the extra bulk of the serging.   My standard MO on knit seams is to baste first (checking for fit & any puckering), then do a "lightning stitch", then serge, mainly just to finish the edges.   Some might consider this excessive, but it's what I do.  *shrug*.   If  I just serge, I've ended up with ripped seams, so I'd rather just overdo it to start with and be safe down the road.

On the collar, I attached the zipper with fusible interfacing strips.   I used a couple of different types; Steam-a-Seam Lite worked best.   I just pressed it on to one side of the zipper, attached the zip to one collar side, then pressed another strip on to the other side of the zipper, with a final press attaching the other collar piece, and then stitched them all together using a zipper foot.
Stitch Witchery, pinned in place and ready to steam.
This product is a bit fussy to work with, but for some reason I have a lot of it,
so My Frugal Self (I should give her a name, she's always around...) will find a way to use it
.

On top #1 I lapped the collar pieces differently than the pattern called for - it just looks more interesting to me.  I meant to do this on top #2 as well, but somehow it got readjusted in the shuffle.

I think KT said to stitch the hem - I hand sew the hems on all of my nicer knit tops.   I consider these in the "nicer" category :).

I really, really like the collar on this pattern!  It would be totally workable if you wanted to do it as a single collar, or you could add piping instead of the zipper....lots of creative possibilities  with this top!  I'm thinking of a more summery version next....or soon.... my sewing room has patterns and fabrics strewn all over it right now, it's a creative mess (matches my mind at the moment) so I'm not sure what's next!

And since it's Springtime (almost Summer!) I have to leave you with another garden pic:
A fringed Gerber Daisy - another one of the
lovely plants gifted to my garden in memory of Mom :)
How about you?  Once you've started sewing again after a lull, do you feel overloaded with a messy sewing room filled with ideas and possibilities and not enough time?   Or do you just calmly start in again on a project and do what needs to be done?   How do you contain your enthusiasm when it gets out of control??!!??  (note multiple qm's and ep's..... [grin])

Wednesday, June 13, 2012

A question, A Whimper, and some Shoulder/Sleeve Ease Notes

1.  The question:  I'm almost done with my second version of Katharine Tilton's fabulous zipper-collar T (V8793) (post coming soon).  In this pattern she calls for stabilizing the shoulder seams with fusible interfacing on the BACK shoulder seams.  I've always placed it on the front seam, with the theory that there's usually more pull on the front.   Any thoughts on this from the experienced knit sewists out there?  Does it really make any difference?


2.  The Whimper:  My clothes are starting to hang on me, because I've lost a bit of weight, even though I'm not trying to (for anyone who IS trying, I support you totally!  Don't hate on me, 'k?).  It's not that I can't afford to lose a few pounds, but dangit!!!   All those clothes I put SO much fitting time & energy into!   And this is coming at a time when I'm actually trying to make clothes more form-fitting, so everything that was "comfortably loose" before, is now being seen through my eyes as "uncomfortably baggy".  I usually lose a bit in the summertime anyway, and gain it back in the wintery months, but summer hasn't even started yet!  I really don't want to gain the weight back..... but dangit!


3.  The Sleeve Ease & Shoulder Adjustment Notes:  I'm consciously trying to perfect a basic knit T top TNT pattern, and I made a number of adjustments on the K Tilton pattern, working towards that end.  I thought I'd post what I've found so far -  Maybe someone out there will find this info helpful, and maybe someone will have some helpful tidbits to add.

My shoulders usually need the following 3 adjustments:  Forward, Narrow, Sloping.   I also have a slightly broad back.   And I really hate gathered sleeves (on me).  You will never.  ever.  see me wearing poofy sleeves.  Promise.

Some time ago this led me to Kathleen Fasinella's Sleeve cap ease is bogus principle, and I've been practicing it and applying it to patterns ever since.   I'm getting closer, and one of these days I'll get it right!

Here are my pattern pieces, laid on top of the original pattern,  with notes (because there's no way I can describe this without pictures!) (please biggify for the details)


I find that these adjustments nearly eliminate the wide baggy bit I often get under the arms of most knit patterns, put my shoulder seam at rest where it should be, and allow me full freedom of arm movement while still having a nice fit in the arms and at the bustline.   Oh, I didn't mention that my upper arms are usually WAY bigger than most skinny-minny patterns.  I used to have muscles, now I have....something else.   That could be another whine, but I've learned to accept it.   Sort of.  If I REALLY want to whine about something, all I need do is look at my neck!  But let's not go there.....

Any thoughts, suggestions, observations, experience, or general ramblings on any of the above are welcomed!

Here's another recent garden pic to leave you with - my favorite lily plus a cat :)