It's about exploring and sharing my creative adventures (mostly sewing these days) ~
~those activities that sometimes obsess, usually inspire, occasionally frustrate
~and always provide a delightful maze to wander through.

Wednesday, February 16, 2011

Welt Pocket Construction Methods - Phase Three (Judy Barlup & other general notes about Welts)

I'll start with some short notes on what I've learned so far, a.k.a. "Welt Pockets for Dummies", or "Welts 101".  The welt is the strip of fabric that is attached to the slit that forms the pocket opening.  The welts formed by the previous two methods are really designed to be pocket openings in an area where the pocket bag is held in place & stabilized by a waistline, or side seam, like you would find in trousers.  Judy Barlup's method involves attaching the pocket bag during the welt construction, and the bag is firmly attached to the welt opening itself - so this is more suited to a jacket or other garment where there is no waistline or side seam to stabilize the pocket bag.   Nope, I didn't realize this when I started, and none of my reference materials had the Dummies opening paragraph....I hope I'm not the only sewer around who dove into welts with so little knowledge, and that my little 101 paragraph will be helpful to some kindred souls.....

Onward now, to the third version.  (And yes, I did again peek at the Vogue book, and my old Singer book.   And again, my eyes glazed over & my brain started getting fuzzy, so I put the books down & just replaced them back in the bookshelf this time.)

I wanted to try Judy Barlup's method - another rather complicated method, but it promises less bulk because there are no seams at the edges of the welt.   Judy Barlup welt pocket tutorial

I'll start right off with a pic of the finished pocket, since there aren't any actual photos in the tutorial, and I wasn't clear about what I would end up with.  This is actually a single welt pocket, with some topstitching showing on the outside.  It is necessary to construct and install the pocket bag during the welt construction.    This phase is very picture heavy, and is sort of a companion to Judy's tutorial.   What I've added is a way to make your own welt pattern based on the size you want.   What I've left out is a lot of the fine tuning details of the actual construction, or else I'd be typing all night.   And I'm too lazy.

Note:  This welt is over an inch high, & 5" wide, so the balance is off, IMHO.   But hey, it's just a practice piece!

This is a step by step tute on making the pattern for your a welt, using whatever measurements you want.   I used a 5" x 1" welt, just because that's the size I used for the other welts I made, although this one is halved like the others were. 

1.  Draw a rectangle, using the measurements for your finished welt.  Extend the lower line by a couple of inches in both directions.  (No need to be exact on any of the extended lines)


 2.  Draw a 45° line at each of the top corners of the welt, extending to the base line, and extending upward a bit.

3.  Draw a line parallel to the your long welt sides, the same width as your welt (1" in this case)

4.  Add your seam allowances.  Here I used Judy's suggestions, but it actually messed me up a bit later.  I would suggest being consistent all the way around.

Finished Pattern.  You will need to cut a piece of interfacing the size of the welt area.  (Barlup calls for interfacing the SA below the welt as well...I don't know why this would be necessary; it just adds bulk, imho). Note the cut off corners at the bottom, and the dotted fold lines.   This is where it's helpful to have your SA's all the same - the dotted fold lines need to intersect the corners of the welt, and if your clipped corners match up to the top line when the piece is folded, it's easier to know that the fold is in the correct place.

I cut the pocket bag pieces, according to Judy's suggestions.   The Stay & the Facing are 2" wide, and the width (i.e., the long side) of your welt plus 1-1/2".    The pocket bags are also the width of the welt plus 1-1/2".   The depth of the bags are up to you, but the Outer Bag will be about 1" shorter than the Inner Bag.   (Note:  I ended up using silk organza for the Stay instead of a thicker fabric, as suggested)

Welt, interfaced, with fold lines showing.

Flipped over, folded & pressed.

Open edges stitched, 1/4" from edge  (this is assuming 1/4" Seam Allowances)

Press this seam open, using a point presser.  (Don't skip this step!)

Turn open, & press.

Mark the pocket placement line on your garment, and pin the Stay to the wrong side.  Mark your stitching line on the back side of the welt.   (Note:  See the two lines on the welt?  Judy suggests bowing the center of the stitching line just a bit away from the folded edge, because even a perfectly rectangular welt has the appearance of the ends being wider.  I'm not so sure about this.  I stitched mine on the bow, but I just ended up with a welt that looks wider in the center!   It may be because my welt was so wide in the first place)

Welt stitched in place.  It's definitely a good thing to refer to Judy's instructions from here on out - hers are MUCH more detailed than what I'm writing here; I just have some added visuals.

Outer Bag placed over the welt

Outer Bag stitched on, stitching from the back.

Inner bag (with pocket facing already attached to Inner Bag) butted up against the Outer Bag, ready to stitch.

NOTE:  (Later addition)  Here are Barlup's Step 10 instructions:  With facing right side against garment right side, butt inner pocket bag to outer pocket bag. Stitch through facing and pocket bag 1/4" from edge, beginning and ending about 1/2" shorter than lower row of stitching on outer pocket bag. Backtack at each end. See illustration 10, stitch #5. By making upper row of stitching shorter, seam will not extend beyond the edge of the finished welt.

I got utterly confused here in a later project.  What's missing is  (in blue) With facing right side against garment right side, butt inner pocket bag to outer pocket bag. Edges of bags need to be butted against each other; do NOT sew through outer bag, DO sew through INNER bag.  Stitch through facing and pocket bag and garment 1/4" from edge, beginning and ending about 1/2" shorter than lower row of stitching on outer pocket bag. Backtack at each end. See illustration 10, stitch #5. By making upper row of stitching shorter, seam will not extend beyond the edge of the finished welt.

Bags stitched on, Inner bag & facing folded over.

Now, finally, it's time to cut the fabric!  

Note that the stitching line on the Inner bag is shorter than the stitching line for the Outer bag & Welt.  When you cut the fabric, the cut will be about 1/2" shorter than the shortest stitching line.  Clip your "V's"  (which 
are lopsided - that's OK) exactly to the end of the stitches.
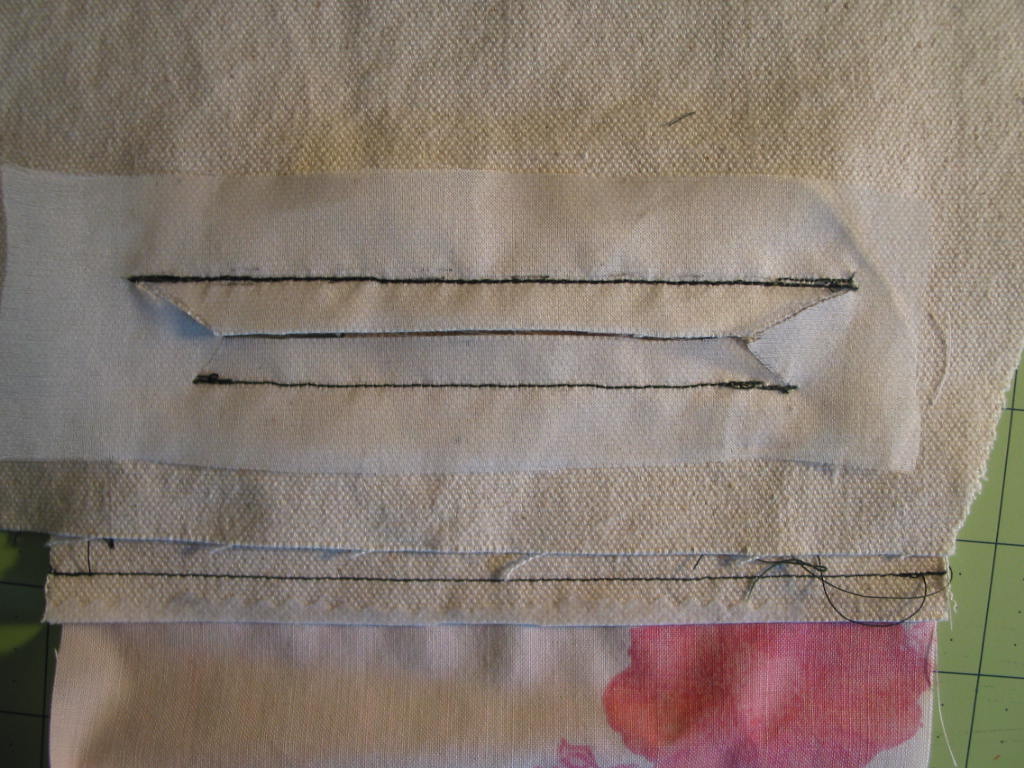
 

Again, I'm deferring to Judy's instructions for this entire last half....way too many words for me to redo!  If you're still with me, this is just meant as a helpful add on to her tutorial.

Judy wants you to open out the V's & stitch them down on the facing, claiming that this creates less bulk, and that the V's & the stitching will not be seen.   It's sort of true that they won't be seen, but that's only if you don't look under the welt.  I would clip the ends of the V's off a bit to make sure they don't show up.  Also, my stitching here is a bit of a joke....getting tired, it's just a practice welt, yadda yadda......

Now you fold your welt back to the outside, top stitch up & down the ends
and you're ready to stitch up the edges of the pocket bags & be finished!
, 

CONCLUSION

For an all around, good looking, easy to do welt pocket, Anna Zapp's method wins, hands down!  (See the prior post for instructions on this....)

Ann of Gorgeous Things has, imho, definitely improved on the traditional method of creating the opening and then inserting the welts.   Adding the ease of stitching up the center of the welts ahead of time makes things MUCH easier, and I think this method would be great to use in cases where you want to create some unusual shapes, or curves, or you have a patterned fabric that you're being anal about what shows up in the welt, or matching it to the garment fabric.

Judy Barlup's method is very time-consuming, if you don't have your welt pattern made up already for a standard size.   She has a whole different pattern for an angled welt!   Although I tried both a horizontal welt and an angled welt on the other two methods, I had no desire to go through all of that with Barlup's method!   However, if you're working with very bulky fabric, and/or only want a single welt, her method does create less bulk, so it could certainly have its place.    Also, until I find a better method for a jacket pocket (i.e., no waistband or other seams to secure the pocket to), this is certainly a good option.

Next up:  I'll be practicing adding the pocket bag to Zapp's welts, and then it's on to the Real Thing!  (which, btw, happens to be a jacket with an angled opening.....ummmm.......Judy?  I may be practicing your other welt yet!)

Welt Pocket Construction Methods - Phase Two

My second method of trying out welts is from Ann of Gorgeous Things.    I won't copy everything, since she's already done it so beautifully here:  Gorgeous Things Welt Pocket Tutorial

My first welt is made following her instructions.   On the second one, I tried a slightly different technique, with much better results!

I thought that marking the lines on the fusible interfacing, not the fabric, was brilliant!  Fusible interfacing is pressed on the wrong side, (with pinked edges), and organza, the same size as the interfacing, is pinned onto the outside.

All 4 edges stitched, through all layers (interfacing, fabric, and organza), using tiny stitches on the corners & ends, longer stitches on the long edges.

Fabric cut, including "V's".  Ann calls for the V's to be marked 1/2" from the ends, which makes more sense to me than the 5/8" called for in Zapp's method.

Pull the organza through to the wrong side, and press, press press!   Theoretically, you now have a perfect rectangular opening.

Here's where I think the issues (i.e., lots of opportunities for messy errors) can happen.  You baste the welts in place, then sew the welts onto the garment fabric, near the original stitches.  My results are far from stellar:

Oooooh, you can see my mess on the inside!


Next Day:  I had another go at Ann's welt method, making two major adjustments from my first attempt, and got MUCH better results.

The first major change I made was laying one welt on top of the other, right sides together, and stitching them together straight up the center.  Then fold each welt back & press open.   This holds the center, where the welts meet in the pocket opening, together while you're stitching the welts in.   BIG help in keeping everything straight!!!

The second change I made was in the basting.   I was actually doing everything yesterday with printed instructions & no pictures.   This does not bode well for a highly visual person like me!   This time I basted by just picking up a few threads at the edge of the pocket opening fold line, & on the welt close to the fold.

Inside view, with welts pressed open & basted in place:

Finished pocket ~ MUCH better than yesterday's!

Inside view ~  again, big improvement!

Up Next:  Judy Barlup's Welt w/ Less Bulk!

Tuesday, February 15, 2011

An Exaltation of Welts (Welt Pocket Construction Methods, Phase One)

Welt:  Strip of material stitched to seam, border, or edge.

I've been putting it off long enough - the whole welt pocket thing.  A beautiful jacket has been hanging on my dress form for nearly a year now, awaiting (among other things) a welt pocket.  So I committed to Perfecting The Welt this month, and I've been gathering info & getting ready to put that info into practice.

It's time!

The first thing I did was look at my Vogue Sewing book (the 1982 version).  My eyes glazed over, my brain started getting flooded with memories of my former sewing life - a time when I remember constructing horrid looking pretenses at welt pockets, & decided they were just.  too.  hard.   I put the Vogue away.

Luckily, a new (used) copy of Anna Zapp's "The Zapp Method of Couture Sewing" arrived just in time!  (I got mine through Amazon - there is a HUGE wealth of info in this book.  Highly recommended!)  I took a look at her section titled "The World's Easiest Welt Pocket" and decided that would be my first go.   Here are the results.

Step 1.  Mark the pocket placement on the right side of fabric with 2 lines, 1/4" on each side of the center line.  (NOTE:  Instructions call for drawing 2 parallel lines 1/2" apart; it was late at night when I made this pocket & somehow I translated that into one line in the center, which you will see in the first pic below....it worked, but this is a case of do like I say, not like I do....)  In my defense, I think that while Zapp's overall method (and results) are fabulous, her instructions do not go in the category of Sewing for Dummies.   I'll actually try to dumb down her instructions a bit for the rest of us.....

Mark, with dots, the corners of each welt.  These should be 1" apart.

Step 2.  Press fusible tricot or other interfacing to the wrong side of the fabric, extending c. 1/2" past the marked areas for the welts all the way aroung.

Step 3.  Press fusible interfacing on the welt fabric, and cut 2 strips the length of your pocket plus 1-1/4", and 1" wide.  These can be cut crossgrain, lengthwise, or bias.

Step 4.  Fold the strips in half lengthwise, press, and mark the center 5/8" from each edge.

Here is the marked fabric (with only one line in the center of the pocket), and the 2 welts, pressed and marked.  Note that I'm making this pocket at a slight angle - the pocket is on the bias.  My welts are cut on the crossgrain:

 Step 5.  Place the welts on the garment front, line up your dots.  The raw edges of the welts will meet in the center.  Baste in place.

Step 6.  Stitch down the center of each welt, from dot to dot.  Use small stitches, and secure each end with backstitching.  (Note:  this is where precision is important!  Your dots need to be exact, and the stitching needs to end right on each dot)

Step 7.  Check the back of fabric, making sure your stitching lines are exactly 1/2" apart, and exactly the same length, with the ends lined up.   If they are not, determine which line is right, and correct the other one.

Step 8 and 9.  On the wrong side, mark a dot centered between the stitch lines, 5/8" from each end.   Cut ONLY the fashion fabric (not the welts) down the center, stopping at each dot.  Cut a V from each dot to each corner, using a very sharp pair of tailoring scissors.   Your cut should end exactly at the end of the stitch line.

Step 10.  Pull the welt to the inside of the garment.   Turn the corner "V" inside and press (press press press!)  Grade the layers, leaving the longest layer toward the outside of your garment.  

Outside after pressing.  Not too bad for a first attempt, if I do say so myself!

Inside after pressing:

Step 11.  On the inside, fold back your garment fabric and stitch through the "V" and the ends of the welts, securing the short ends of the welts.

Step 12.  Hand baste or zigzag the welts together, in preparation for sewing the pocket bag.   Leave this in place until the garment is finished.

Inside view, with graded layers.


Okay.  So now I'm feeling pretty good about this whole welt thing, and it's time to look at another method.   I picked up the Vogue Sewing book again.   Again, my eyes glazed over & my brain fogged up.   I put the book down.

Practice session No. 1 is over, but I've found some adjustments that may make Ann's method more do-able.    I have 2 or 3 other methods lined up to try as well, so hang in here with me; I'll be back....

Friday, February 11, 2011

An (Almost) FREE New(ish) Ironing Board Cover

I'd been hemming & hawing for awhile about getting a new ironing board cover - spring for one of the pricey Miracle covers?  See if I can find something locally?   Make one myself?  & if so, how & out of what?

Finally I'd had enough....  I went through my stash, "scorch tested" a few pieces of cotton I found,  looked at how the old cover was constructed, & just did it......
Need I say more about why I needed a new one?
I gathered together the ingredients:  Fabric, the string from the old cover, some bias tape from stash, and an old cord pull closure thingy (what ARE those things called???)  I also used an old wool blanket and a layer of batting.
Drawstring closure thingy made of plastic w/ spring inside 

I removed the old cover, cut two from the new fabric, with some extra around the edges for seam allowance.  The old cover held the string in place with some strong stitching, using some sort of an industrial style of overlock.  I figured bias tape would do the job just as well.
Lovely bright orange bias tape - almost certainly came from a bag of freebies from a yard sale, or maybe one of the goodies stuffed inside the drawer of one of my vintage SM cabinets :)   Not a color I think I'll ever need for a fashion garment (I have nothing against bright orange...on other people....).  I simply stitched the tape to the edge of the fabric, turned & pressed it, then stitched up the other side of the tape, creating a tube for the string.

The string, ready to thread through the seam enclosure.....

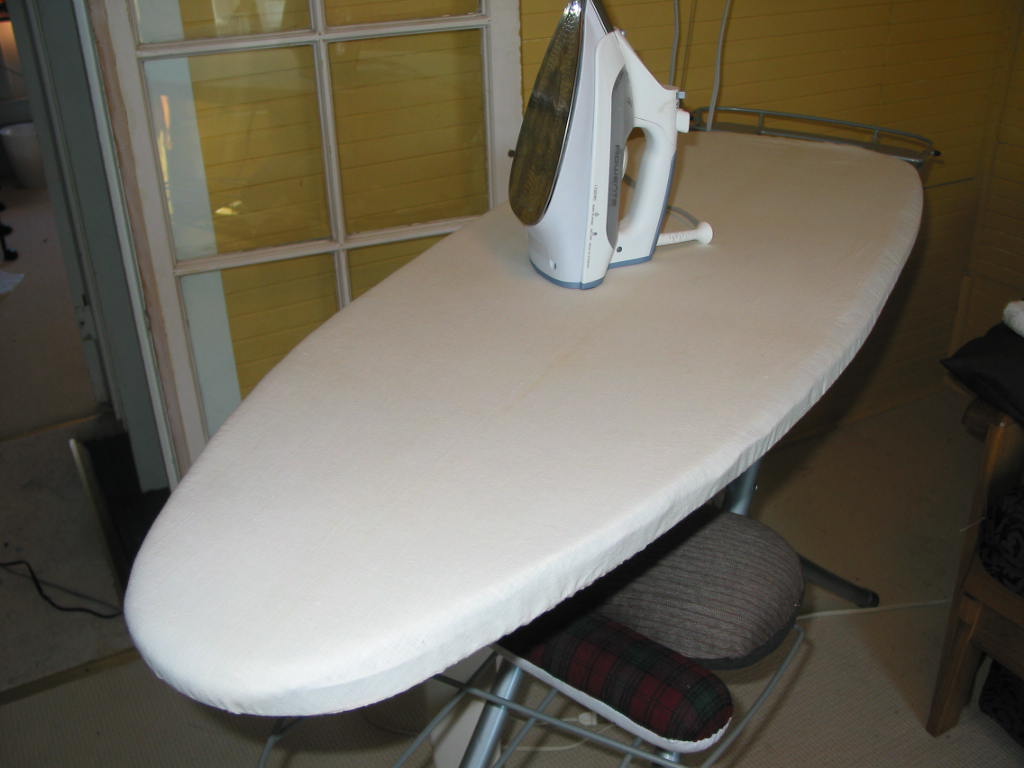
All stringed up, looped through the cord closure, tied off at the end, & ready to install!

The blue is an old wool blanket that I sent through the washer & drier (on Hot!) a couple of times (the blanket was another yard sale freebie find....hey, I'm frugal when I can be!).   I used two layers of wool, one layer of batting (from my stash), & the cover on top
All pulled up tight & ready to scorch!  I mean.. well.... *sigh*  I'll TRY not to scorch it.... not for awhile anyway.......
P.S.   To my credit, I've not scorched any fabric yet....only my board cover.   Just in case you were concerned.....


My First Burda! (That Ubiquitous Turtleneck)

I'm tired of being cold.  Yes, yes, I know it's California cold, but I moved out of Montana (and to Hawaii) for a good reason - I really don't like being cold!

So I finally decided it was time to set aside the arty wearables I've been playing with for the past year, & start sewing some more practical items for myself.  Especially since all of my years-old winter long-sleeved layers & fuzzies are either getting worn out or uglied out.

I decided that the Burda turtleneck (9-2010-121) that has been so popular over at Pattern Review would be a good first step into the maze of eye-bleeding pattern lines that the Burda mags are so famous for.   Especially since it's only 3 pattern pieces,  & with the construction simplicity & all the hints that have been documented at PR, I figured I could ignore the also (in)famous pattern instructions that Burda continually gets knocked for.   I made a mental note to add the seam allowances (yet another Burda idiosyncrasy...gotta add the SA's yourself...) So why is Burda so popular?  Great styles, definitely, and great fit, apparently.... so it's time for me to have a go at it!

First off....all.   those.   lines.   Here's a sample:

I outlined my pattern pieces with yellow hi-liter - just roughly tracing over the largest size, so that I could more easily locate my pieces on the tracing paper.
No seam allowances included in all.   those.   lines.   Did I mention that yet?
In spite of how often I reminded myself to add the seam allowances, when I cut out my first 2 pattern pieces....yep..... I forgot.     At least I did it on the pattern pieces, not fabric!!  *whew*.
Here's a traced pattern piece.   After my initial goof, I retraced my pieces & then placed carbon paper beneath my tracing, & followed my seam line with a double tracing wheel, adding my seam allowances.  

One thing that seemed obvious to me was that the sleeve cap on this top looked very high - & the instructions called for easing the sleeve & installing it after sewing up the side seams & sleeve seams.   Really?   On a knit top? So right off the bat I lowered the sleeve cap - I've done this by guess & by golly before; this time I decided to learn it the "right" way, so I cut & slashed & re-drew the sleeve cap:

Altered cap sleeve.    To remove the excess ease from the sleeve cap - cut across the sleeve below the cap, & slash from the sleeve cap top (here I made a cut in front and in back) all the way to the cross cut.  Overlap the slashed pieces, lay the cap back on the sleeve piece, matching the edges, & tape back together.  (Hope that made sense....if anyone would like more clarification, I'll detail it with better pics)
Others have mentioned that there is a lot of ease in this top (by Burda standards, that is) & that it fits fairly loosely.   I like loose fit, so I went ahead & cut according to my measurements, which meant a 40 at the top, graduating out to a 42 at the hips.   Other than that, & the sleeve cap adjustments, I cut as is.  I had some leftover bamboo knit, which I've already made 2 tops from; I figured if I messed up, it wouldn't be much of a loss, so I decided to use the bamboo as a wearable muslin.

Here's the t-neck portion.   Step one (thanks to PR hints) was to add some ribbon at the center back of the t-neck, so that it will be nice & easy from here on out to tell the difference between front & back.   It's good advice!


 Step two:  Ignore Burda's convoluted instructions for sewing down the turtleneck, & do it the easy way!   Although this solution seemed fairly clear to me after reading through Burda's method, I'm thankful for the reviews before me who confirmed it!
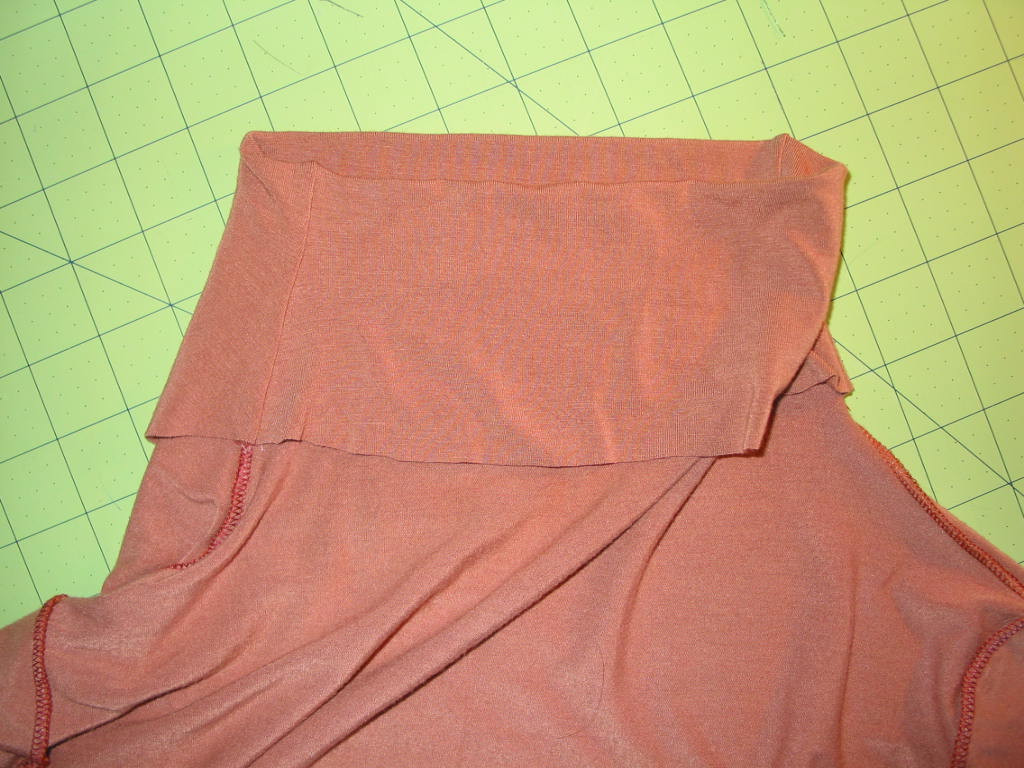
Turn the top inside out, then Fold the neck (both front & back pieces together, touching each other) over, so that the side seam curves match.  Pin the edges together, & baste.   NOTE:   This was what I did on this, my first version of the top.  I simplified it even further on later versions, and did NOT sew the entire length of the t-neck...I only sewed the bottom inch or so.   More about this later....)

Side seams basted together, ready to sew.


After sewing the side seams  together, separate the front & back neck pieces & flip them into place.   You're done!  

The next step is to, once again, ignore Burda & sew the sleeves in flat.  It's a knit, and if I learned nothing else last year, it was how wonderfully easy it is to sew sleeves in flat in knits!

I still had more ease to deal with than I wanted on the sleeve cap, so I made some more adjustments on my pattern pieces for the future tops (I have made FOUR of these.....so far!)

With sleeves installed, it's time to serge up the sides & the arms, decide on a hem finish (I used a double needle on this one) & it's done!   No neck binding to deal with....it's almost criminal how easy this top is!
'nother note:  Thanks to Lynn Rowe's wonderful knit sewalong at PR, there are a few steps to take that I now consider essential in a well-made knit top.   Be anal about cutting on the grain.  I even thread trace down the grain on a solid color, just to be SURE my pattern is laid on straight.   I'm not putting all this time into making a top, just to have it twist on me after a wash or two!    I also baste all of my hems in place before sewing.   Each time I thought I could bypass this step, I was sorry.   And my thread tracing & hand basting is getting faster all the time :)   


Here's Top #1, finished!  This is a bamboo knit from Fabric Mart.
Note the 3/4 length sleeves.   This is because I flat out didn't have enough fabric (those pattern sleeves are loooooong!)  This one I hemmed with a double needle.

 Remember when I said I changed my method of sewing up the sides of the t-neck?   Here's why:
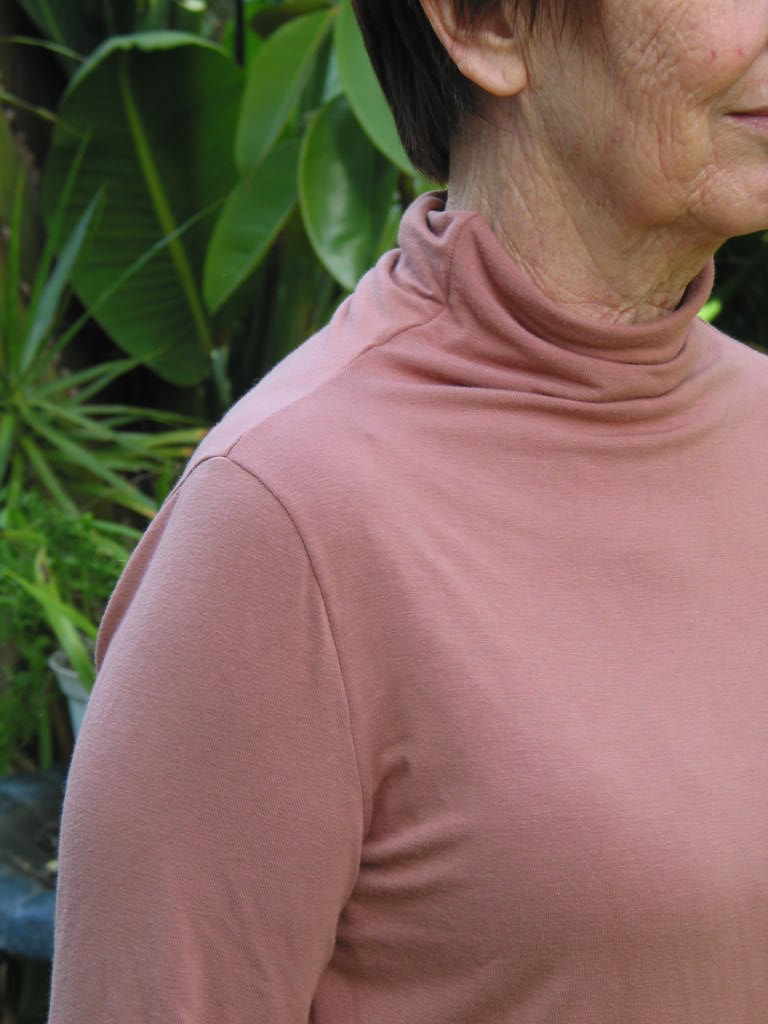
See the little pointy big at the side seam top of the neck?   This top has a tendency to move into that position after being worn for awhile.
This was top #4 - I only attached the neck seams at the lower edge, for about an inch.  The top (folded over) section holds the fold nicely, but the seam line is softer, & doesn't settle in to that point. 
I made a few other alterations at the armscye, which helped eliminate the wrinkles you see in the salmon colored top underneath the arm.   I'm still playing with this concept, but it's mostly coming from Kathleen Fasinella's wonderful posts about Sleeve Caps.  http://www.fashion-incubator.com/archive/sleeve_cap_ease_is_bogus/

I'm on a roll now!   I did make a few more alterations, & at this point I am super happy with everything about this pattern!   The t-neck is very comfy (not too confining) & I even love the suuuuuuper looooong sleeves!   I nearly always cut my sleeves to 3/4 length, or roll them up, but it has more to do with those sleeve ends just getting in the way.

Alterations made:

1.  Cut out excess sleeve cap ease.
2.  Adjust armscye
3.  Narrow the shoulders a bit.
4.  Sew a slightly narrower seam in the neck, to be SURE it's not too tight....same with the upper sleeves.
5.  Widen the waist & hips (usual for me on pretty much any snuggish pattern)
6.  I cut the lower end of the sleeves quite a bit narrower - more than an inch off, I think, so that the gathered portion of the long sleeves stays in place & doesn't slip over my hands.

The other versions:

A fun & funky rayon knit from Emma One Sock.  Full length sleeves on this one.

The back - I LOVE this fabric!

Another fun EOS knit.  I cut these sleeves as long as I could with the fabric I had (I think this was a roll end)  You really need the FULL 2 yards the pattern calls for if you want the full length sleeves!  I hemmed this one with a triple stitch - it's a tad bit less 'formal' looking than the double needle, and a WHOLE last faster!  (don't need to change the needle, re-thread - twice - and you can hem it from the inside.)

Bamboo knit from Fabric Mart.  I LOVE their bamboo, & plan on getting more colors as soon as it goes on sale again!
Bottom line:   This pattern deserves all the kudos it's been receiving.  Super easy to make, comfy all around, and just enough of an edge to the design so that it's not your humdrum turtleneck of yore.   It's a winner!   Burda, I'm raring to go on a more complex pattern of yours now!   (But I'm glad that I started with an easy one)  ;-D