 |
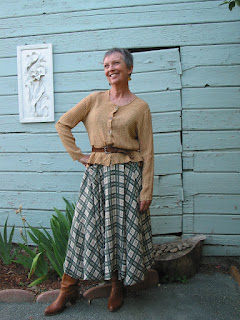
| In honor of shams, I'll start with a twirling shot ;-) |
I ended up (after some "how did I manage to do that???" mistakes, which I blame on my brain not being completely back in my body yet) with a 39" square, and 14"x39" rectangles (this doesn't include S.A's). I meant to start with a larger square, but with my 5'4" height and way short legs, that would not have worked at all! The smaller the inner square, the more dramatic the points are - next time (oh yes, there will be a next time!) I'll make the square smaller.
I did make a couple of additions. The length of my skirt is great for heels, but I thought it would be nice to be able to shorten it. A quick addition of 4 buttons - one at each "point" at the hemline (note: these are not really "points" - when you've sewn up the seams joining the short ends of each rectangle, you have a straight hem - they just fall into rounded points when you're wearing it - it's magic!). Then I sewed buttonhole loops with round elastic at the real points - where the rectangle seams and the corners of the square meet.
(if you haven't made the skirt yet, this will make sense when you sew it together, trust me!)
When the skirt is buttoned up, the hemline is not only shorter, but falls more evenly - I think it gives a more casual look.
I did make a couple of additions. The length of my skirt is great for heels, but I thought it would be nice to be able to shorten it. A quick addition of 4 buttons - one at each "point" at the hemline (note: these are not really "points" - when you've sewn up the seams joining the short ends of each rectangle, you have a straight hem - they just fall into rounded points when you're wearing it - it's magic!). Then I sewed buttonhole loops with round elastic at the real points - where the rectangle seams and the corners of the square meet.
(if you haven't made the skirt yet, this will make sense when you sew it together, trust me!)
 |
| Button at the hemline; elastic loop at the point. |
 |
| Buttoned up! |
The other addition I made was a little patch pocket (I get nervous when I leave the house with no pockets in my garment - I've accepted this as a fact of my life; apparently I'm not only a bit of a button addict, but I'm a bit of a pocket addict as well. I'm covered with this skirt. ;-D I first made a pocket so that the plaids were angled crosswise to the body of the skirt so that they stood out; I thought I would like the look, but I didn't. So I matched the plaids so that pocket blends in. I cut an oval-ish shape, folded it right sides together and stitched the edges, then turned it right side out. In order to make the pocket lay a bit flatter & make it more secure, I also added a casing & a strip of elastic at the top:
Here's the completed pocket:
A couple of looks:
 |
| Full length, just a little bit dressy, just a little bit vintage-y The blouse, btw, is Decades of Style Collar Confection. I made this blouse pre-blogging life, but it's reviewed here on Pattern Review |
 |
| Striking a pose... |
 |
| I think I could go square dancing with this look! Or maybe to a country BBQ? ;D Hem is buttoned up here |
Things I learned, and what I would do differently next time:
- Make a wider waistband. 1" doesn't quite do it for a skirt with this much fabric. Even though this is a lightweight fabric, it tends to pull the waistband off kilter. I probably used elastic that was too wimpy, and cut it too long, but I'll live with it. (I sewed the elastic onto the fabric, so changing it out would be a BEAR!)
- Cut the square a bit smaller, for more dramatic points.
- For a more flattering look, I would consider cutting the waist hole smaller & adding a zipper. Or maybe darts.
- This particular fabric is a bit crinkley in one direction. In one of those 20/20 hindsight moments, I discovered that ripping a crinkley fabric does not equate evenness with the stripes on a plaid. I had to choose between keeping the grain straight, or the stripes straight. I chose to cut with the stripes, since the hemline is naturally uneven anyway. Crinkle plaid fabric could be an issue in a different pattern (note to self: remember this when working with crinkles!!!)
I hope I've helped encourage a few of my readers to try this pattern out, if you haven't already - how about you?


