This concept is so basic that I'll describe everything in the simplest terms, so that even a beginning beginner should be able to follow.
You'll Need:
Fabric Scraps - you can even piece bits together, so you don't need much! Anything washable will do, but my first hint is that patterned fabric hides stains much better than solid colors.
Velcro - Just a small square of hook section and loop section. Do NOT use sticky velcro! (gums up the sewing machine and doesn't work without being sewn)
Paper - to draw out your pattern
Ruler & a couple of plates or something round - size dependent on the person you're sewing for
Thread
Sewing Machine - The one thing my Janome has that my beloved vintage machines don't have is a few decorative stitches - just enough to have a little fun with this project.
For the pattern, determine the width you want to cover the person's chest, and the length from shoulder to waist (or a bit longer or shorter, depending on your needs). My final pattern was a bit smaller than pictured below, since the Mumsie is pretty tiny. Once you've decided on your dimensions, find a large & a small circular object & trace your circles, as indicated below:


You will be cutting 2 pieces for each bib, and these will be sewn together, so allow room for seam allowances (1/4"-1/2") on all of the cut edges, including the small circle, which will be cut out for the neck.
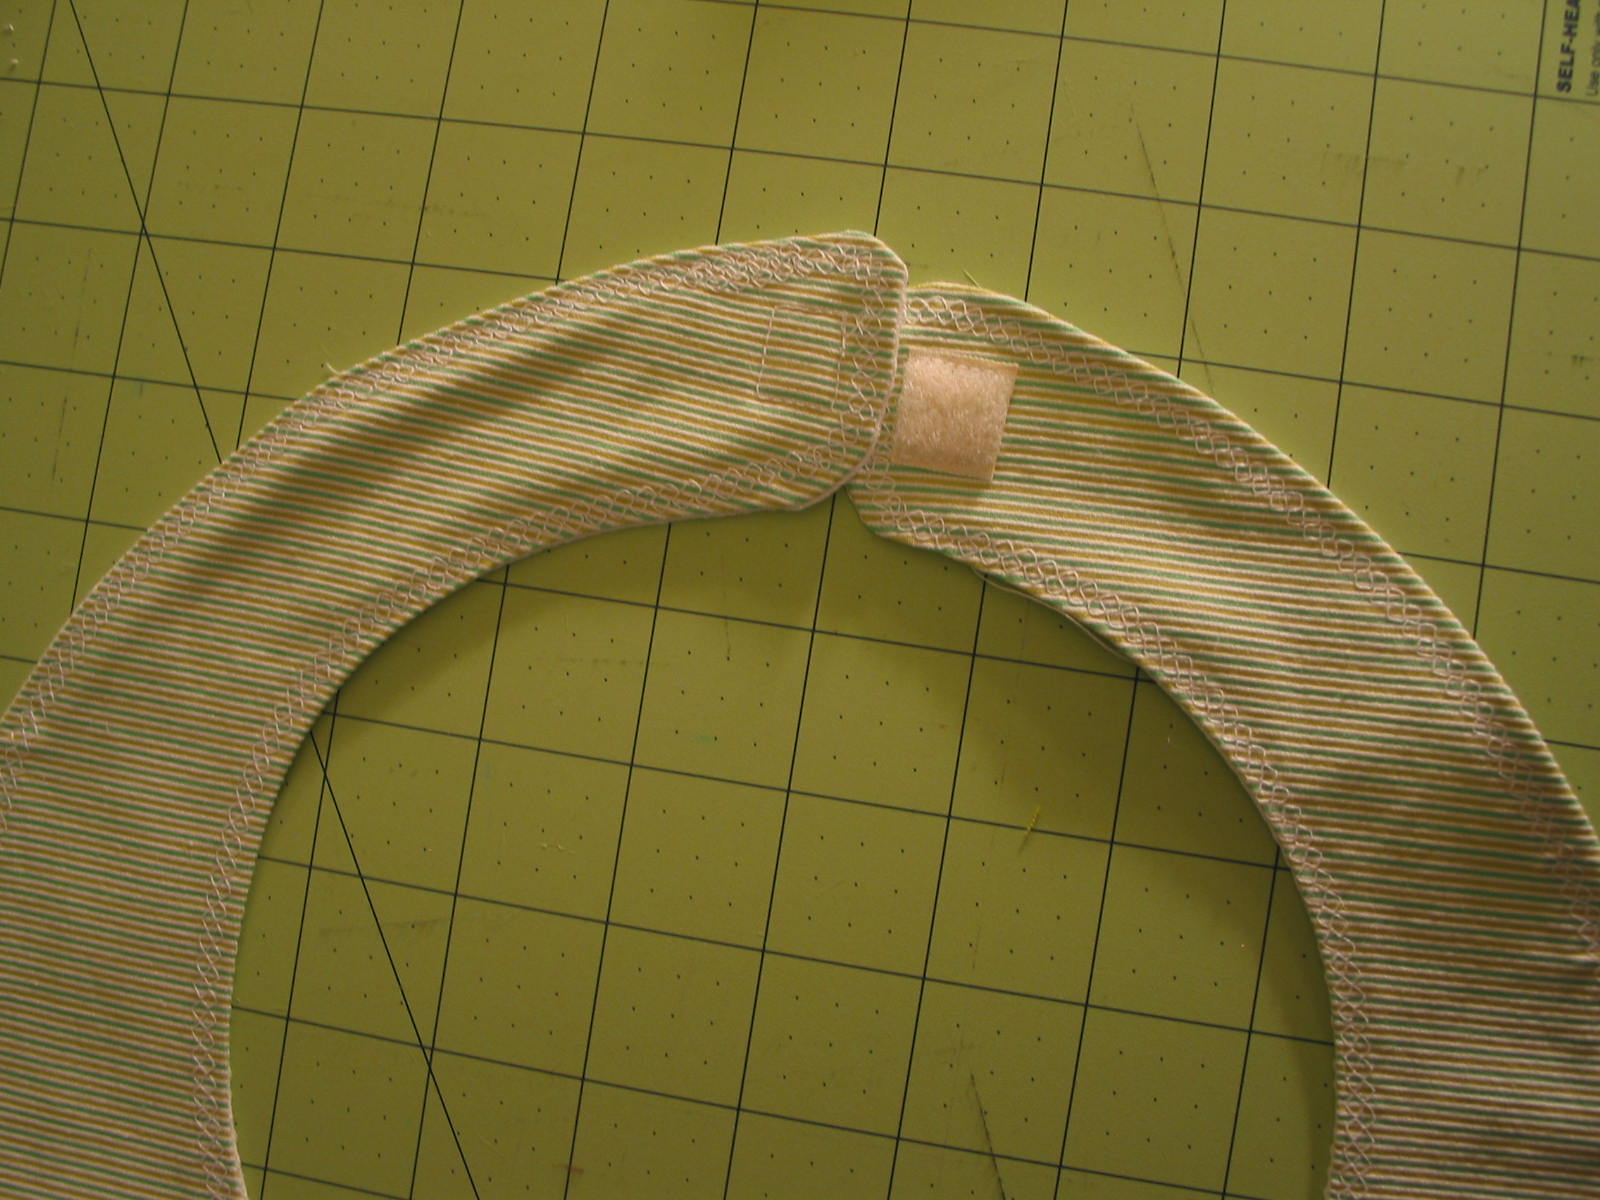
Cut out your pieces, including the neck circle, and cut all the way through the strip above the neck circle. This will have a velcro attachment behind the neck. You can round off the corners of the strip ends if you want - this is optional.

I used 2 contrasting fabrics, and on this one, used the cut out circle as a decorative applique, sewing it on to the contrast side with a decorative stitch. If you're going to do anything like this, sew your applique on BEFORE sewing your two fabrics together.

Place your two fabrics with right sides together, matching all edges, pin, and sew all edges together, leaving about 2" free to turn the bib right side out. If you biggify this picture, you can see the 'free' section on the top left.

Reach through the section you left open & work the fabric through so that the right sides are now showing. Press the edges flat, trying to work the fabric out so that one side isn't rolled over the other at the edges. I use a large, sturdy pin to do this, and work it while I'm pressing. Don't worry if it isn't perfect - it's a bib, not a couture piece! ;-D
Now is the fun part! I don't even worry about the unsewn section that was left open for turning, because I just go around the entire piece with a decorative stitch. This adds a little sumpin' sumpin' to the design, and gives you a sturdy edge that won't roll around with use.

Stitch the velcro pieces on to the ends at the back of the neck section
And you're done!
Here's a sampling of the ones I made:

And a close up of the decorative stitches I used at the edges:

Quick, gratifying, practical, easily washable, and even fun to make!
13 comments:
I've made mamy of those adult bibs. In fact, I have one for myself in my vehicle for those times I'm out and want a coffee, (which I always spill) or a donut (which I always crumble on myself). Love the jacket in your last post and looking forward to more from you.
Thank you Gwen - & you just gave me a D'oh head-slapping moment - Of course! One for me for the car! lol what a concept! I learned long ago that an enclosed coffee cup in the car is essential, but oh those crumbs..... :D
This is great, thanks for posting this. I have made a few but the neck opening was too small on my last. What is the width of the plate you used as a template for this on yours?
yarndiva that plate is just shy of 9" diameter, which I think should be plenty large enough for most people.
And you're very welcome! :D
Hi!! If it would be helpful, you could add a deep pocket at the bottom... to catch those crumbs, etc.
Take good care of YOU as you care for your dear Mother ;)
Rhonda in Montreal (PR)
Hi Rhonda - and Thank You :) I'm learning...and hopefully growing some wisdom...definitely growing patience...and trying my best to take care of myself during this time. And it's always nice to have a reminder :)
And the crumb catcher is a great idea, thanks! Especially for those car driver crumbs ;D
I'm so glad I found this. My wife has been wanting to make adult bibs for a while now. I think she'll enjoy making these.
Thanks for sharig. Mom asked me tomake her some.
Nice! That looks pretty cool, I should make an adult bib like this for my Mother. Would it be hard to make it longer and more like an apron? I think she would use it more if it resembled an apron.
Jason - this sort of pattern would be super easy to adjust the size, or length. I made mine reversible, but that wouldn't be necessary; really you can make them as detailed or simple as you want. And if you have old aprons, towels, sheets, scraps of fabric, etc., around, you can make them for pennies. Bless you for doing this, and good luck!
I know this comment is a bit old and I don't know if you will see it or not. But, I was searching for a simple item I and my granddaughter could whip up to give to a local nursing home. This is perfect! She has never sewn before, and it has been years for me. This is simple enough for a beginner and simple enough for me to relearn how to sew. Thank you!
tysm for posting I needed this to make a bib for my mother in the nursing home ty for posting
just thinking, I am going to use a magnetic snap. I have some so I will try that instead of Velcro. Some times the Velcro sticks too tight, I guess the snaps might too. Carol
Post a Comment