It's about exploring and sharing my creative adventures (mostly sewing these days) ~
~those activities that sometimes obsess, usually inspire, occasionally frustrate
~and always provide a delightful maze to wander through.
~those activities that sometimes obsess, usually inspire, occasionally frustrate
~and always provide a delightful maze to wander through.
Thursday, March 31, 2011
Mini Wardrobe - FINI!
The completion deadline for the Pattern Review March Mini-Wardrobe contest is almost here, with a few frantically sewing last minute stitchers -that's usually me.....but, for a change, I'm all done with plenty of time to spare!
This is the third contest I've entered at PR, and I have to say each of them has been incredibly motivational, both with the self-set goals, and all of the genuine and helpful encouragement given by fellow contest entrants and managers. This one has been my favorite though - even though I'll feel rather lucky if I even get a single vote (or maybe someone will make a mistake & vote for me in error; that's OK too ;-D ) I have already won, for SO many reasons!
1. I have a fabulous new wintery wardrobe that should last me for years! I've already tossed (i.e., re-homed) a few of my 30-yr old Patagucci bits - they're still wearable enough to keep someone warm...just not me anymore :) Upgrade that closet!
2. I've been warm....toasty warm....during this ridiculously cold, wet, dreary winter (by California standards, of course) and now the sun is emerging just in time to get busy sewing something Spring-like :)
3. I've learned more than I ever thought I wanted to know about fleece - where to buy it (The Rain Shed in Oregon, and Mill Direct Textiles - both have an extensive selection of Polartec & other fleece related products. And how to sew it - I got a lot of great info from Sew The New Fleece by Rochelle Harper - it's filled with both practical info & creative ideas - thumbs up!
4. I have a new found concept of making WARDROBE pieces! i.e., garments that have been planned out to actually match each other! What? You think that at age (mumbledymumbledy) I should know how to do this by now? You may be right, but my MO is to buy a piece of fabric (or, when I was still buying RTW clothes, a piece of clothing) because I loved that individual piece. Once I got it home, or sewn up, then I tried to figure out what to wear it with. You know where this gets you? With a top that matches one pair of pants, or a skirt that doesn't really quite work with anything else. I'm done relying on black to match everything!
5. I feel like I made some wonderful new connections with others who participated in the contest thread at PR - martoonis, pints, elves, furry mascots, laughs, support, encouragement. This is community at its best :)
6. Every pattern I used is destined to be a TNT for me!
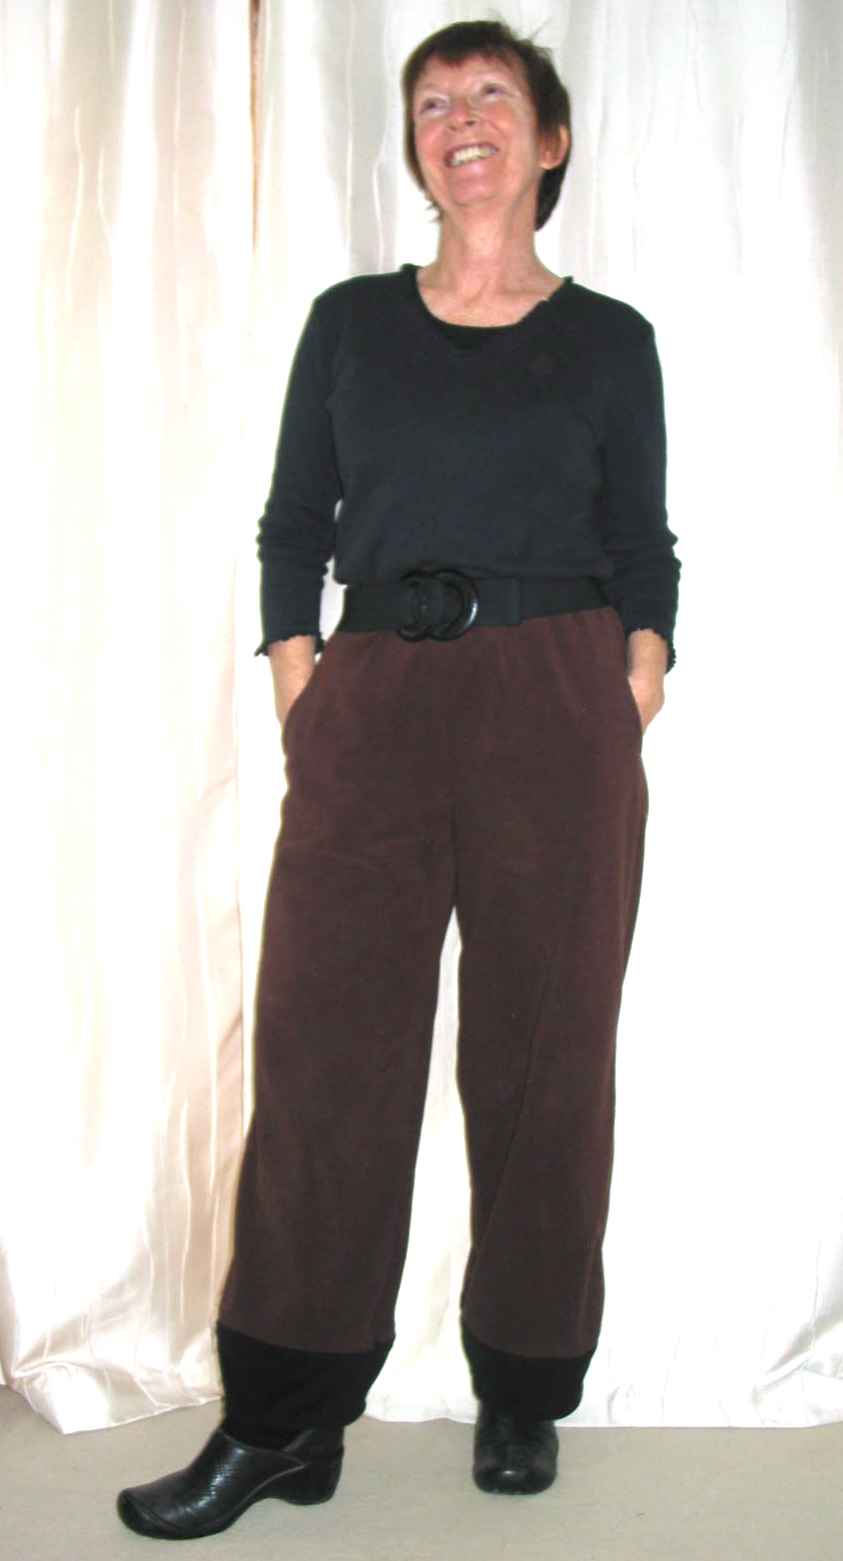
Marcy Tilton's Vogue 8712:
View C is on the left - made of black ponte, just a bit edgy but SUPER comfy and (imho) great style! View A is on the right - Again, SUPER comfy fleece. Maybe not the most stylish pants, & when I make them again, I'll use perhaps 1/4 mile less fabric in the width of the legs, but still, I LOVE these pants! And yes, I'll be making both views again!
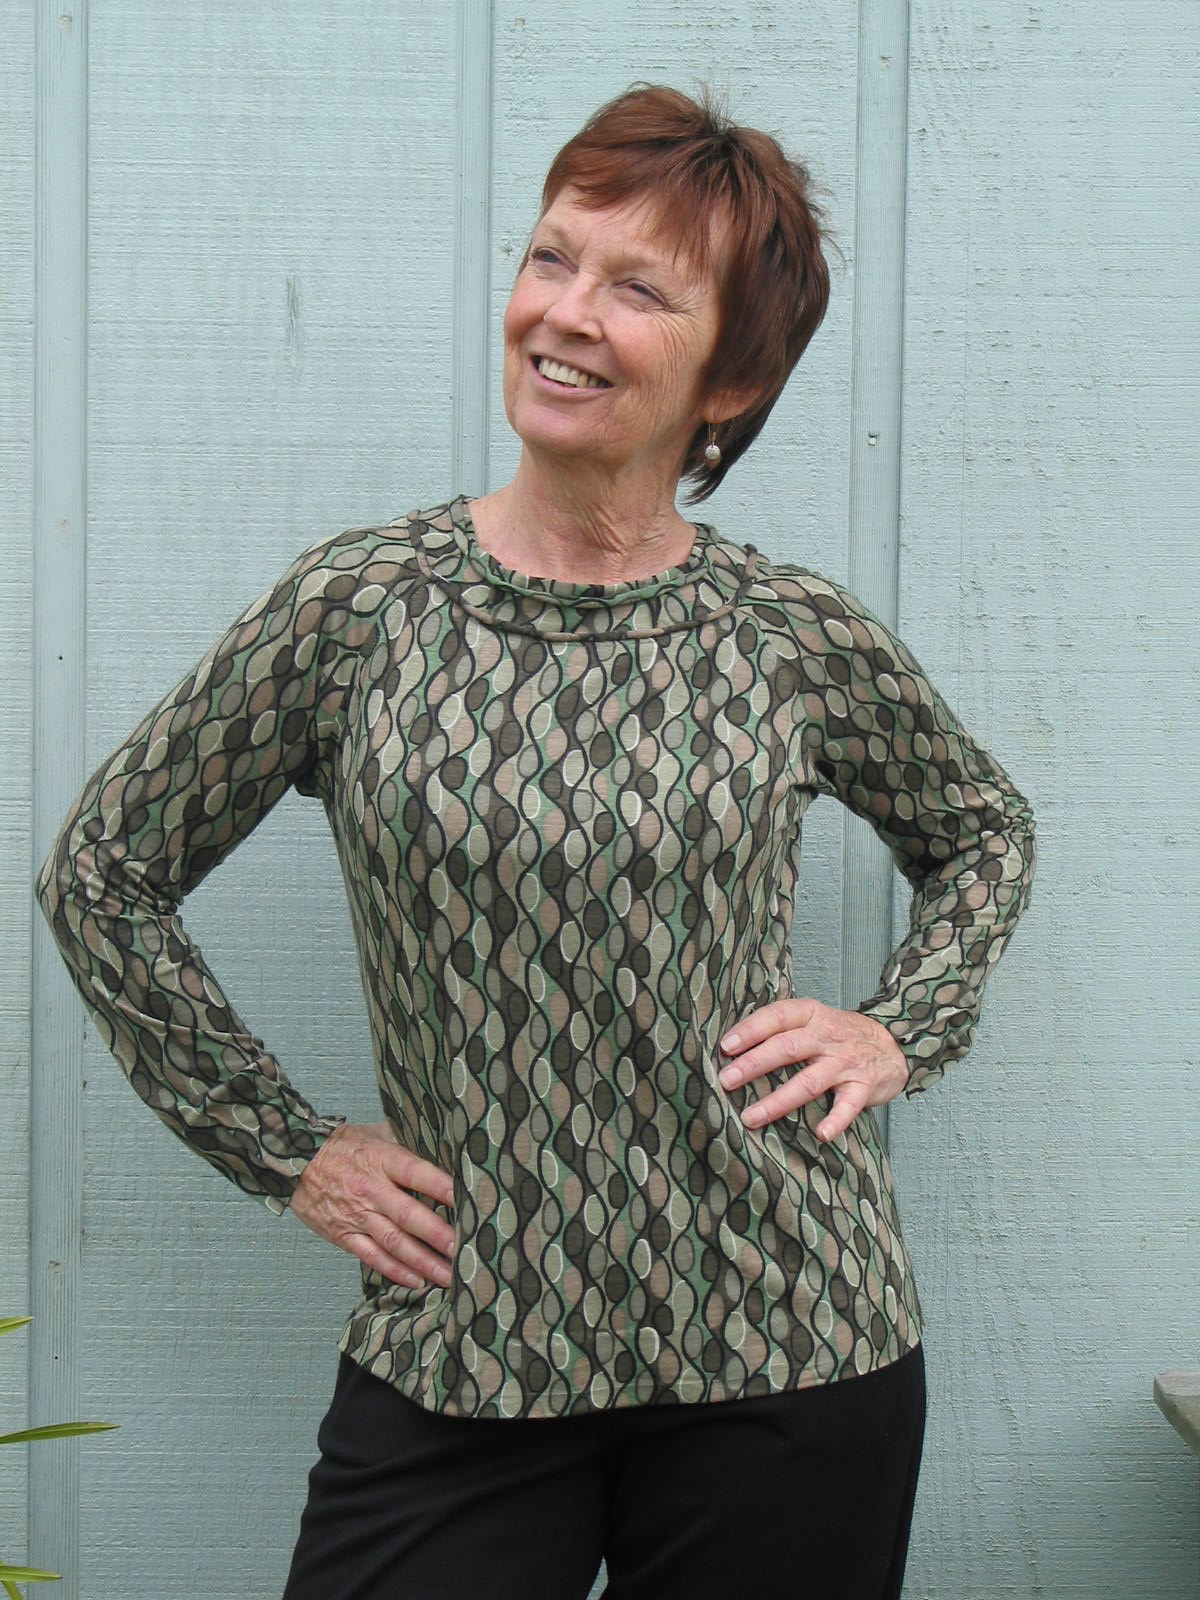
Another Marcy T, Vogue 8636:
Another pattern that I absolutely love! Love the fit, the raglan sleeves, the wide neck band, the construction ease, and all of the creative options. I'll definitely be making more of this one :)
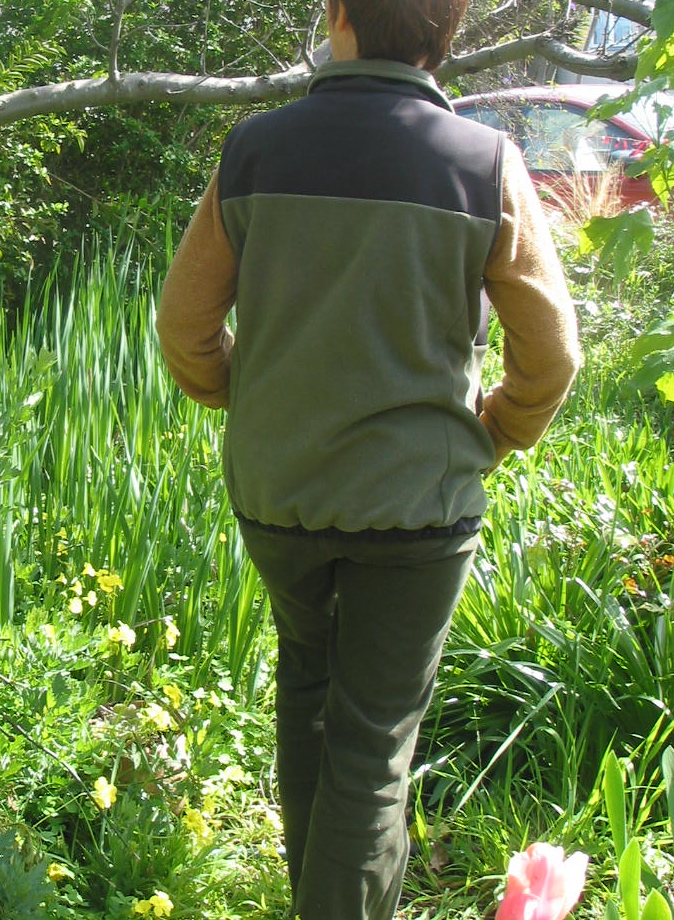
Kwik Sew 3813:
This pattern rocks!!! I feel like I am getting SO much bang for the buck here. People can't believe this is 'homemade'; it has such a polished RTW look :) I plan on using the jacket view of this pattern for the next cold season :)
And Jalie 2911:
This puppy has done a superb job keeping me toasty warm....and was the inspiration for the whole "Fun & Funky" theme. I will definitely be making more pullovers from this pattern, using different fabrics & other fleece weights - super easy & again, super comfy!
I raise my martooni glass to all the participants in this contest!
Contents
Fleece,
Marcy Tilton,
mini-wardrobe,
V8712
Sunday, March 27, 2011
How to make a Short Person look even Shorter
The Pattern Review mini-wardrobe month of March draws to a close, and today I added the final touches to my knit top, smiling at another project actually completed! :) I called my photo buddy, ready for my close-up.
Now, I want to be clear that I LOVE all of the pieces I made for this mini-wardrobe, and I've been wearing that yummy fleece to death...seriously, I've had at least one of my fleece garments on every day this month!
There are, however, a few combinations that are probably best left to the lounging-around-the-house category.
Here's one - Is this person 5'4"? or 4'5"?
Note that the boxy top, with a (rather dramatically obvious) horizontal line right above the waist is made even more noticeable by the open zipper and hands in pockets, holding the sides of said boxy top open even wider.
The brown pants are especially effective at shortening already short legs with a dramatic cropped effect, just above the ankles. It also helps that the total length of the pants are bordering on "flood water" length - definitely good for wading in deep puddles.
Clearly, a mistake was made in the layout of the knit top - the lines of the pattern run vertically, and of course horizontal lines are the prevailing theme here.
I'm not sure about the effect of the head wrap, but it seems that shots with the head wrap make the wearer appear a bit shorter than shots with no head wrap, so I believe we're on to something here.
Just for fun, here's some contrast:
| Tall(er) Person |
| Short Person |
Tuesday, March 15, 2011
The Not So Kwik Sew Fleece Vest....
Yes indeed....MORE Fleece!!!! Probably the last of the season, but not my last for ever, I'm sure - love the stuff!
This is another piece for the PR mini-wardrobe contest - Kwik Sew 3813. It seemed that it might have the potential to look like a nice RTW piece, and it did not disappoint - I'm happy with the results :)
Here's the pattern view:
Notes about the sizing: I sewed a Medium, which, for Kwik Sew knit tops, is usually about right for me (with tweaks to the shoulders, and grading out at the waist & hips). By the time I finished this, I had trimmed WAY back at the shoulder edges (I think they're drafted on the wide side) ...in fact I completely re-drafted the armscyes & took the side seams in as well. I suspect that, even though this layers over thick tops very nicely, I could have sewed a small, which is actually the appropriate size for my measurements. I choose a KS medium for knit tops because I'm way past the age & body type where I'm comfy in a tight-fitting, thin knit top! This top, however, seems to fit more appropriately for the listed measurements.
Bottom Line? Wonderful pattern!!! I will sew the jacket version too, & I'm sure this will get a lot of wear (it is already!) This is one of those pieces that surprises people when they find out it's homemade...don't you just love that?
Next up: View C of the Marcy pants (almost done, in fact!)
This is another piece for the PR mini-wardrobe contest - Kwik Sew 3813. It seemed that it might have the potential to look like a nice RTW piece, and it did not disappoint - I'm happy with the results :)
Here's the pattern view:
And my finished piece:
(and I know it looks like Spring in my garden, but trust me, I'm STILL appreciating the fleece pieces I've made - it's another grey, chilly, stormy day outside today!)
I used Polartec 200 Fleece ( the green) and a wind & water resistant Malden Mills fabric for the contrast. The contrast is layered over the fleece, so it's a toasty warm covering on the upper torso. The front zipper is a YKK separating zipper. I discovered that it's not so easy finding a good quality 6" zipper! (needed for the welt pocket) After buying a 7" zip & UNsuccessfully trying to undo the zipper end, I ended up doing what I've always done in the past - securing the end with lots of heavy duty thread, hand sewing the zipper end so that nothing (hopefully) will EVER get past it.
Showing the green fleece, & back & front of the WindBloc fabric. Both fabrics are ravel-free; the windbloc is tough - use fresh needles! I had heard that fleece is hard on rotary blades, & sure enough, after this project it was unquestionably time to replace the blade in my rotary cutter!
My favorite part of the whole project - I got to use my brand new labels! I sewed the label on a strip of fleece, reinforced it with ribbon on the back, & sewed the whole strip on to the neck seam before sewing the collar down. I got the labels from Heirloom Woven Labels - they were recommended to me, & I'm happy to say that I can pass on the recommendation :)
The finished label:
One of the details I didn't like was the zipper guard - it had a tendency to curl at the top, & when it did that it just looked wrong, so I trimmed it. I also serged all of the inside seams (I really don't like unfinished seams, even if the fabric is non-fraying) Here's the original curve on the zipper guard:
And after I trimmed it. I used a decorative stitch along the edge of the fleece to give it a bit more stability - the stitching is subtle, but I like the look.
The upper welt pocket is zippered. I added a zip pull with a strip of fleece. I discovered that if you cut a strip of fleece & stretch it out, you end up with a strong, thin bit that you can use for embellishment, & even use it as really thick thread! This strip happens to be a serged edge that got trimmed, & I added a bead I had by hand sewing the bead on to the end. I took a bit of a risk by doing all of my topstitching in green, which gives a nice pop to the blackish fabric (and also, of course, shows every little waver.....)
Some views of the finished vest, zipped, unzipped, etc:
Bottom Line? Wonderful pattern!!! I will sew the jacket version too, & I'm sure this will get a lot of wear (it is already!) This is one of those pieces that surprises people when they find out it's homemade...don't you just love that?
Next up: View C of the Marcy pants (almost done, in fact!)
Tuesday, March 8, 2011
Those Fabric Scraps that are just too fine to toss......
Hello. My name is Jilly Be and I'm a fabriholic. Not only do I adore petting the luxurious cuts of shimmery silk, and melt at the mere thought of wrapping my body in oh-so-soft cashmere, when I'm all done with the cutting & sewing, even the little bits of these goodies that are left over give me far too much pleasure to just toss.
Besides which, I'm a life-long recycler & re-user of anything that might have a hint of creative re-use, somewhere, to someone....even if not me. So it has to be a pretty tiny scrap for me to consider it worthless.
But what to do with them to make them worth hanging on to? I got a noodge from dfr at Sewing Misadventure with some of her ideas, including drawstring bags, handkerchiefs and casings - in fact, I just used a scrap for a waistband casing myself:
Rebecca at Tales of a Wannabe Seamstress also has a bunch of ideas & links, including coasters & pencil pouches.
For the holidays last year I gathered some of my beautiful silks, knits, sheers.....all sorts of fabrics....to mix & match into versatile, never-ending scarves like this one:
It's two different variations of the same scarf, & you can make many more just by pulling the insides through! You can make these scarves with fabric scraps as small as 6" x 12" - I got the instructions from Threads Mag Issue #97 (September 2001), and reviewed the scarves here. Here's my pictorial tutorial on How to make an endless tube scarf. Great gifts, but be sure to save your oober special pieces that match that great jacket you made for yourself!
I really like using knits for this sort of scarf, because you can scrunch them up & end up with a look like this:
This scarf is actually a mix of knits & wovens - your imagination is the only limitation!
Of course, dolls are the perfect size for some of those scraps, as Gloria Stitches knows.
What unique ideas have you come up with for your scraps? Link your ideas here & pay them forward!
Fun & Funky Fleece - March Mini-Wardrobe Storyboard
I've entered a contest! The Pattern Review mini-wardrobe contest, which calls for sewing 4 items in March, which will mix & match with each other and one existing item in the wardrobe, to create a total of 6 outfits.
An outfit. What a concept! Right off the bat, I realize that my shopping (for clothes in the past, and for fabrics & patterns these days), pretty much consists of falling in love with a single item & bringing it home. And then trying to figure out what to wear it with. I'm really not a matchy-matchy sort of outfit person, but I do know (kind of, anyway) what colors work for me, and what textures I like. But with my penchant for off-beat lines & funky styles, I often have to do a lot playing around in my closet to find things that actually work together. And my closet is mostly full of a) VERY casual, well-worn & comfy jeans & pants & tops that may or may not match them, and b) casually elegant out-to-see-a-client sorts of outfits that fit my off-beat style, but they're a bit dressy for everyday wear.
I'm looking for that balance in between, and to replace the jeans end of the spectrum with something that's still comfy, but not so ho-hum.
Hence....the concept of the mini-wardrobe! I hereby vow to fabric shop with "what will this go with?" firmly in mind!
In the meantime, my contest wardrobe is all about staying warm in this cold California winter weather. I'm fully aware that my wardrobe is probably going to stand out like a sore thumb in amongst all of the colorful Spring wardrobes others are planning, but I'm sewing what I want & need right now.
Here's the plan:
The Pullover & the brown & black fleece pants are done, & I'm working on the vest now. And, I might add, I'm wearing those pants & pullover as I type! And I'm warm & comfy :)
Friday, March 4, 2011
Oompah Loompah Fleece Pants
My first pants! Well, except for all those 'hippie pants' made from Indian bedspreads way back when....& a few others I've forgotten....
I am calling these my Oompah Loompah Pants. They're fleece, (the brown is Polartec 200 Fleece & the black is Polartec Windpro - thick, warm, & super luscious feeling next to the skin!) and the pattern is Marcy Tilton - you aren't getting sleek & sexy out of that combination! These are Marcy's latest Vogue offering - Vogue 8712, View A.
Belted, & possibly even suitable for going out & about:
Based on sizing comments from other reviews, I bought the smaller size grouping (8-14) & cut a 12, & still graded down in areas. A 29" waist & 39" hips placed me between a 14 & 16 on their chart. WAY off!!!!! - I actually think a 10 might be better. I'm still getting used to the Big 4 sizing, but it seems that overall, you need to ignore the measurement charts & figure out the sizing on your own. Marcy is, of course, known for excess volume in her sizing.
I have a small pile of Marcy patterns in my stash - this is #1 for me, and I can hardly wait to get started on some others! Her funky, creative style just calls out to me...I even have a few fabrics on order from her (including 2 pontes for other versions of this pant!) www.marcytilton.com
Some notes on pattern changes & working with fleece:
I shortened the area between waist & crotch by about 1/2", and lengthened the legs by 2". These are, essentially, glorified sweat pants, and the object was warmth, so I wanted my ankles covered! At 5"4" (almost), my ankles are covered & toasty with that extra 1-1/2". I also ended up taking the back waist seam in by about another inch, tapering to nothing about 5" down. This worked well enough, although, as mentioned above, I'm just going to try a 10 next time.
A few changes I made based solely on the thickness of the fleece. The inner casing of the waistband is supposed to have raw edges top & bottom. The last thing I needed was another layer of this fleece at my waist! After playing with a few options, I ended up using a stretch cotton for the elastic casing. I folded over the edges & sewed them, then sewed it in place, & trimmed the top of the fleece to be just a touch higher than the casing.
The casing is a stretch cotton - it has the same amount of stretch as the fleece, & MUCH thinner, of course!
I like the contrast of the fabric, even though no one sees it.
I used a 90/14 stretch needle, and a long straight stitch for everything other than the serged areas. I serged the pocket edges, and the crotch seam. Other seams were all left raw.
I trimmed seams back before topstitching wherever there was going to be more than two layers of the fleece.
The pocket edge was serged, as well as the crotch seam. All other edges I just left raw (Ahhhh the joys of fleece!)
Bottom of leg, & topstitching detail. And cat hair. *sigh* A note on topstitching fleece: do NOT sweat thread color details! It pretty much just disappears into the fabric, & all you see is the line.
Love love love this pattern! I definitely see more Marcy Pants in my future....
I'm possibly on the verge of addiction - to fleece. It is SO easy to work with, and the concept of not needing to finish edges speeds things along so nicely...not to mention all of the creative possibilities with such a flexible fabric! I whipped out a little hat in 30 minutes before I went to bed last night (pictures will follow) & I can see tons of possibilities there....
I am calling these my Oompah Loompah Pants. They're fleece, (the brown is Polartec 200 Fleece & the black is Polartec Windpro - thick, warm, & super luscious feeling next to the skin!) and the pattern is Marcy Tilton - you aren't getting sleek & sexy out of that combination! These are Marcy's latest Vogue offering - Vogue 8712, View A.
Belted, & possibly even suitable for going out & about:
Based on sizing comments from other reviews, I bought the smaller size grouping (8-14) & cut a 12, & still graded down in areas. A 29" waist & 39" hips placed me between a 14 & 16 on their chart. WAY off!!!!! - I actually think a 10 might be better. I'm still getting used to the Big 4 sizing, but it seems that overall, you need to ignore the measurement charts & figure out the sizing on your own. Marcy is, of course, known for excess volume in her sizing.
I have a small pile of Marcy patterns in my stash - this is #1 for me, and I can hardly wait to get started on some others! Her funky, creative style just calls out to me...I even have a few fabrics on order from her (including 2 pontes for other versions of this pant!) www.marcytilton.com
Some notes on pattern changes & working with fleece:
I shortened the area between waist & crotch by about 1/2", and lengthened the legs by 2". These are, essentially, glorified sweat pants, and the object was warmth, so I wanted my ankles covered! At 5"4" (almost), my ankles are covered & toasty with that extra 1-1/2". I also ended up taking the back waist seam in by about another inch, tapering to nothing about 5" down. This worked well enough, although, as mentioned above, I'm just going to try a 10 next time.
A few changes I made based solely on the thickness of the fleece. The inner casing of the waistband is supposed to have raw edges top & bottom. The last thing I needed was another layer of this fleece at my waist! After playing with a few options, I ended up using a stretch cotton for the elastic casing. I folded over the edges & sewed them, then sewed it in place, & trimmed the top of the fleece to be just a touch higher than the casing.
The casing is a stretch cotton - it has the same amount of stretch as the fleece, & MUCH thinner, of course!
I like the contrast of the fabric, even though no one sees it.
I used a 90/14 stretch needle, and a long straight stitch for everything other than the serged areas. I serged the pocket edges, and the crotch seam. Other seams were all left raw.
I trimmed seams back before topstitching wherever there was going to be more than two layers of the fleece.
The pocket edge was serged, as well as the crotch seam. All other edges I just left raw (Ahhhh the joys of fleece!)
The hemline is the only edge that's actually turned under! I added stay tape for stability.
Here's the cute pocket detail (NOTE: I used the Pocket pattern piece for the contrast fabric. The pattern calls for using the Pocket FACING piece for contrast, but this piece is not visible). I used lining fabric for the facing. Decreasing that Oompah Loompah bulk, you know....
Bottom of leg, & topstitching detail. And cat hair. *sigh* A note on topstitching fleece: do NOT sweat thread color details! It pretty much just disappears into the fabric, & all you see is the line.
Love love love this pattern! I definitely see more Marcy Pants in my future....
I'm possibly on the verge of addiction - to fleece. It is SO easy to work with, and the concept of not needing to finish edges speeds things along so nicely...not to mention all of the creative possibilities with such a flexible fabric! I whipped out a little hat in 30 minutes before I went to bed last night (pictures will follow) & I can see tons of possibilities there....
Contents
Fleece,
Marcy Tilton,
mini-wardrobe,
V8712,
Vogue
Friday, February 25, 2011
I will not build a Wadder...
At least, I haven't had a wadder yet. I'm either lucky, or stubborn, but I will re-work something until it DOES work for me. This one wasn't looking so good at first...
Ok ok, I know the collar isn't supposed to be worn like that....but here's the best I could get out of it:
And this is after chopping 3" off the length of the cowl!Here's what it's supposed to look like:
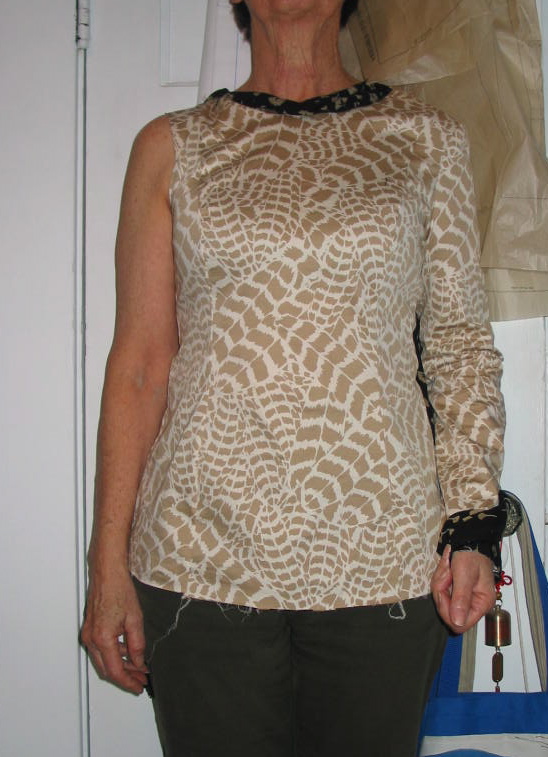
Now, in a thin little, very drapey knit, I suppose that cowl would look quite nice. A 6" neck like the model has would help too. (My fabric is a stretch cotton, bought online in one of those enticing hooks from fabricmart...you know the ones ~ "Spend THIS much & you'll save SO much more! And a free box of something you may or may not ever use thrown in!!!" Hey, I love feathers...the fabric has feathers....what could go wrong?
Actually, it IS very nice fabric. But the colors on me? Not so much.
However, back to my refusal to create a wadder... I slashed off the cowl. All of it. This, of course, entailed unsewing all of the (already serged) seams around the shoulders & recutting them.
I'll cut the neckline lower still...I'm taking baby steps. The color is still too pale for my taste though, so I looked through my stash for something else, & came up with a gingko leaf patterned cotton (which I LOVE); there's enough there for a neckband & wrist accent, so I think I can save this top.
It's a little not quite my style. Yet. But getting there. Maybe. Plus I'm trying to spiff up my wardrobe a bit & step outside my funky, casual, comfort zone...just a little. I'm open to creative ideas.....
To be continued......
Thursday, February 24, 2011
Fun & Funky, Fabulous, Functional Fleece!
Snow in San Francisco? This year, yes! Well, close enough anyway - close enough to justify my fleece wardrobe! My poor old fleece pieces, all old enough to remember my days of active kayaking and camping, have uglied out to the point of really not being suitable for public viewing in any place BUT a campsite. And even that is questionable...
At last, I'm starting to replace those poor old tired pieces - here's #1, Jalie 2911:
This pattern rocks! Because of the collar. Note: the green bits are my own embellishment, but the pattern stands on it's own very nicely, even though it does lend itself to having some fun with embellishments. I just felt that my brown was a little too.....drab. It's still winter, & I'm tired of drab! So I funked it up a little with the green additions.
The two ends are overlaid on top of each other. The zz'ing on the left shows the narrow seam peeking out beyond the seam on the top piece; the zz on the right overlaps the bottom piece. Sew the seam (at the top of this picture) with these overlaps in place, and your clips & corners in the right places, and the collar fits perfectly when you install it on the rest of the garment.
What I learned about Working with Fleece: I used a Polartec 200 double faced velour fleece from Stonemountain and Daughter in Berkeley. They have a limited selection of fleece, but they do carry the good stuff. This is a midweight fleece, very toasty, absolutely perfect for lounging in, layering, & even going out in public. This was my first fleece sewing project, & I ended up using it as sort of a play piece - trying every technique I could think of to sew seams & fiddle around with. I zigzagged edges & used a long straight stitch on some seams, used a stretch stitch & left the edges raw on some, serged a few seams, used the triple stitch to topstitch the collar, topstitched the green bits with a stretch stitch, & probably a couple of others that were rejected.
Zigzagged edges with a long straight stitch on the seam. Too much work for a fabric that doesn't ravel!
The brown shows the edges left raw - on most of the seams I did this, using a stretch stitch, & stretch needle (75/11)
I am totally a fan of this triple stitch! It's great for a nice beefy topstitch, especially on knits. I used this to topstitch the outer edges of the collar.
I found this fleece very easy to work with. All of the stitches I played with worked, to some degree. The only place I had some trouble was when I was working on multiple layers with the stretch stitch. I used my basic little Janome, which has no adjustable presser foot pressure
Notes on the pattern & my alterations: According to other reviews, this pattern has a lot of ease compared to most Jalie patterns. Because my fleece was on the thick side, I cut a size U (a size up from my measurements) & graded out at the waist & hips. I also did a full arm adjustment of about 1". With fabric this thick, I actually could have used a little more wiggle room in areas, just to have more layering possibilities. It's perfect with nothing but a very thin layer underneath, though. All Jalie patterns, I am convinced, are made for Skinny Minny Arms. Not mine.
For the green hemming, I sewed a very narrow seam, right side of the green to the wrong side of the brown, folded the green over to show on the outside, & rolled it just a little further to show 1/4" of the brown at the bottom. I stitched the ditch between the brown edge & the green. The upper edge of the green is pinked, then sewn down with a stretch stitch.
I will definitely be sewing this up again! I think it will lend itself to a number of different fabrics; it can be plain or embellished, casual, funky, or even a bit dressy.
By the way, I am toasty warm in my office right now, LIVING in this top in this chilly California winter!
Friday, February 18, 2011
I never did, nor will I ever, look like her....
You know the woman ~ the one with mile-long, shapely legs, 6 feet tall, no boobs....the one who looks smashing in the 20's & 30's styles that I drool over from afar and never wear.
Like this (Decades of Style #2001, 1920s Tulip Kimono):
which has been hanging on my dress form, in various forms of unfinished, since last spring. Not only does it not look good on my frame, it's Just. Not. Me. I kept asking myself "Where will I wear this????"
But I can be determined if I set my mind to something. So I'm at it again, completely re-working it, and I hereby declare that this will get finished! And wearable! By Me. Soon. Really. After all, the is the piece that was the inspiration for all those practice welt pockets.
Weekend Update: I got a picture taken before I got sidetracked. By fleece. (Translation: It's cold in California, so I'm sewing fleece right now!)
The wannabe welt is pinned on to give a sense of what it will look like. I think I like it. :^)
Like this (Decades of Style #2001, 1920s Tulip Kimono):
Early last year, when I started dreaming about re-learning how to sew & re-vamping my wardrobe with all these super fabulous new outfits, I saw myself wearing this sleek and elegant 20's kimono. Me. All 5'3-1/2" of me, me with the aging, athletic build. I found luscious silk & cotton fabrics that I loved together, as I dreamed of elegance, high heels, & seamed stockings. Me??? high heels & seamed stockings??? Hush, those of you who know me well. A girl has her fantasies...
After numerous fits & starts, I eventually ended up with this:
which has been hanging on my dress form, in various forms of unfinished, since last spring. Not only does it not look good on my frame, it's Just. Not. Me. I kept asking myself "Where will I wear this????"
But I can be determined if I set my mind to something. So I'm at it again, completely re-working it, and I hereby declare that this will get finished! And wearable! By Me. Soon. Really. After all, the is the piece that was the inspiration for all those practice welt pockets.
Weekend Update: I got a picture taken before I got sidetracked. By fleece. (Translation: It's cold in California, so I'm sewing fleece right now!)
The wannabe welt is pinned on to give a sense of what it will look like. I think I like it. :^)
Subscribe to:
Posts (Atom)