I'll start with some short notes on what I've learned so far, a.k.a. "Welt Pockets for Dummies", or "Welts 101". The welt is the strip of fabric that is attached to the slit that forms the pocket opening. The welts formed by the previous two methods are really designed to be pocket openings in an area where the pocket bag is held in place & stabilized by a waistline, or side seam, like you would find in trousers. Judy Barlup's method involves attaching the pocket bag during the welt construction, and the bag is firmly attached to the welt opening itself - so this is more suited to a jacket or other garment where there is no waistline or side seam to stabilize the pocket bag. Nope, I didn't realize this when I started, and none of my reference materials had the Dummies opening paragraph....I hope I'm not the only sewer around who dove into welts with so little knowledge, and that my little 101 paragraph will be helpful to some kindred souls.....
Onward now, to the third version. (And yes, I did again peek at the Vogue book, and my old Singer book. And again, my eyes glazed over & my brain started getting fuzzy, so I put the books down & just replaced them back in the bookshelf this time.)
Onward now, to the third version. (And yes, I did again peek at the Vogue book, and my old Singer book. And again, my eyes glazed over & my brain started getting fuzzy, so I put the books down & just replaced them back in the bookshelf this time.)
I wanted to try Judy Barlup's method - another rather complicated method, but it promises less bulk because there are no seams at the edges of the welt. Judy Barlup welt pocket tutorial
I'll start right off with a pic of the finished pocket, since there aren't any actual photos in the tutorial, and I wasn't clear about what I would end up with. This is actually a single welt pocket, with some topstitching showing on the outside. It is necessary to construct and install the pocket bag during the welt construction. This phase is very picture heavy, and is sort of a companion to Judy's tutorial. What I've added is a way to make your own welt pattern based on the size you want. What I've left out is a lot of the fine tuning details of the actual construction, or else I'd be typing all night. And I'm too lazy.

Note: This welt is over an inch high, & 5" wide, so the balance is off, IMHO. But hey, it's just a practice piece!
This is a step by step tute on making the pattern for your a welt, using whatever measurements you want. I used a 5" x 1" welt, just because that's the size I used for the other welts I made, although this one is halved like the others were.
1. Draw a rectangle, using the measurements for your finished welt. Extend the lower line by a couple of inches in both directions. (No need to be exact on any of the extended lines)

2. Draw a 45° line at each of the top corners of the welt, extending to the base line, and extending upward a bit.

3. Draw a line parallel to the your long welt sides, the same width as your welt (1" in this case)

4. Add your seam allowances. Here I used Judy's suggestions, but it actually messed me up a bit later. I would suggest being consistent all the way around.

Finished Pattern. You will need to cut a piece of interfacing the size of the welt area. (Barlup calls for interfacing the SA below the welt as well...I don't know why this would be necessary; it just adds bulk, imho). Note the cut off corners at the bottom, and the dotted fold lines. This is where it's helpful to have your SA's all the same - the dotted fold lines need to intersect the corners of the welt, and if your clipped corners match up to the top line when the piece is folded, it's easier to know that the fold is in the correct place.

I cut the pocket bag pieces, according to Judy's suggestions. The Stay & the Facing are 2" wide, and the width (i.e., the long side) of your welt plus 1-1/2". The pocket bags are also the width of the welt plus 1-1/2". The depth of the bags are up to you, but the Outer Bag will be about 1" shorter than the Inner Bag. (Note: I ended up using silk organza for the Stay instead of a thicker fabric, as suggested)

Welt, interfaced, with fold lines showing.

Flipped over, folded & pressed.

Open edges stitched, 1/4" from edge (this is assuming 1/4" Seam Allowances)

Press this seam open, using a point presser. (Don't skip this step!)

Turn open, & press.

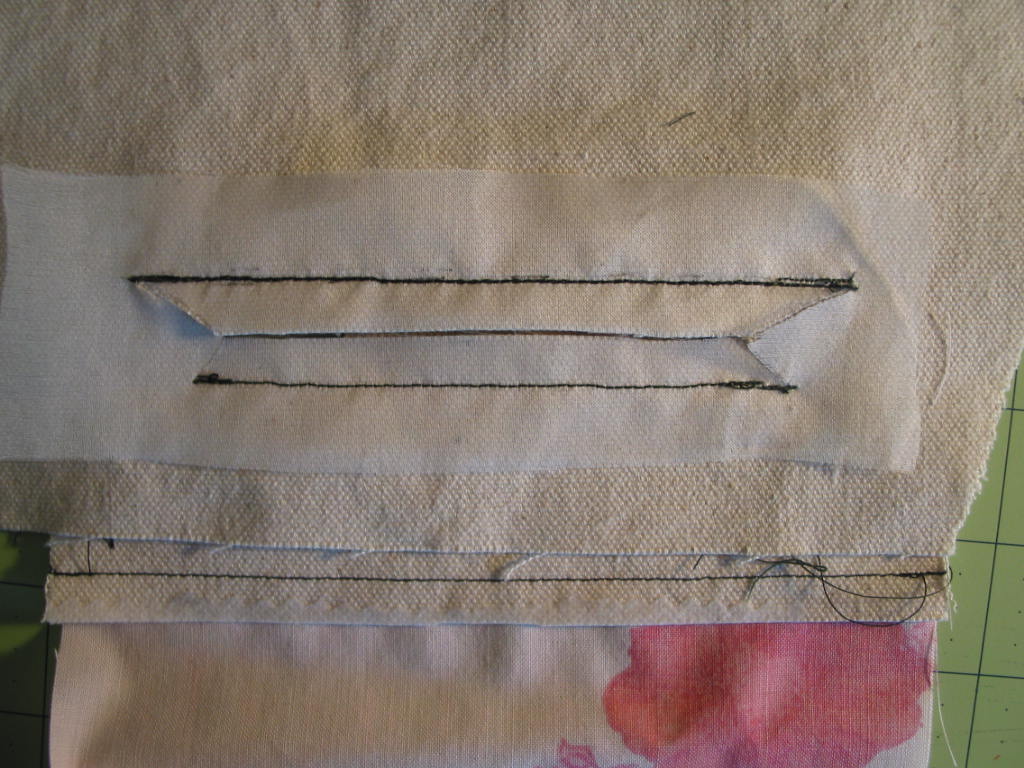
Mark the pocket placement line on your garment, and pin the Stay to the wrong side. Mark your stitching line on the back side of the welt. (Note: See the two lines on the welt? Judy suggests bowing the center of the stitching line just a bit away from the folded edge, because even a perfectly rectangular welt has the appearance of the ends being wider. I'm not so sure about this. I stitched mine on the bow, but I just ended up with a welt that looks wider in the center! It may be because my welt was so wide in the first place)

Welt stitched in place. It's definitely a good thing to refer to Judy's instructions from here on out - hers are MUCH more detailed than what I'm writing here; I just have some added visuals.

Outer Bag placed over the welt

Outer Bag stitched on, stitching from the back.

Inner bag (with pocket facing already attached to Inner Bag) butted up against the Outer Bag, ready to stitch.

NOTE: (Later addition) Here are Barlup's Step 10 instructions: With facing right side against garment right side, butt inner pocket bag to outer pocket bag. Stitch through facing and pocket bag 1/4" from edge, beginning and ending about 1/2" shorter than lower row of stitching on outer pocket bag. Backtack at each end. See illustration 10, stitch #5. By making upper row of stitching shorter, seam will not extend beyond the edge of the finished welt.
I got utterly confused here in a later project. What's missing is (in blue) With facing right side against garment right side, butt inner pocket bag to outer pocket bag. Edges of bags need to be butted against each other; do NOT sew through outer bag, DO sew through INNER bag. Stitch through facing and pocket bag and garment 1/4" from edge, beginning and ending about 1/2" shorter than lower row of stitching on outer pocket bag. Backtack at each end. See illustration 10, stitch #5. By making upper row of stitching shorter, seam will not extend beyond the edge of the finished welt.

Now, finally, it's time to cut the fabric!

Note that the stitching line on the Inner bag is shorter than the stitching line for the Outer bag & Welt. When you cut the fabric, the cut will be about 1/2" shorter than the shortest stitching line. Clip your "V's" (which
are lopsided - that's OK) exactly to the end of the stitches.
Again, I'm deferring to Judy's instructions for this entire last half....way too many words for me to redo! If you're still with me, this is just meant as a helpful add on to her tutorial.
Judy wants you to open out the V's & stitch them down on the facing, claiming that this creates less bulk, and that the V's & the stitching will not be seen. It's sort of true that they won't be seen, but that's only if you don't look under the welt. I would clip the ends of the V's off a bit to make sure they don't show up. Also, my stitching here is a bit of a joke....getting tired, it's just a practice welt, yadda yadda......

Now you fold your welt back to the outside, top stitch up & down the ends
and you're ready to stitch up the edges of the pocket bags & be finished!
CONCLUSION
For an all around, good looking, easy to do welt pocket, Anna Zapp's method wins, hands down! (See the prior post for instructions on this....)
Ann of Gorgeous Things has, imho, definitely improved on the traditional method of creating the opening and then inserting the welts. Adding the ease of stitching up the center of the welts ahead of time makes things MUCH easier, and I think this method would be great to use in cases where you want to create some unusual shapes, or curves, or you have a patterned fabric that you're being anal about what shows up in the welt, or matching it to the garment fabric.
Judy Barlup's method is very time-consuming, if you don't have your welt pattern made up already for a standard size. She has a whole different pattern for an angled welt! Although I tried both a horizontal welt and an angled welt on the other two methods, I had no desire to go through all of that with Barlup's method! However, if you're working with very bulky fabric, and/or only want a single welt, her method does create less bulk, so it could certainly have its place. Also, until I find a better method for a jacket pocket (i.e., no waistband or other seams to secure the pocket to), this is certainly a good option.
Next up: I'll be practicing adding the pocket bag to Zapp's welts, and then it's on to the Real Thing! (which, btw, happens to be a jacket with an angled opening.....ummmm.......Judy? I may be practicing your other welt yet!)
7 comments:
Please tell me that there won't be a quiz later on these various methods!
You've done a nice job on presenting these tutorials and they are a great help.
Thanks Gloria! I've done some more editing, after several more "Aha!" moments.....this has been quite the educational experience for me!
And trust me, I'm in no position to be giving quizzes on this matter!
Jilly, have I mentioned that I love you?
I will joyfully receive love from wherever it comes! :~D. Now then, want to help me GIMP?
I'm so glad you did this experiment for the rest of us:) Next time I need a welt pocket I'll come review.
GIMP - I read your post on PR and got an instant headache. Surely, if we can sew and make welt pockets (and blog) we can figure it out.
There are only about a zillion welt tutorials in books, online - but every one of them seemed to start with complex! I really prefer starting with simple; and THEN move into complex....hopefully I managed to do that here & pass it on :)
THINKING about GIMP gives me a headache....but I'm sticking with it. I know it will be useful - all those times I've been futzing with pictures & thinking "if only I could________" This is another of those situations where a tute that starts with simple would be SO helpful!
Jilly, thanks
Post a Comment