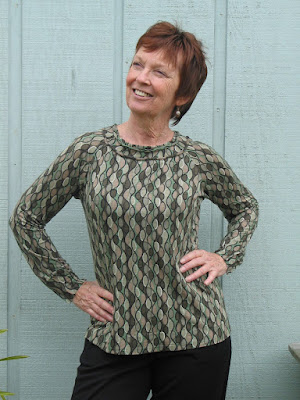
My confession: I was a born & bred tomboy (is that term even used anymore?) who has aged into a less active lifestyle, and although I'm still outside scraping my knuckles & getting poked & gouged by wildlife, said wildlife is more apt to be a rose thorn from my garden than a wild goat that's chased me off the edge of a cliff while hiking in the mountains.
As much as I still think in youthful, active ways, I do admit that some activities are simply best left to the young(er) & fit(ter), and it is now time (nay, it is PAST time) to retire all of those old, ratty, stained active theme t-shirts from the various 10K's I used to run and the kayak events I used to frequent. Yes, it's time to dress up the t-shirts, and accept that I now feel better in a pretty rayon/lycra print T than I do in a T that's printed with a pic of a hapless kayaker in peril.....
Marcy Tilton to the rescue! Here is my version of her Vogue pattern 8636:
Some of the things I love about this pattern:
Really nice fit - the raglan sleeves are SO easy to construct, and can hide a multitude of body/shoulder fitting issues, especially in a knit :)
Several creative (but not outrageously out-there) options are described in the pattern, and there is a lot of room for your own creativity (Marcy's particular gift, imho!)
I added some fabric tubes to the neckline, which, because of its width, can have a tendency to be a bit floppy if your fabric is thin. Here's how I dealt with that:
 |
| #1. Add interfacing to one side (Pam Erny's Pro-Tricot) |
Fashion Sewing Supply - I'm still playing with it, but so far, I have to say that her interfacing deserves all of the rave reviews it's been getting!
The neckband still needs some way of adjusting the folded edge so that it lies flat on the body. The pattern calls for darts, or buttons & gathers. I used the dart method. The pattern calls for 4 darts in the front and 2 in the back - I ended up making the 2 back darts about twice as wide as called for - 4 darts in the back would have had the same result. The next time I make this I'll cut the entire neckband an inch (or more) shorter, and stretch it to fit the body of the shirt.
I decided I wanted a little something extra, so I used my Dritz fabric turners (I LOVE this little set of tools!) to make some simple embellishments for the neckband.
 |
| Finished tube on top. A length of fabric cut about 3/4" wide below that, and the metal rod & blue plastic tube for turning. This is the smallest size turner in a set of 3. |
 |
| Catch the end of the fabric around the tip of the metal rod (just do it any way you can!) and start to push the fabric through the center of the blue tube. |
 |
| Once the turned fabric appears at the other end of the blue tube, you can grasp it with your fingers & pull it through. |
 |
| Keep pushing the unturned fabric up to the first end of the blue tube, while pulling the turned fabric out the other end. SO easy!!!!! It takes longer to describe it than to actually do it. |
 |
| After stuffing a bit of padding inside (I did this with the metal rod) I handstitched two rows of the tubing on to the neckband. |
 |
| It adds just the right amount of 'something special', I think :) |
 |
| I liked the pleats at the wrist - another little 'something special' in this design. |


