
Cut out a few rectangles, stabilize the edges with some stitching, pull a few threads for some fringed edges, and an hour or so later - a new set of placemates!
Right?
Enter stage left: The Realistic Time Management Police :(. Three or nine hours later, here's what I did, & what I learned:
Cutting out the rectangles, piece of cake. Well, except for the fact that my
I decided to do fringes all the way around; 1/4" or so on the long edges, 5/8" or so on the short edges. The narrowest possible zigzag width, and a really short stitch length should make it nice & stable. Do you know how LONG it takes a non-industrial machine to do a really short, narrow zig-zag? The equivalent of a 15 mph freeway drive, even though you have the gas pedal pushed all the way to the floor! I started with my machine set at .4....after awhile moved to .5, .6, .7, .8.......really, THAT short a stitch is way overkill for stability. Trust me on this one & don't waste your time.
By the way, this entire method will apply to garment construction as well. :)
Here's the short short short stitch I started with. The nice aspect of the plaid is all those lines to follow, making a straight stitch line really easy. And you DO want a very straight stitch line, so that your fringe edge doesn't go all wonky.

Next up, pull those threads for the fringe. Oh yeah, do you know how LONG it takes to pull threads....thread by thread by thread.... on 24 edges of deceptively small rectangles of fabric? Hint: longer than one hour. Time to practice some Zen attitude. Or multi-task. The good news: I discovered that "So You Think You Can Dance" started last night! My FAVORITE reality contest show! I might have missed it if I hadn't been looking for something to multi-task to. So I'm doing the Happy Dance! (No where near as beautifully as some of the competitors on this show though - good heavens those kids/athletes can DANCE!)
But back on task: Here's what I learned about thread-pulling. Start at the outer edge, & pick your threads out one by one, with an appropriate thread picker. I used a large quilting type of pin. NOTE: You will probably find that one direction, either the warp or the weft (depending on the fiber width, & tightness of the weave) will be easier to pull than the other direction. You might as well start with the easiest direction, because this will leave the corners unravelled, which will help make pulling the threads in the other direction easier. Make sense? Since I had cut out my rectangles with some laid out lengthwise & some crosswise, my fringes ended up looking a bit different on the different layouts, but hey....they're placemats, who's going to notice? Just don't do this on a garment!
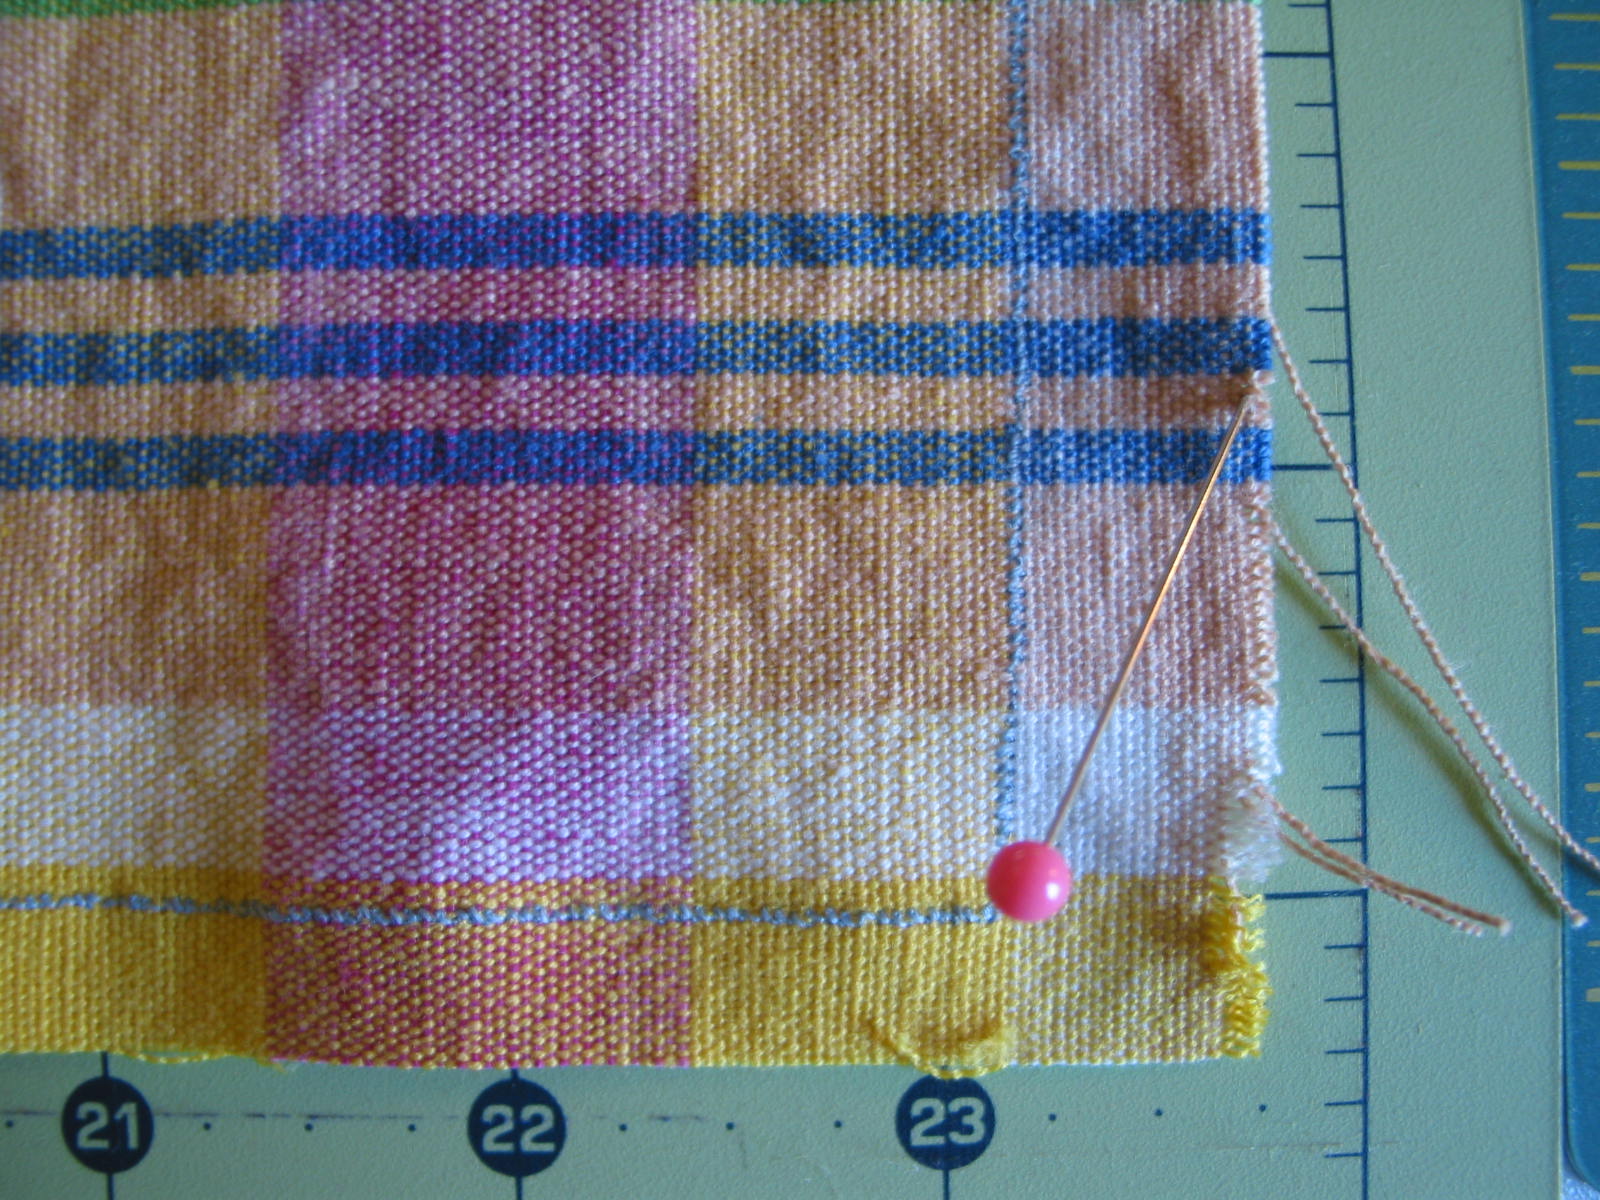
Go ahead & pick the threads for an inch or few at one end, all the way to your stitching line. Then pull your threads one at a time, all the way to the other end. Trust me, pulling them one at a time is MUCH easier than breaking threads halfway through & picking them out again!

In order to avoid breaking that thread, pull it until it bunches the fabric up & stalls......

...& then, while holding on to your thread, gently push the fabric down the other end. Your thread will then loosen from the far end and (if the thread pulling goddesses are smiling upon you) the thread will slip right out & you can start on the next one. Of course, the ease of this will also depend on how tightly woven your fabric is.

By the end of the day, I had a cheerful new set of place mats! This fabric, btw, was a bit too heavy for napkins, but a bit on the thin side for place mats. I had briefly considered doubling the layers with another fabric & making them reversible, but I wanted....you know.....quick & easy (picture me rolling my eyes here). So I spray starched the heck out of them & declared them sturdy enough for lunch :)

And we're ready for company!

And the really good news? I have more sewing time today! AND I'm looking forward to spending some quality chat time with my fellow BABES (Bay Area Bash Expressly for Sewists) this Sunday.
And yes, the flowers are from my garden, which is blooming profusely after such a rainy winter! I promise I'll share more flower & garden pics in upcoming posts :)
5 comments:
What a cheery table setting.
I'm one of those who can't post, except anonymously so we'll see what happens. This has been going on sinced the 24th.
glorm aka gloriastitches
Awww Gloria sorry :( I know that some people had their Followers section go blank, but I didn't know that some folks weren't able to post - hope it gets solved asap!
You can come over for lunch if that will cheer things up a bit ;-D
Whahoo diddle dee dee---I can post. I commented on my blog as to what I did.
Oh, yeah, sorry I didn't RSVP. Hope it's not too late to come over for lunch.
Those are wonderful placemats-thank you for the tutorial. I have made fringe on clothing and *know* that what looks easy is not. Gorgeous and cheerful table.
Glad you are back in your sewing room.
Goria how about if I bring a couple of placemats to the BABES gathering tomorrow? ;-D
Thanks Mary - I love my dinnerware, but those colors are in a league of their own - I've never been happy with ready-made tablecloths/napkins/placemats that I've found, so this is yet another good reason to have picked up sewing again! :)
Post a Comment