It's about exploring and sharing my creative adventures (mostly sewing these days) ~
~those activities that sometimes obsess, usually inspire, occasionally frustrate
~and always provide a delightful maze to wander through.

Monday, November 28, 2011

The Koos Coat - The Good News/Bad News Post

The Bad News:  In spite of laying the two sides (inside/outside) together & matching them up perfectly, (which involved only a tiny bit a trimming, once I started basting them together they somehow no longer matched up.  At all.   WTF?   :(  In fact, I had a chunk of excess fabric on the reverse side that I could have made a sleeve out of.

The Good News:  OK, so I exaggerate a bit....I approached it with a "Yes, I Can Do" attitude, & in a little stroke of brilliance I realized that I could take a dart in the fabric, and place it so that I could disguise it with the Top Stitching - YES!

The pinned dart (although it did get moved & adjusted after this pic)
The Bad News:  I machine basted (with a walking foot) several lines from top to bottom, connecting the fabrics, & it became clear that, even though everything pretended that it was matching up,  puckering was going to happen anyway.   The tweedy tan wool blend on the reverse side was stretching out a little bit more every time I looked at it, no matter how subtle I tried to be.   :(

The Good News:  Steaming and Pressing the sucker into submission appeared to be taming it!


The Bad News:  I started topstitching (with walking foot) along the bias strip lines (I really wanted to be working with the expanding tan fabric on top, but in order to have the guide lines to work with, I really needed to start on the pieced side).   Everything seemed to be going well, until I got to an area where the steaming & pressing just wasn't doing the trick.   YARDS of excess fabric started appearing!!!!   Well, OK, maybe it was inches, or perhaps it was really centimeters (I'll never, ever get centimeters & quarter inches figured out....which one is bigger?), but still.   Way.  Too.   Much.

I went to bed.

The Good News:  In another flash of inspiration, I realized that the excess fabric was all appearing right about where the pocket would be placed!   I checked it today, and sure enough, it looks like I may be able to coax the folds underneath the pocket.   :::whew:::
If you biggify the pic, you may be able to see the dart (near the armhole at the top)
and the thread tracing around the pocket edges.   I think I can save it.....
The Bad News:  I may end up with a one-sided coat, not reversible.   But the semi-good news is that it's actually OK, since I probably would wear the pieced side out 90% of the time anyway.

I guess, when it comes down to it, it isn't really a Jilly Be project if it doesn't involve a couple of unexpected side trips along the journey...

The Good News to end with:  No matter what, I'm committed to enjoying the journey! (side trips & all....)

Hope all of your unexpected side trips are pleasant and fulfilling!

Saturday, November 26, 2011

The Koos Coat! - In Process (and A Secret...)

I am THIS stoked about this pattern (Koos Van den Akker's Vogue 1277)!   Seriously, this is the most fun I've had on a sewing project....maybe ever!    This was a pattern I fell in love with the moment I first laid eyes on it.  Reversible, all sorts of room for creative fabric placement, and I loves me a great swing coat, especially one with such a fabulous, updated look:

Now, as far as I'm concerned, no one does the extremes of Is it Ugly or is it Fabulous quite like Koos.  Case in point:
I know that beauty is in the eye of the beholder & all that...
but seriously?  He's done worse (imho, of course), but this is the only one
that's still currently available.

Back to The Coat...

Choosing fabrics was step one.   Challenging?  Oh yeah....  Fun?  You betcha!  I started by shopping my stash, & filled the missing pieces in from here & there, laying them out, moving them around....

And eventually ended up with this:

Which evolved into this:
(The fabric bit sticking out on the right is the sleeve)
Once I had the bias trim laid out on it, I was loving the combination!

The pattern instructions, by the way, are very clearly laid out.  I've heard that Vogue gave instructions that are totally different (and more complicated) than Koos teaches it, but I've had no problems (so far) following anything.

Well, except for the bias strip pattern piece & instructions.   I should have been able to tell at a glance that those were written by someone from Pluto...or someplace...but I wasted time trying to decipher them anyway, before I just did it my way.   I've posted this method before, but I'll show my super easy way of cutting a bias strip here:
Once you have your bias tube sewn up, you simply insert a small self-healing mat inside the tube.   This way, you can lay a clear ruler on the edge of your tube, & cut accurate edges (to the width of your choice), using a rotary cutter.   After you cut a section, simply slide next section of the tube to the top of the mat, replace your ruler, and cut another section.   Accurate widths for the full length of the strip, without having to mess with scissors!   (I promise I'll do a full tutorial on this.....one of these days..... but there are already a lot of tutorials on cutting the fabric & sewing up the tube.   I've just never seen this method of inserting a mat inside the tube for cutting before)

Anyway, back to The Coat....

The instructions call for sewing the fabric pieces together WRONG SIDES TOGETHER.   After trimming your seams, you then lay your bias strips on top of the seams & top stitch each edge of the strips:
I thought this was kinda cool...no worries about getting off kilter
with your SA's on the other side of the fabric,
and everything looks finished, even on the unseen part!

Here are the pieces all sewn together & long edge stitched, connecting both sides of the coat 
(this is the WS of the fabric showing)
Inspector Sir Fur Purr seems to approve.
(Yes, cats are allowed to shed all over my fabric.  That's life with cats.  I got over it long ago)
This shows the reverse side.
After sewing the two sides together along the outer edge (RS together), you turn it through the neck/armhole opening, and baste the opening's raw edges together.   Here's where I'm at now:


The next step is All.   That.   Topstitching!   My only concern is how to get the topstitching done w/o puckering happening....   I'm practicing on scraps, but I still don't feel totally confident that I can keep both sides nice & smooth on the full lengths of All.   Those.   Lines.   

Any tips or hints will be gratefully received!

Oh, yes, I promised to reveal A Secret!   Here it is.   See how simple the main body of the coat is, w/o all of the pieces?    This fabric was actually "Muslin" #2.   I did up the first one (out of an old tablecloth) in a Med = too big.   So I decided to cut a wearable Small from fleece (I loves me my fleece, as many of my readers probably already know), and finalize my sleeve adjustments (they needed to be shortened) & check the overall fit before cutting into "The Good Stuff".

You say you don't want to fiddle with all those pattern pieces, or don't like the fabric matching game?   But you like the lines of the coat?   Well, here's The Secret.  Once you've connected your pattern pieces together, you can cut this out in a thick, double-sided fabric, stitch it up, finish your seams, & you can actually have a wonderful coat in a couple of hours!   Add pockets if you want, or line it, or make it reversible with another solid piece, and it's still an easy project!

Here's my fleece coat....this one is totally unfinished; I do plan on having some embellishing fun with it, & lining it with something else, but this can give you an idea of the possibilities:

My goal is to have the coat done by the end of the month (just a few short days away eek!), but hopefully I'll have most of the day tomorrow to work on it.

Wish me luck with the topstitching!

Thursday, November 24, 2011

The Yin and the Yang of Gratitude


I was reflecting this morning on the (many) blessings in my life - all I am grateful for - and it occurred to me that every single blessing on my list also contained a challenge.

The reverse, of course,  holds true as well - every challenge contains a gift.

May I maintain an awareness, as I move through my days, to recognize the lessons available in every present, and to (gracefully) accept the offerings in every difficulty.

I am very grateful to be included in this amazing community of sewists - thank you for all of your gifts to me during my inaugural blogging year :)   May you all be blessed with an abundance of gifts, lessons, students, teachers....and of course, fabric!

Happy Thanksgiving to one and all :)

Monday, November 14, 2011

I've Tied the Knot - with the Peony Vest!

Yes, the courtship is complete, and how appropriate that the last step did indeed involve a knot!

This one, to be precise (more on that bit of the ceremony later):

The head scratching moments I had towards the end, while trying to get the jagged, wavy hemline to lie flat after all of the fitting adjustments I made (in spite of a muslin that I thought fit well...::shrug::) was definitely a lesson or seven around making sure that your lining - including grainline - matches the outer piece(s) perfectly!

Which mine, clearly, did not.  With all of the odd-shaped pieces, and a slippery silk habotai lining, and multiple side seam adjustments along with even more hemline adjustments.... well, by the time I was actually matching the lining pieces to the hemline I had more unmatched edges than I thought possible!  Have I mentioned that there was no room for error at the hemline?  That the lining pieces were just supposed to be exactly the same length and angle as each of the pieces of the vest?  What planet was I sewing on when I thought THAT would magically happen after all of the alterations I made???

I finally managed to get the hemline lying (relatively) flat and smooth, but on the last panel....well....a picture is worth a thousand words.   This is not one of my proudest sewing moments:
The good news is that you can't see the ugliness from the outside, 
and all of the other segments actually turned out quite well.   
In comparison anyway.  
And with a lot of handstitching.

Oh yeah, I had a bit of an "aha" moment - when I was trying to figure out how to get as many of the lining seams sewn by machine as possible (I'd long since given up on trying to follow the pattern directions), I ended up with something that looked an awful like like a bag full of fabric - is this why they call it a bagged lining?   Of course, I may be way off on that (oh, the pages I could fill with what I don't yet know about linings!), but it made sense to me...


A note on the knots - the very last step!   I had some bits of bias strips made from the charmeuse print, and I wanted to make some sort of non-button buttony things to place here & there.  I was making some rather unsuccessful rolls, when serendipity knocked on my bloggy door & took me over to this tutorial at Handmade by Carolyn.  PERFECT!   I whipped up a few knotty buttons - super easy by following her excellent instructions.   The only thing I did differently was to use a large, very blunt needle to pull my bias strip through itself, and I just made several knots on one strand before cutting them  (that's the frugal me who doesn't want to waste any of that precious fabric!).


Finished "button",  on an an evenly hanging hem!   *whew*

The only "real" button on the vest - 
it's a wannabe leather look - actually plastic, but a perfect match, I thought!


A few more closeups:


The next step in our journey is expanding our group of friends to play with.  Initially, I actually thought the Peony was going to play well with things like blue jeans & boots, but, well.....not so much.   I did find a few combos in my closet that were happy to go out & play with us, but I'll be keeping my eye out for some new potential playmates as well.

Here are some of the options:

 I only have one top that I feel really works with the vest (white would be OK, but, well....who has NO white tops in their closet???  That would be me....  Well, I do have a couple of summer blouses, but nothing with any actual substance, that could be worn under an Autumn vest....)  So with only one top (this Citron silk blouse...which I love - when I was still buying RTW, I was definitely a Citron addict....) my bottom layer was a bit limited.   These RTW pants worked well though.

I also like it with this Decades of Style Arches skirt 
The color looks a bit odd in this photo,
but it's a perfect match for the green in the charmeuse print:

Add my yummy new Harlequin Feltworks scarf,  and I love the look!

And then there's the slightly Bohemian bent.
This look reminds me that a bright, colorful piece actually pairs well with a solid neutral look to coordinate.  I've never really been that much of a matchy-matchy person, but as I try to refine my style I'm  beginning to understand how matchy matchy can be a very good thing, in some circumstances.


The bottom line?   Someone needs new boots and shoes.   And fabric for some more tops.  Must budget for that......

All in all, the journey's been a fun one!   It went slowly mostly because of other life 'stuff' - I'm noticing that I'm becoming a much more patient sewist when I take missteps...they're all learning opportunities, and I prefer the slow and steady aspect of the journey, especially when I'm working on something "special".

Like, you know, a long-term relationship.

Friday, November 11, 2011

Welcoming the Wales! 111111 (Corduroy Appreciation Day)

Surely you've heard by now?  It's 111111 - National Corduroy Appreciation Day!   Yes, really.  The Corduroy Club claims all days with lots of 11's, and this one is the Mother of them all!  (Will we still be wearing corduroy in 2111/11/11?)

Life has sidetracked me from blogging & sewing much lately, but I did hope to whip up a pair of Linda pants (in corduroy, but of course!) last night, but I didn't quite get finished in time for a photo this morning - maybe later today....   I'm doing my part for the Corduroy Lovers of the World!

I leave you with a few cord shots, and hope you are showing some appreciation for the cords, and cord wannabes, in your world today :)


And of course, Corduroy:

P.S.  I had a little trip down memory lane while I was sewing up my Linda Pants (still no pic...but I did finish them before midnight!)  Years ago, I remember making a corduroy robe for my BF, with velvet collar and cuffs (yes, it was that many years ago).  I think it was a Christmas gift, and he wore that thing to death.  Probably the last time I sewed with corduroy....but I know I'll be making more...I'm loving these pants already!

Tuesday, November 1, 2011

A Side Trip Down Easy Street - Kwik Sew Bed(?) Jacket

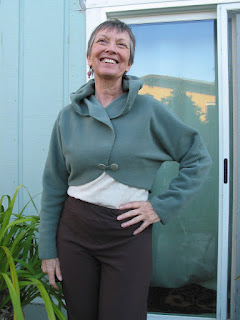
Well, it was supposed to be a bed jacket...but I like it so much I think I'll be wearing this one out & about!

On those mornings when I don't need to jump out of bed, I enjoy a few minutes of sitting up in bed and "beditating". On those chilly winter mornings, however, this usually means crawling out of bed to put the fuzzy warm robe on, & then crawling back in bed with the ungainly robe, and it doesn't even cover those cold ears anyway!   The solution?  A warm, fleecey, hooded bed jacket!
I meant to make this Kwik Sew last year, but never got around to it.  A couple of recent below freezing (OK, ok, maybe below 55, but still....COLD for these tropical-loving old bones!) mornings convinced me that it was time to whip this puppy up soon.

After a session with the Peony Vest that involved a few too many trials and errors figuring out the hem/lining details,  I decided it was time for a quick & easy side trip to rejuvenate the mojo - the bed jacket was just the ticket!

I dug into my fleece stash & selected this nice, thick, soothing green Polartec 200, traced off a Small, and cut out the 2 pattern pieces w/ no alterations, looked through the instructions, & decided this was probably about 30 minutes of needle time.  Including sewing on a button!

Well.....almost it was.

I serged the first 3 (out of 4) seams, & decided that the serged seams were entirely too bulky for this thick fleece.   So I finger pressed the seams to one side & sewed over them with a decorative stitch to flatten them.  The last seam (underarms & sides) I just sewed with a straight stitch.

I also had an issue sewing the corner where the hood attached to the back - going over clipped corners with the serger is not a technique I've figured out yet.
If you look closely, you can sort of see the clipped corners
 - on the 
wrong side of the serging
- this was definitely a case where the sewing machine is preferable, at least for me!

The small ended up being a tad on the too small side, so instead of making a buttonhole & button, I braided 3 thin strips of the fleece together to make  a button loop - this allowed the front to be a little bit looser.   Then I did a decorative stitch around all of the edges (the pattern calls for hand sewing a blanket stitch around the edges, but for a one hour top?  I think not....)

Here's a close up of the deco stitching & buttons:

Can a project be too easy & still produce results that are this much fun?  I'm happy to add a few more sewing projects like this to my repertoire!

I love that the collar can lay flat, or sit up....lots of options!

Being all warm & cozy


The collar as it fell when I pulled the hood down - fun!
Materials: 1.5 yards of Polartec 200 Fleece, 2 vintage pleather buttons from stash, thread.
Time:  About 3 hours, from pattern tracing through button sewing.
Rating:  Two Thumbs Up!

I'll definitely make another variation (or two) of this one!

The question still remains:   will I be wearing my bedclothes out on the street, or will I be wearing street clothes in bed?   And does it matter?

May your dreams be pleasant, and your mornings be full of promise :)