It's about exploring and sharing my creative adventures (mostly sewing these days) ~
~those activities that sometimes obsess, usually inspire, occasionally frustrate
~and always provide a delightful maze to wander through.

Sunday, January 29, 2012

That Ubiquitous Burda T-neck, Take 5

The TNT that I've not only made the most versions of, but also wear the most, is that ubiquitous Burda turtleneck/funnel neck T from September 2010.   The weather is calling for more of these, so I whipped one up last week out of a wool viscose blend knit that I ordered from Emma One Sock over a year ago, and liked it so much I got more!   It's the same fabric I made this Decades of Style shawl from.  And I still have a bit more to dip in to when the next pattern calls out to use it :)

The only thing I don't like about this pattern is the way the neck gets all floppy in your usual drapey knit, after a bit of wearing.   So I decided to try some interfacing.
I used Pam Erny's pro-tricot deluxe interfacing, installing it in the neck area.

Here's the neckline once it's folded over:  (Note:  my previous post, linked above, details all of the construction notes on this T)

You don't want to pull this T over your head when your hairdo is all poufed & sprayed & done up just so.....oh wait....that's never me anyway.... because it is a tad bit tight with the interfacing, but it does give the neckline that extra bit of oomph that keeps it from getting super saggy.   I have enough super saggy developing around my neck as it is, I don't need any help from my clothes, thankyouverymuch...

The wearing of the green:


LOVE this fabric - it's super lightweight, and the background is even a little bit sheer, but it's incredibly warm - perfect for the Bay Area temperature variations.

Here's to TNTs!   Especially the quick & easy ones :D

When I uploaded the pics for this, I found this shot in my camera.   I did not take it. (unless I did so accidentally)   It was just there, and it was so intriguing that I had to keep it.  It's the light coming through the cut glass window in my front door - it always gives an interesting little light show when the sun shines through.

Hopefully this evening I will start cutting out my snuggly new robe!

Saturday, January 28, 2012

Plans, Hams and a Glockenspiel

I've been sooooo good about not buying fabric this year (yeah, I know, we're only in month #1, but still.....), so I felt justified in finally treating myself to a ham stand.  Oh yes, and a new ham to go with it.  I already had a ham (vintage, practically free, & recovered by me) but it was sort of an awkward size, and I REALLY wanted a ham stand.   I hadn't forgotten the rave review that shams gave last year to stitch nerd, and then Pam recently gave her new ham & stand from Stitch Nerd another rave review, and that pushed me over the edge.  You get to choose your own fabric!  You get personalized service!  And after a very short wait, you get your own custom ham!  Her prices are very good.   The stand is pressboard; maybe not as pretty as a hardwood piece, but it looks very sturdy and I expect it to give me years of use.  The ham is VERY well made, and you get a choice of wool on one side, cotton on the other, or any combo you want, with quite a few lovely fabric choices.
I'm beyond delighted with everything about this.   My old ham is on the right - flatter, wider, & shorter.  The new one is more rounded, longer (12") and, well, prettier ;-)   They will both have a place in my ironing regime.   And you know what?  With goodies like this, I actually LIKE ironing more than I ever did before!  What I really like is actually the result that consistent, conscientious pressing gives.

And since we're on the subject of not buying fabric, I'm doing some serious stash shopping instead, and starting to make some actual plans that involve matching fabrics to patterns.   Everything is subject to change, of course, but this is definitely helping me to realize that I don't need ANY MORE FABRIC.  Not right now, anyway.   Except for that organic cotton I bought for the baby gift.  And the flannel I got today for my winter robe.   Because it doesn't count if it's necessary to complete a project that is going to be worked on immediately.   Right?

To help keep me on track, here's The Plan:


#1.  I need a new robe.  I've needed a new robe for more years than I care to mention, but finally, FINALLY, I found the right fabric - that yummy Marc Jacobs fleece that FabricMart had about 1000 yards of (they still have some as of this writing), with a flannel lining.  Toasty warm.   Crazy as it may sound, I'm going to use the SW Soho Coat as my base pattern.  Partly because I am LOVING my little hoodie bed jacket, so a robe with a hood sounded like a good idea, and partly because I have another fabric that I want to make into a raincoat, using the Soho pattern, so this robe will be my practice run.
Add caption
#2  The Soho Rain Coat.   This fabric was a score from Fabrix (thanx shams!!!) - Yummy, rich color, incredibly fun pleating, and probably a b**ch to sew, but I'll find out.   If it works, it should be AWEsome!

#3.  I think I've finally worked up the courage to cut in to this frabjous Chanel boucle that I splurged on at Emma One Sock, shortly after I re-started sewing.   I've been looking for the right pattern (along with  the courage-gathering), and I think I finally found it in this Loes Hinse....with some modifications, including shortening it to sweater length.  I'm trying to work with more blues, to expand the blues I already have, so this will be a nice wardrobe expander :

#4.  It's the year of pants.  One down, 11 to go.  This is the pattern I'm choosing for this yummy wool blend, that I also used on The Koos Coat.  This is actually the 3rd piece in my Winter 6PAC, so it also will be a wardrobe expander.

#5.  More pants.  Style Arc's Jilly Jeans, because of COURSE I need to make Jilly Jeans!

#6.  Continuing to make  what I actually need, the wintery California chill is bringing cardigans up to the top of the list.   This is a possibility for this Jalie pattern, but I'm not too sure about the fabric yet:

This should keep me busy for a few weeks.   Yeah, I know I'll get sidetracked, but at least I do have A Plan!

And what does a glockenspiel have to do with all of this?   Absolutely nothing.   But I put it in the title because I just couldn't resist using the word along with Plans and Hams,  so here's a picture of one:
Edited to add A trivia tidbit, because it came up in conversation the other day so I looked it up -
a glockenspiel is made of metal; a xylophone is made of wood.
Now we both know!  ;-)

I must admit that creating a plan like this (whether or not I actually follow through with it) not only helps me to solidify my options, but it sort of makes me feel all grown up & stuff....it feels pretty good, in a responsible sort of way.

Do you play with storyboards, or match fabric swatches to patterns, or pictures like I did above?  Or do you work with one pattern & buy the necessary fabric as you need it?   Or do you just live your life being distracted by bright shiny objects and bring home whatever speaks to you at the moment?  I know we're all different in our approaches, and I know my own propensity to wander off at the sight of today's fancy, but the end result of actually having something practical that I will wear simply can't be beat, and I'm finding that having something resembling an actual plan helps make that happen.   What works for you?


Tuesday, January 24, 2012

Sewing for Baby [EEK!]

The time has come...the babies in my life are starting to have babies! Well...one of them is, anyway. (ETA:  To be clear, this is not my grandbaby on the way - I'm content to "adopt" other peoples' kids....best of all worlds, imho)  ;-)    Baby shower time!  Cute baby gifts!  Adorable baby clothes!  What should I get???

And then it dawned on me...Hello?  I can SEW something!  And then....

Panic mode sets in.
Now, what on earth is so frightening about sewing for a baby?   I'm sure Freud would have something to say about that, and I have thoughts, but perhaps they're better left alone for this blog's purposes...

Fabric choice - WTF is it with all the warning labels?  Cute baby flannel prints all say "Not suitable for children's sleepwear"....huh?  So if I make something out of this and Baby catches fire it's my fault?  Eek!  Research about fabric flammability & laws left me with the following conclusions:
1.  The sleepwear that is worn right next to baby's skin should be tight = no airflow between skin & fabric.
2.  If you buy RTW sleepwear, polyester (that can, presumably, MELT onto baby's skin), is safer (translation = 'legal')  than yummy, soft, natural cotton.   All righty then.
3.  I think that the laws currently in place were determined at a time when more people smoked,  & left their ashtrays in baby's room (seriously???) & other fire hazards were more prevalent than today.
4.  I'm sewing baby clothes out of cotton, not polyester, thank you very much.  Perhaps I'll give them with a warning "This is not flame-proof, so please don't set your baby on fire while she's wearing it."   I should be covered, right?

After the research phase, the fabric choice was easy, based on their registry choices.  Natural color, organic cotton.  With thanks to all the sewing moms in cyberworld, I decided to make a baby sleep sack.  Or sleeping bag.  Or bunting.  Or whatever it is they're calling it these days..... McCalls 4236 was the pattern of choice (on sale at JA's, made that choice easy).   I gathered all of the ingredients, but it still took me until 5 days pre-shower before I managed to cut into the material.   (More Freudian fear....but we're not going there.....)   I still had decisions to make:  What size? First I cut a Large, which was GINORMOUS!   I cut it down to a Medium.   This pattern runs large!   How to finish the seams?  How to install the zipper?  Sleeves or sleeveless?  What if I make the wrong choice?   Sheesh, really?  (this is why I much prefer the Selfish Seamstress route!)   I mean, really, ALL there is to the pattern is 2 pattern pieces and a zipper.   But of course, I wasn't about to leave well enough alone, and managed to tweak just about every single step of the process.
1 pattern
1 zipper
thread
3 pieces of fabric
Utter simplicity, right?
I found this variegated wooly nylon thread that put a smile on my face, and decided I had to use that in the serger.  The pattern calls for turning the neck & arm edges under & stitching.   That would be too easy.   I decided to make a binding, with the edges serged using the colorful serger thread.   One reason for this was practical - this is a REALLY thick cotton knit, and I figured that a serged edge would reduce a little bit of bulk.   Not that Baby cares about bulk....at least based on my observations....   Anyway, the fabric is YUMmy feeling, and really warm!   Definitely something I would be comfy sleeping in :-)  My plan (fingers crossed) is that the new family will have lots of newborn-sized goodies for the Spring & Summer, and this will fit Baby on cold nights next winter.    That's the plan.....
Binding, cut on the cross grain, one edge serged.

I attached the binding (RS of binding to WS of the fabric), giving the binding a good stretch as I sewed it onto the body (those little curves are pretty tiny!).   Then trimmed the seam allowance, leaving just enough binding to fold over to the RS & give a narrow binding, showing on the outside.

The next change I made was to use a separating zipper & install it upside down.   This, again, was on the advice of the cyber-sewing Moms (thank you!)   There is no consideration in the pattern for a zipper guard to protect baby's skin, and I want to add something.    I was wishing at this point that I had made some time to go snoop shopping in baby stores, but I decided I could figure something out.

And I did :)

I cut a strip of the fabric wide enough to cover the zip (which was a wide, sports zip - plastic teeth) after it was folded in half lengthwise, and serged along the edges:

Then I attached it to one edge of the zip, leaving a lip about 1/2" long peeking over the neckline:

Folded over and tacked down, this protects Baby's neck from the zipper:

Inside.  The serged edge is sewn onto one edge of the zipper:

Bottom of zipper.  I extended the zipper guard to cover the tail of the zipper, and gave it some reinforcing stitches.

Last step was to finish the armhole edges (same as the neck), serge around the edges of the bag, give it a wash (I had already pre-shrunk the fabric, as I always do, but I wanted to package it up sparkling clean)

It's very simple, with just the pop of color.   I hope they like it.

Just so they can have something to use right away, I'm adding a receiving blanket, with serged edges to match the sleeping bag.   Or Baby Sack.  Or bunting.   Or whatever it is.


Silly, really...all that fear over sewing a simple baby item.   Now when baby is big enough to wear real clothes....that should be fun!!!!   I actually did sew a fancy christening gown once....in my former sewing life, 30-some odd years ago....   And a wedding gown for that baby's Mom.   Part of me really wants to see those garments again, part of me thinks I might be better off never really knowing what the construction of them looks like.....  Conveniently, I keep "forgetting" to ask about them....

Next up.....   Gosh, I don't know!!!!   Maybe a raincoat.   I have a plan.....  Or maybe I should catch up on the undone housework.  Or bill paying.....

Does your sewing take priority over other household tasks?  Do you have dishes piled in the sink while you're happily stitching away?  Do you, too, sew first, pay bills later?   Or do you actually manage to [gasp] do it ALL?   (if so...what are your secrets?)

Saturday, January 21, 2012

And the Blogiversary Giveway Winners are....

...using the highly precise, not-to-be-questioned, tried and true method of drawing names from the hat:

Jodie (blogless) wins the Jalie 2794
Martha (also blogless)wins the Raggedy Ann/Andy Pattern
The talented and elegant Debi from My Happy Sewing Place wins the Retro Butterick 6759
And Mary, who blogs about her sewing and some mouthwatering cooking recipes at MarySews has won the Sewing Workshop Yin & Yang Dress.

Congratulations ladies!   Your patterns are eagerly awaiting their trip to loving new homes; please email me (moonpadler at aol dot com) with your mailing information, and I will send them on their way to you :)

This was fun, and I even discovered a couple of lovely new (to me) blogs in the process!  Elle C made this absolutely delightful zipper bag, definitely worth checking out!  Anne at Anne's Antics has some delightful creations (& is hosting a blog hop party right now!)

I look forward to hearing from the winners! :)

Friday, January 20, 2012

The Evolution of an Accidental Vest (K Tilton V8777)


AKA - Sewing Without A Plan
AKA - Starting With A Plan, but Changing Your Mind (A Sewist's Prerogative)
AKA - Why Take the Safe and Easy Route, When the Scenic Route is So Much More Interesting?

I had a plan.  I dove into the Stitcher's Guild Winter 6PAC with every intention of finishing it, but item #1 was the infamous Koos Coat, which ate up almost all of the time allotted for the 6PAC.   Item #2 was the LaFred Thalia pants, but they ended up being made in a different fabric (and different color scheme) than the 6PAC plan.   On to the new item #2 - a super simple, neutral vest, Katharine Tilton's Vogue 8777, which I whipped out in no time:


Super simple and neutral it is!   Too simple.  Too neutral.  Must fuss & futz & do something else to it....

BTW, there isn't much to say about the construction of the vest.  3 pattern pieces, stitch up the seams, & finish them with a topstitched faux flat fell.  I used a narrow zig-zag for the seams, and the "triple stitch" for the topstitching.  The instructions are very clear - it's one of those patterns that takes twice as long to trace & cut the fabric as it does to sew up.

That is, if you leave it alone at this point....

This vest (View C) calls for unfinished edges.  I'm really not a fan of unfinished edges, (unless they're frayed, or done with a fabulous selvedge, or have something fun & special going on), so I wanted to do something...but what?   My M.O. these days is to go to bed & let the questions stew, & as I'm drifting off, that's when the answer usually comes.  This time the answer was TIES!   Ah yes, all those neckties....

I selected some ties that worked well with the vest color, draped one around the neck & front, & decided that was a good place to start.  (Note that I still don't have a plan, exactly...I'm just kind of stumbling along & seeing where the path will lead....)

I dug out the Steam-a-Seam (which still feels sort of like cheating to me...why IS that?   The stuff is GREAT!)  I placed the tie so that half of it extended beyond the center front edges of the vest, Steam-a-Seamed & stitched it in place along the edge of the vest, and step 1 was done:


I decided that the armholes needed a bit more tie action, so I selected 2 more ties, & stitched the narrow end of a tie around each armhole.  For these, I placed the edge of the tie even with the armhole seam.   And used more Steam-a-Seam.   I stitched the armscye edge, then stitched down the other edge of the ties.   The added fabric of the ties on top of the ponte caused the arm edges to stand out a bit.   I did take a dart in the tie "binding" under the arm to lessen this effect, but it's still there.  I'm OK with that:


I'm having fun with the vest so far, and liking it, but now the bottom edge clearly needs.....something.   Time to sleep on it again.   This time, piping was the answer.   But,  a) how to make it, and b) how to attach it so that it looks finished on both sides?

I wanted to make a continuous bias strip out of what I had left of the two armhole ties:

I stitched them together along the long edge, RS together.  
This made for a semi-rectangle, a bit wobbly on the edges, 
with the narrow end of each tie attached to the wider end of the other tie.
I then marked 1.5" wide lines all along the pieced together ties.
Note:   I ended up with TWICE the length of bias strip that I needed!  
I could have (should have) made my marks 2" wide - 
it would have made sewing up the piping MUCH easier.  20/20 hindsight & all that....
(Biggify the pic to see the lines more clearly):

I then attached the other long edges of the ties, by matching the end of line #1 on one tie to the beginning of line #2 on the other tie, forming a tube.
If you've matched up your lines, you will have one continuous line going round the tube.
This is a classic way of creating a continuous bias strip, except for the rather wonky edges,
creating lines that aren't really on the true bias.  
But hey, I figured if it didn't work, 
I was just out two cheap vintage neckties & a bit of time.....worth it!

Start cutting along the marked lines, being very careful to only cut through one piece of fabric at a time.
You'll end up with one long strip of bias.
The result of my mad method of wonky grainlines was that the strip had some narrow spots,
and some wider areas,  but this wasn't like a binding that needed to be even, so it worked out all right *whew*

Next step was sewing up the piping, using a zipper foot.
This is where a wider strip would have been MUCH easier!
It also would have been easier using a straight stitch Singer,
but I was being lazy (late night sewing syndrome) & didn't want to fill a new bobbin & switch threads.

I placed the strip on the wrong side of the vest fabric (once again, Steam-a-seam to the rescue!),
with the piping just below the hemline edge, & stitched it in place, again using the zipper foot.

I then cut a 1/2" wide strip of the ponte & covered up the raw edge of the piping by using.....you guessed it....Steam-a-Seam!   I stitched a bit of the strip in place, but the stitching looked horrid, so I just used the Steam-a-Seam alone.....we'll see how well it holds up.... [gulp]

I wasn't content with the look yet, and being something of a pocket fanatic 
(I loves me my pockets)
I created two little pockets from the remaining ends of the ties:

Just one more little step:


Finally....Done!!!!

The midnight photo session:

Annie Hall's got nothing on me..... 
And yes, I WILL wear this outfit out & about....just like this :)

It's a little bit....Grampa Vest
a little bit Annie Hall
a little bit....odd
But still, I kinda love it :)


Note the "Obi Sash" at the waist in this pic, made from two more ties.

Materials Tally:

Fabric:  Rayon Ponte: - 1 yd.
Vintage Neckties:  3
Steam-a-Seam Lite:  8 yds.  (approx.)

Note:  Add to Shopping List - More Steam-a-Seam Lite.  I'm officially out.

I wonder if I'm even capable of seeing a completed garment in my head and actually following that vision through to completion.   I honestly have great admiration for those who can do it!   I'm the same with room design/decor.   It happens over time, by trial and error.   It's wrong, it's wrong, it's wrong, and then suddenly I place something just so, and it's right!

How about you?   Are you one of those talented people who can visualize a plan and carry it through?  Or do you muddle along and figure it out as you go, enjoying the process but not really knowing where it will take you?   Or do you have another way that works for you?


Wednesday, January 18, 2012

Blog Comment Issues?

I really like the new interface in the Comments that allows you to "Reply"to individual messages, so I switched from the PopUp Comment window to the embedded Comments in order to have that feature.
(side note:  appropriate image for this SOPA/PIPA day, eh?)
Unfortunately, I've received a couple of emails from people who said they weren't able to comment on my blog, so I've switched back to the PopUp Window.

If you tried to leave a comment on my Blogiversary/Giveaway  post, please give it another go....if you still can't comment here, would you please do me a favor and shoot me an email, letting me know?  Has anyone else had trouble with the new interface?

UPDATE:  It appears that people who are using Internet Explorer (and WHY are you still using IE, she asks?) are having issues commenting on some of the blogspot blogs that have the threaded comments (i.e., the new blogspot rollout that allows direct Replies to comments).    Until (if) google/blogspot fixes this issue I guess I'll forgo the threaded feature and stick with a pop-up window for comments.

Ah well....we shall carry on!

Monday, January 16, 2012

Happy 1st Blogiversary and a Giveaway!

Woohoo!  I have a reason for a little giveaway party!   Not that I need an excuse, but...I published my very first blog post one year ago today, so it's my First Blogiversary :)

I've already written a little year-end wrap-up, so all I'm going to say here is that I'm THIS delighted with my discovery of the blogworld, and the thought that I could actually create a blog myself, have fun doing it, and attract people who apparently enjoy reading what I share.   Makes me feel good :)  


I credit my local sewing group, BABES (Bay Area Bash Expressly for Sewists), who encouraged me to start a blog after my first meeting with them.  One would be hard-pressed to find a group that is more welcoming, supportive and generous with knowledge and goodies - we always have plenty of fabric, patterns, knowledge and paraphernalia to share.   But then, what I have discovered in this wonderful world of stitchery is that sewists tend to be like that.

Which leads me to - the Giveaway!   Another first for my blog. :~)  I'm hoping to find good homes for the following patterns:

#1)  Jalie 2794.  The popular sweetheart knit top.  I did make this a couple of times, but I don't think I'll be doing it again.  It's popular for good reason, but as I'm finding my own style, I realize that this just isn't it.  Uncut, and Jalie's typical every-size-in-the-book


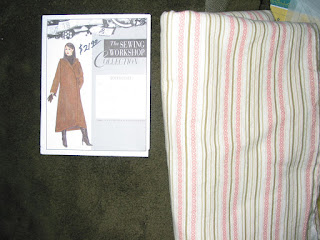
#2)  The Sewing Workshop Yin & Yang Dress.  (Sm - XL) This one was cut, but to the largest size, so all sizes are there.

#3)   McCalls 2531 - Vintage Raggedy Ann pattern from the 70's. (Someone on Etsy is asking $26 for this!  Think it'll sell?  I hope mine will find a great home - for free)  :~)  Includes sizes for 15" - 20" & 25" dolls.   It looks to be still in factory folds, with everything in reasonably good condition.

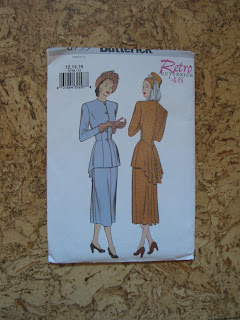
#4) Butterick 6759, Size 12, 14, 16.   Retro Peplum Jacket & Skirt.   Uncut, Factory folds.


This presents a variety that will hopefully appeal to a few people - I hope you see something you would like!

I love my followers, but it's not a requirement; this is open to one and all.   Just leave a comment with which pattern you would like (I'll be giving away all 4), and will have a random drawing on Saturday 21st.

Good Luck!

One more thing...I just saw this picture, and given the day, just had to share...
May we all have dreams, and remember to live them :)
Happy Martin Luther King Jr. Day.