It's about exploring and sharing my creative adventures (mostly sewing these days) ~
~those activities that sometimes obsess, usually inspire, occasionally frustrate
~and always provide a delightful maze to wander through.

Wednesday, January 23, 2013

Renfrew #2 - Stripey Success!

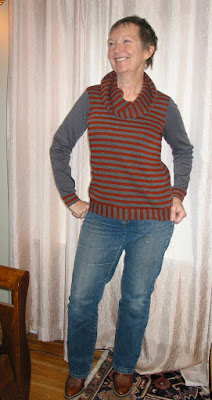
In spite of a bit of a snafu with an error found too late to fix, Renfrew #2 is finished, and I'm a happy camper :)  I was going to give a prize to whoever caught the error first, but I think it's not obvious in these photos (and I'm too lazy to take more).  I guess that's a good thing, yes?   That it's not obvious, not that I'm lazy....

The stripey fabric is a stable, double-sided sweater knit - I think there's some wool involved, because I'm realizing that the cowl is making my neck itch just a bit :(   A burn test indicates some synthetic as well, so it's a blend of this and that, and maybe some of those.     The good news is that the flip side (worn next to my skin everywhere BUT the cowl) is super soft and yummy feeling :)   UPDATE:  I found a swatch of the stripey fabric in a different colorway - it's a Poly/Acrylic/Rayon/Wool blend from Fabric Mart (2 years ago).  The grey on the sleeves is a ponte - also very yummy feeling.

I swear that I am going to start keeping better records of my fabric purchases, so that I will know the content!   At least, I will record it if the info was there when it came to live with me.  (Note to self - next month's Habit Shift will be something about fabric records...)

High on the priority list of new-projects-to-sew-because-I-NEED-them is Jeans.  You think?  Also more nice sweaters, a new handbag or two, work t-shirts, jammies and underwear.   Not necessarily in that order.  But all desperately needed!  Like....now.  :(

Back to the Renfrew.   Changes I made after Number 1, posted here, were the promised sleeve cap alterations (could still use some tweaking), and I shortened the length.  This was not such a good thing, because this knit is SO much more stable than #1!   It has virtually no stretch in the length, and about 1/5 the stretch in the width.   I know these things going in, but I think a little bit of adjustment will do the trick, when a LOT of adjustment is really what's needed.  I'll learn.   Eventually.   

This is a size 10, but I sewed the side seams at about 1/4" instead of the 5/8" called for, and it was just barely adequate.   I cut the length of this one about 1" shorter than #1.   Here's the difference between stability and stretchiness:

Just for variety, I cut the cowl and the waistband on the cross grain, meaning they had very little stretch.  I cut the waistband a bit longer to accommodate for this, and eased the body of the top into the cowl & waistband as I sewed them.  It worked fine, and I like the look.  The sleeve bands I cut with the stretch going around the wrists, for ease in pushing up the arms (which I often want to do - but not today!   This cold, grey, cold, rainy, cold day....)

The cowl!   Oh the cowl!  LOVE this yummy, beefy, super warm, double-sided cowl!
I think it would be fairly easy to adapt this cowl into a simple hoody, and I think I'm going to give that a shot.  I don't have a sweatery hoody, but I'm wearing the fleece hoody bed jacket I made last year every night, and I'm LOVING it!   Need a warmer day version.  Yup, need.   On the list.

Here's the back:
Yup, those armscyes definitely need more tweaking.   Also, did I mention that I need new jeans?

I'll leave you with a little kitty story - I think my blog has had a dearth of cat pics lately, after all...

This is Mitzi, the Mumsy's kitty (who seems to be allowing me to settle into the role of New Mom quite comfortably - finally!)   The bag she's in must have picked up some very enticing scents in its journey out and about last night, because she was exploring it with great interest:

By the end of the Renfrew photo shoot, she had claimed ownership of the bag.

And now, at the end of the blog-writing, she looks to be settled in for the duration.  I think that only a call for food will get the cat out of the bag at this point.

I have one frivolous item cut out and ready to go, and then - honest - I'm focusing on necessities for awhile!

How about you - is it frivolity or necessity on your cutting table at the moment?  We do need a mix of both, don't you think?

Monday, January 21, 2013

Renfrew #1 and some Random Ramblings

I finally made up the Sewaholic Renfrew top that I've been wanting to make for, oh, since it was released a year ago.   Well, actually, I've made a practice top - a "wearable muslin", if you will, but I'll be diving into a "real" top asap!

Maybe I was in a reflective mood while sewing, but I have to say I learned a few lessons while making this top.

1.  Pay Attention.   OK, it may be unfair to say that I learned this while making this top, but I certainly had yet another lesson about paying attention!   In this case, it involved the fact that there are two (2) fronts in this pattern.  One of the fronts is for 2 of the views.  The other is for the 3rd view.  I had a 2 in 1 shot of selecting the correct piece.   The odds were in my favor.  I still lost. 

2.  Almost anything can be salvaged if you're determined enough.  In this case, I just did a little patching.  Knowing it was a practice piece, I didn't even bother matching the fabric pattern.  

3.  It's usually very prudent to use the fabric that the pattern-maker recommends.  Especially if it's an Indy pattern maker who knows whereof she speaks.  Although I did know going in that a flimsy, 4-way stretch fabric was not going to behave like a stable knit (the recommended fabric), and would probably definitely not be a good final choice, this was, after all, just a practice piece.

4.  Even practice pieces deserve respect.  Just because I don't think it's really going to very wearable does not mean I should do a shoddy job.  'Nuff said, ok?

5.  Notes about the Renfrew pattern:

  • The sleeves are completely symmetrical (!?)   This surprised me, especially since, in all of the 44 reviews at Pattern Review, I only saw one other person (clothing engineer) who bothered to mention this as an issue.  Nearly everyone who has made up this pattern gives it a rave review.  Maybe people really like not having to pay attention to which part of the sleeve is front & which is back?   I did cut my practice piece sleeves as drafted.  I will re-draft them for future Renfrews!
  • My own body consists of narrow shoulders, wider waist & even wider hips, and I adjust patterns accordingly.   Sewaholic patterns are designed for the pear shaped woman, and the finished garment measurements for bust, waist & hips were perfect for me!      I left the shoulder width alone (although I did adjust for forward & sloping shoulders), but as it turns out, my shoulders are still narrower than the pattern's, so I need to make that adjustment as well.  The bust, waist & hips of the finished piece were perfect as drafted - how nice is that?! (although that's such an easy adjustment on most patterns, so that alone wouldn't justify buying a Sewaholic top)
  • Sleeve issues aside, the pattern is drafted perfectly!   The instructions are clear and easy (there was one mistake in the cowl instructions; apparently this has been corrected in future editions - the first instruction for the cowl in my pattern said to sew the 2 cowl pieces wrong sides together, but the illustration showed right sides being sewn together.  Luckily, I followed the illustration, but I did get confused when I read the words, and had to check the Sewaholic blog to make sure where the error was.
  • Tasia (Ms. Sewaholic)'s blog is a detailed wealth of information!  She is a cutie, and very generous in answering questions and sharing her experiences :)
  • The sleeves and torso of this pattern are long!  I shortened the sleeves by nearly 2", and will do the same on the torso for my next Renfrew.
  • Love love love the bands at the end of the sleeves and the torso.  It's a nice way to finish it. :)
  • Easy easy easy top.   Instant Gratification.   And I love instant gratification ;-)
  • A number of reviewers mentioned the width at the bottom of the sleeves - the band is definitely wide!  I narrowed the band by over 1".  There's still enough width (in this fabric anyway) to push the sleeves up, but I don't like sleeves that dangle down over my hands.
  • If you make the cowl top AND the long sleeves, this top is a fabric hog!  There isn't a fabric calculation on the envelope for this particular combo.   Sadly, my lack of fabric records means I don't know how much I started with, but I did have to piece together the waist/hip band in two pieces, instead of one.  The cowl is 2-sided (very nice!) but you could cut it as a single if necessary.
  • Based on most of the Sewaholic patterns, I'm not really her demographic, but the bottom line for this one is a big thumbs up!  The neckline and sleeve length variations, along with the finishing bands, make this one a very good TNT candidate. :)

On to the finished piece.  It is, indeed, wearable.  But I don't know that it will get a lot of wear.  By me, anyway.  No really my colors, nor my style of fabric.  I'm not willing to show my face and prove that this color combo isn't a great one for me, at least not today.  Bad hair day, no makeup...you know the story....


The bands on the sleeve and at the bottom
make it really easy to adjust the length 

while wearing it, and have it stay in place.
This is a feature I really like!
Onward to more lessons learned/random ramblings:

6.  Even though flimsy rayon/lycra fabric comes in some glorious colors and patterns, and even though it feels good next to the skin, I really don't enjoy working with it.

7.  It also isn't very durable.  And I can be very hard on my clothes.

8.  There are lots of other choices of fabulous fabric.

9.  Life is too short to work with fabrics that are less than fabulous, so I'm going to use up the flimsy knits in stash that have some redeeming quality, and I will need a VERY good reason to acquire any more!

10.  I refuse to buy another sewing machine (even a well-priced Featherweight) until I sell some of the ones I already have.  I know, that has nothing to do with this pattern, but the issue arose while working on it, and I was tempted, and I survived the temptation.   And I was relieved.  :)

11.   Cheesecake is tasty.

Have you decided that there are fabrics you are no longer willing to work with?  What are your least favorite fabrics, and which are your favorites?

Meanwhile, I have interviewed and hired a combination of fabrics for my next Renfrew, so I'm up to the sewing attic to work on that!

P.S.  It occurs to me that I now qualify as an official member of Pretty Grievances' Jungle January!
Jungle January!

Happy Sewing, all!  :)

Friday, January 18, 2013

And the Winner....

... of my 2nd Blogiversary drawing ....

will be announced in one short moment!  First, I want to say that I am SO touched by the heart-warming comments everyone left on my blogiversary post.   Seriously, your comments made my day, over and over again.   I'm looking forward to yet another enriching year of sewing, and because of my readers, a fulfilling year of blogging about my exploits!

And now for the winner - it's Number 17!!!


Snoopy is Dancing!!

The Sun is Shining!

Even the Penguins are Happy!

And a package containing these goodies 
will be winging its way to you soon!

Oops....did I not say who Number 17 is?   (my impish side is showing....)  };-)   Number 17  is... Jane of Lucky Sew and Sew!  Jane's smile is infectious, and her blog always has something interesting going on - lately it's been home dec projects staging a home.   Jane, an email will be on its way to you asap!

I have a feeling this was more exciting for me than it was for my readers - I'm already wondering what excuse I can drum up for another giveaway!

Meanwhile, I have a couple of hours that I get to spend in the sewing room - happy sewing all!

Tuesday, January 15, 2013

Happy Blogday to Me...Happy Blogday to Me... (and a Giveaway)

Yes, my blog is TWO years old!  Well, technically, the date is tomorrow, but I'll be gone all day, and I can't wait to share :)

I would love to start by sharing a little nibble with all of my wonderful readers - isn't this cake just too yummy-looking?

I WANT this cake!  
(And I don't even like most cakes all that much)
Made by kategreencakes.com,
I think this is the most awesome-looking 

sewing themed cake ever!
When I started this blog I really thought it would be mostly for me - a way to document my projects - but it has grown into so much more, thanks to all of you!   The community that I've developed and expanded, the sewists I've connected with, both via comments & emails and better yet, in person, have enriched my life in ways I hadn't imagined.   Thank you, thank you, thank you all :)  You have given me advice, encouragement, pats on the back, smiles and hugs, and the courage to step into fabulously unknown territories and have fun with it all!

Out of curiosity, I ran through the projects I blogged about in the past year, and came up with some surprising numbers.   I made a total of 28 items (at least that I remember and blogged about) -  not as many as I thought, but not too shabby.     Of those, 11(!!) were self-drafted!   Who knew?  Most of those were pretty simple projects, but still...
Of the rest, 7 were Vogues - 3 Katharine Tiltons, 2 Marcy Tiltons
3 Simplicity
2 Sewing Workshop
and 1 each McCalls, Burda, Style Arc, Au Bonheur, and New Look.

This coming year, I think there will be many more Style Arcs (I have a stash of them, untouched, for heaven's sake!), a lot more Indies, and, I'm sure, a continuation of lots of Vogues.   Another thank you to all of you for presenting your inspirational views of patterns I would probably have overlooked!

Now, as my mundane "Thank You", here's a little giveaway that I hope someone will really appreciate :)
GIVEAWAY GOODIES!  :)

I LOVE this notebook!   It's a spiral-bound 5x8" journal, with graphics by our very own bluemooney at Unzipped.  If you don't win this one, you can get your own (or some fun sewing-related mugs and other goodies, at mooneydesigns.  Robyn is, imho, way too quiet about her graphic design goodies, so I'll do a little horn-tooting for her :)

The other bits in the giveaway are a Clover seam ripper (because really now, WHO can't use another seam ripper?  Hello?) and one of my favorite fabric marking tools, the Clover Chaco Pen Liner.  I like this marker because of the super fine line it makes.   The chalk brushes away very easily (VERY easily - it's not so great at long term markings on fabric that will be handled a lot before you need the mark, but it's perfect when you want a precise, fine line).  And it's refillable too!  Although I've been using mine for at least a year, and it's still a long way from needing a refill.

This giveaway will be open to anyone, anywhere (as long as you get mail delivery!   I think I'm not feeling generous enough to pay for a dogsled expedition to the far North...)

Please leave a comment on this post by Friday, Jan. 18, 5:00pm PST, with some way to contact you (an email listed on your blog is fine).   Depending on the number of posts, I'll use some fair and scientific method of drawing the winner.   My cats are completely unbiased, so perhaps I'll enlist their help....

I'm so excited!  A giveaway!  And I'm the giver!   I hope the recipient is as excited as I am - good luck all!  :D

Thursday, January 10, 2013

My (not so) Little (not so) Black Dress

This is probably as close as I'll ever get to the proverbial Little Black Dress, but it's simple, it's neutral (dark grey/chocolate brown almost black), it's accessorizable, and I think it should take me to a variety of places.  (Ahhh, this brings to mind some very fond memories of reading one of my favorite Dr. Seuss books "Oh, The Places You'll Go!")

The Pattern:  (I'm not sure where this model thinks she's going - she certainly appears to be ready to soar.  Or something...

Lynn Mizono's Vogue 1312.  In spite of being a declared non-dress wearer, I am warming up to the concept and keep finding more dress patterns sneaking onto my cutting table.  This is now my second made dress!   To add to the 2 (sleeveless, very casual, summer frocks) I already own.   Which makes a grand total of 4 in my closet.   I think this makes me rather the odd one out in this dress-sewing crowd!  At any rate,  this one I wanted to make from the moment I saw the pattern!   There was a bit of a drawback in that it calls for nearly 5 yards of fabric, and I didn't have anything suitable in stash of that quantity.  Even finding something I liked that fit in my frugal budget was proving a challenge!  I'm pretty sure that I used something closer to 4 yards in the end.

The Fabric:  The pattern calls for lightweight fabrics - I ended up using something I would call a "winter weight" - quite substantial, and a bit of a concern because of the possibility that it would pull the dress down.  It's a lovely stretch woven - another find from Fabrix -  a burn test was inconclusive, but the important part of it to me is that it feels quite yummy :)  And in the end  it's stable enough that I think it will hold its shape nicely.   I lined the bodice with a stretch Bemberg rayon, which has just a little less stretch than the fashion fabric, and they played well together.

The Fitting:  I muslined the bodice, and ended up doing my usual narrow/sloping/forward shoulder adjustments.  I also thought the neckline was too wide for me, so I added 1/2" all the way round the neck.  This turned out to be perfect.  The muslin (in a woven) wiggled over my head easily enough, so I eliminated the zipper.   If I make another one, in a summery woven (which is very likely!) I will probably fit the bodice a bit more snugly and add the zipper.

I used a very scientific and precise method of tissue fitting to determine the appropriate length, documented in these pictures:
Length of pattern as drawn
Carefully folded up a precise 4" -
the length I decided on
Note about lengthening or shortening the pattern:  The skirt has an upper section and a lower section; the pattern pieces are marked to "lengthen or shorten here" on BOTH the upper and lower sections.  Unless you really want the upper section to be a different length, I strongly advise simply cutting off (or adding to) the length along the hem edge of the bottom pieces.   If you try to adjust both upper and lower, you will end up with pieces that don't match up.  Trust me.  (Dorothy found the same problem in her PR review.)

I'm 5'4" (almost), and I'm happy with the length shortened by 4".

The Process:  This is a well-drafted pattern, and the instructions are clear and easy.  (Yay!)  Everything went together beautifully.    All of the pictures and instructions that one would need are right in the pattern envelope :)

I did take a little side trip when I decided to add pockets - I blogged about my method here in my previous post.

Here's a look at the partially made dress, with the upper portion of the skirt attached to the bodice.    A short skirt lover could stop right here if they wanted!  The lower skirt is simply 4 rectangles sewn together - very easy to shorten the length after it's all put together, if you wanted to wait until that point.


The Results:
The Pose.
Of Course.
One simply must do The Pose.


Because I'm also going to pose like this
on a regular basis.....

Looking Normal.


LOVE me a pocket!!!

The necklace is a creation by Don Pezzano of Urbandon - if you're not familiar with his work, check him out!  Mostly he designs and makes menswear, but his jewelry is unique and amazing!

So, where should I go with my version of the LBD?

Next up:  A 'should-probably-have-my-head-examined' project - something I made once and  sweated blood and tears over, and in the end get very little (if any) wear out of....and I'm doing it again?   Yes, yes I am.   To be revealed....

Tuesday, January 8, 2013

Side Seam Pocket Tute (for me. and maybe you.)

This is really more of a self-indulgent tutorial than it is a tute that may (or may not) actually be helpful to anyone but me.

Truth is, I'm a pocket addict.  I must have my pockets.     I may or may not actually put anything in said pocket, but it's my little security blanket anyway.  This means I often want to add a pocket to a pattern that doesn't have one.   In so doing, I often end up re-inventing the wheel as I try to remember how to do it.   I say to myself "Self, you've done this enough, you know what to do".   I draw out a new pocket template to match my pattern, dive in.....

....and realize after a seam or two that I've done it all wrong and wonky.

So I unpick what I've done, tuck my tail between my legs, and go off in search of a pattern to guide me.

This time, I decided to document how I did it in my newest project, so here's my little reminder to myself of how it's done.  Maybe one or two of you will find it helpful as well :).

1.  Draw pocket pattern/template.   Upper edge should match a seam (like the waist) for stability.


2.  Mark the area where you want the opening of the pocket to be.


3.  Trim, press, and understitch.


4.  Stitch long, curved edge of pocket pieces together.


5.  Baste pocket to front.

6.  The last step is to add the back of the skirt (or pants).  Mark the top and bottom of the pocket opening on your seam.  The back, front, and pocket seams are all sewn together at once, along the side seams; pull the front of the pocket out of the way as you stitch by it,  leaving the pocket opening free.   To clarify, the BACK of the pocket is stitched to the BACK of the skirt, all the way from top to bottom of the seam.  The FRONT of the pocket and the front of the skirt are stitched to the back of the skirt above and below the pocket opening.   Hope this is clear!

The finished project will be revealed soon!

Wednesday, January 2, 2013

Habit Shifting Continued - it's about that Fabric....

November and December slipped by with no habit-shifting promises.   I barely spent time in the sewing room, so it was hardly fair to try altering a habit for 21 days when 21 days of being in the sewing room didn't even exist!

On the positive front, when I was sewing, my promised new habits during the previous months (putting away scissors and thread, keeping current and upcoming project patterns tidy in their designated box, and snipping my threads as they happen) have ALL been successful - I'm really doing it!  :).   Not only that, but practicing these habits seems to have spilled over onto other areas, more consciously being tidy, not only in the sewing room, but other areas of my life.   Nice.  :)

After a bit of internal debate over what January's new habit should be, I decided I should go with the one that will have the most impact.

Fabric.

All. That. Fabric.

Some might say I have too much fabric.  You would be wrong.  I don't have enough space to store the fabric I have!   That's the problem, and that's my story.

That said, I AM on something of a fabric-buying diet.   Although, admittedly, if finances weren't a bit of an issue, I wouldn't be controlling the fabric acquisition as much.  Yeah, so I'm a fabric addict.  I admit it.

But still, there IS this little problem of how it seems to constantly expand and take over valuable, formerly usable space.

Which brings me back to the habit-shifting issue.

I hereby vow, that for the month of January, I will neatly fold up every piece of fabric that gets pulled out and fondled, for one reason or another.  I will do this at the end of every sewing day, before I leave the room.  If there is no bin or drawer to put the fabric in, I will at least stack it up. I do have a designated stacking area.  Or two.  Maybe three...or four.   It needs to be whittled back to ONE!   OK, maybe 2 - the fabric that isn't being considered at the moment, but has no home yet, and the fabric that is being interviewed for an upcoming project.  And in the meantime, I will create other areas in the house (I do have ideas) to neatly store fabric in categories (bustles, sweaters-to-be-repurposed, etc.)

How about you?   Have you made and succeeded at your monthly habit-shifting promises?  I swear, there is something HIGHLY effective at taking one small action and consciously paying attention to what you're doing, shifting it into a new action for 21 days.

And it's a New Year - what better time to start, if you haven't already?   A friend recently used the phrase "Happy New You" - I like it, so to all my blog-reading friends, here's to a

Happy New You!  

Tuesday, January 1, 2013

Don't Toss Those Old Crappy Zippers! (Flower Tutorial)

I love playing with zippers as embellishment, and even have a bagful of vintage garage sale zips, so making one of those rather ubiquitous zipper flowers has been on my list for awhile.  Now that I've actually made one, I'm guessing the trend will be over soon, so follow this tute at your own (non-trendy) risk.....

I found a few tutes on YouTube, but they all showed these pretty little symmetrical petals, or a simple circle with the zip just wound around and around itself.  I wanted something a bit more organic and wilder looking, so I just struck out on my own.

What you need:

  • Zipper - I like the old metal teeth, but a colorful plastic zip has its place :)
  • Non-fraying backing - I used a piece of fleece, cut in a circle.
  • Scissors (natch)
  • Needle & Thread (of course)


I started with an outer "petal" - I simply made a loop, and anchored it in place on my backing fabric with a couple of stitches:

I continued making petals with randomly sized and placed loops, anchoring each one in place with a stitch or two:


Several outer petals, stitched in place.   I anchored the thread and cut it:


I then started a tight roll at the other end of the zipper - this will be the center of the flower.:

Adding the zipper pull was an afterthought - it would have been better to start by stitching the pull in place.   You could, of course, add a bead or 3, or some other flower-center-goody.  I also doubled the zip back on itself randomly, rather than just continuing the circular pattern.  Take a stitch every now and then to secure your folds and loops.

Once I had looped and folded and rolled this end of the zipper, I secured it in the center, then made some random stitches pulling the outer petals into wavier shapes.   Each flower you make will look totally different than the others by using this method.  Just like nature intended!  ;-)

Here is the flower stitched on to the hat it was meant for (hat review is here):

You could, of course, use a sturdier backing and make a pin to place wherever you want to wear it.

Pretty simple with a fun result!   Remember:  don't toss those old crappy zippers!

I'm all ears for other creative ways to use up my zipper stash - what have you done with yours?  Or want to do?