I started with the easiest possible step, and just made a muslin of the underdress to check for fit. Thanks to Martha, Seams Well, and Coco, who bravely went before me, I knew that I wanted to lengthen it (by about 2" in my case - on my 5'4" frame? Yes, this is a short dress!) and go with a smaller size than one might think based on measurements - I cut an 8.
Other changes made:
- I eliminated the front opening and it still slips easily over my head.
- I also raised the lower armhole by about 1/2" (even after doing my usual sloping shoulder adjustment, which gives a net result of raising the armhole by almost 1") I did not, however, make a narrow shoulder adjustment - the cut is already fairly narrow.
- I also raised the front neckline by about 1.5".
- After sewing it all together, I discovered that I also needed to take in the side seams, at the armscye, by about 1/2" (for a total of 1" on each side) - I tapered this to nothing about 4" down the side seam. The reviews of the others who made this dress indicate similar issues with the fit around the armscye & bust area. Everything else is a very loose fit, so I cut the rest of it as is, and was happy with the fit.
The next step was figuring out which fabric was going to go where, and what pieces to cut out. I settled down for a session of pattern instruction reading to try to get it to all make sense in my brain. But before getting too bogged down, I hit on a rather brilliant and simple solution (if I do say so myself)! I simply took a picture of all of the pattern pieces on the instruction sheet, enlarged it a bit, cut them all out, labeled them and figured out what went where with my little paper doll pieces. :) That may sound like a lot of work, but it really only took about 10 minutes, and it made everything fall into place so easily! And probably saved at least an hour (or two) of angst and potential mistakes down the line!
 |
| Ahhh, the memories of the paper doll days - did anyone besides me play with paper dolls when you were kids? Or maybe you still do? ;-D |
Not only was it easy to see which pieces were used in which view, and where they fit, but I was able to note my adjustments on each piece, avoiding any cutting errors (thanks for that heads up, Martha!) Tracing the pattern pieces and knowing which fabrics to cut was a piece of cake after that - yay! And only 11 pieces to cut for view B. Although I did draft a couple of pockets as well.
I also eliminated the elastic gathering at the back. Actually, I did install the elastic, even though I questioned whether I was going to like it - sure enough, I did NOT like the extra pouf it gave to my backside, so I removed it. All 4 pieces of elastic. Installed using the zig-zaggy lightning stitch. *sigh* Luckily, it was another of the gorgeous days we've been having, and I was able to do my unpicking while sitting on the front porch in perfect outside light, watching the peaches grow :). I was also lucky in that the unpicked stitches didn't show on the fabric at all!
I shopped my stash for this one, and found two pieces of linen, and some batik cotton - I never would have shopped specifically for a combo like this - the magic that can happen when you're searching for a match in stash is such a happy thing at times! :)
Laying out the chosen pieces:
(I did see something I wanted to change when I did this -
I dumped the small brown square in the back,
replacing it with a piece of the batik)
In this view, the entire underdress (the silvery/grey linen) is one long piece, extending from neckline to the lower hem. The other two views have a shorter underdress, with extra layers of skirt attached. The grey pieces in the bodice are actually part of the overdress - the bodice and the upper skirt are two layers of fabric.
Sewing everything together went very smoothly - the pieces are perfectly drafted, and fit together beautifully. The instructions are very clear - good job done on this one by Katherine and Butterick!
Surely y'all know by now that I loves me my pockets, and this dress, in its casualness, just screamed out for pockets to me. The pattern has these quirky little gaps in the seams between the bodice and the skirt, so I added one small pocket inside one of the gaps:
I did this by stitching up a simple patch pocket, attaching the top of the pocket to the overskirt, then lining it up and patching the 3 lower edges to the underdress.
I also added a pocket at the side seam, using a similar process. I left an opening in the side seam of the overskirt, and attached the pocket opening to the front piece of the overskirt, and patched the rest of the pocket on to the underdress. A bit unconventional, but I do have functioning pockets!
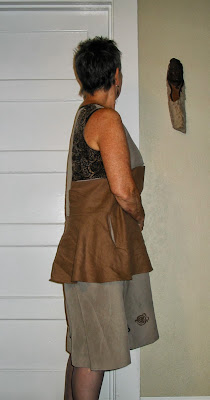
You can see the opening of the pocket in this shot.
You also get a sense of the line of the back without the elastic gathering.
It still has a bit of "flounce", but not as extreme as it was with the elastic gathers.
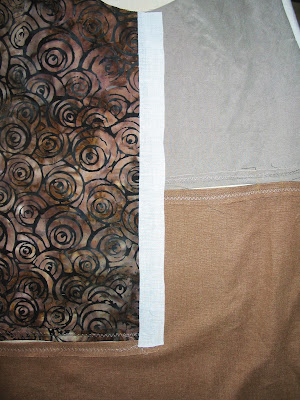
Another change I made was to eliminate the center front opening and buttonholes - the dress slips on easily without buttons, and I'm all for simplifying, especially when it comes to eliminating the full-on plackets and buttonholes! Unfortunately, I didn't think this through when I was cutting the overdress pieces of the bodice - they meet in the center without overlapping, and then you add the center band for the buttons and buttonholes. This meant that I ended up with no seam allowances at the center front!
My solution was to butt the edges together, lay fusible interfacing over them, and then zig zag over the butted seam.
Finished, with buttonhole-less buttons :)
Oh, one other change - the pattern calls for a neck facing;
I made a binding instead.
Styled two ways (and worn both ways the same day I finished it!
(I should probably also mention that, given the linen fabric, I do look
a bit rumpled after being out and about for a few hours.)
The funky, edgy look:
And the more casual look:
Oh yes - the border print bits on the bottom are Marcy Tilton silk screens. I'm thinking of adding just a couple more, so the dress isn't completely finished yet.
Bottom Line? I like this pattern WAY more than I thought I would! I can see it in a much lighter-weight fabric, maybe even a sheer overlay, and I can also see it with sleeves as more of a winter-weight dress. It's definitely a winner in the comfy-casual category, especially given the wide array of creative options inherent in the design. Thumbs way up!
And yes....I think it's true....in spite of the better part of a lifetime declaring myself a non-dress person....I do believe I'm turning into a lover of dresses! The times, they are a-changing....


25 comments:
Your new dress looks great Jilly! What is the pattern number?
Whoops! Butterick 5881 - added to the review now, thanks!
Oh, that was quick! thank you :) Butterick how interesting, I assumed it was a Vogue pattern for some reason.
Katherine just moved from Vogue over to Butterick, for some reason. I think maybe Butterick is upping their image a bit lol!
Love...LOVE it! YOu did it again, you added your own spin and made enviable art.
Well, I'm glad that you are coming over to the dress side of the fence as they look great on you.
This is the third version that I've seen of this dress and the versions just keep getting cuter and cuter! Love the stenciling around the hem.
Oh, I do love your version, Jilly! It's so you. In fact, I must confess - I like yours better than mine. It's more refined and funky. A difficult combination!
Adborable! - You. The dress is really cute too.
This is awesome! I love the screening, the colors you chose, and the length. NIce work Jillian :-)
Great version of this pattern!
The dress is darling, and so YOU! Love the color blocking and details at the hem.
You look fabulous in this! Love it with the boots! I really like your fabric choices and the silk screens really set off the hemline as well. I'm not usually much of a dress person, but you guys are definitely making me think twice about that with all the lovely renditions of the recent Tilton dress patterns. (of course, I've bought most all of these Tilton dress patterns, even though I say I'm not into dresses . . . .)
So cute, Jillian!! I love your collaging and the silk screening at the hem is the perfect touch. Love!
Very cute, loos forward to trying this myself....
This really looks good on you -- even from the side (I'm not brave enough to show a side view:)! I love the fabric choices you made.
Such a great dress! I love the screened embellishments and the fabric combinations you chose. So glad I got this pattern too! I would definitely not call it an easy one though. Not with its asymmetrical style and many odd pieces. Thanks so much for the tips.
Another great garment from you! Rated Easy? I always avoided things which claimed "so easy a child could do it".
I lived for paper dolls, even making tons of paper clothes for them, then coloring the clothes.
They rated that EASY? You are a champion and creative thinker with your doll pieces. Brilliant solution with the help of a friend. This final piece looks awesome on you and it was definitely worth the effort. Dresses are your friend, absolutely.
LOVE your dress, Jilly! This pattern really is a blast :-) and you used one of my fav batiks of all time, looks great with your solids. Nice!
I did the same thing - I was much more interested in paper dolls than I was with doll dolls. Except for my Barbie - making clothes for her was way more fun than dressing baby dolls lol
Such a clever idea for organizing the pieces! Thinking time before sewing makes such a difference and your dress is a WOW! I'll bet you have more ideas for future versions too once you get out among your public and they give you raves!
Fantastic project -- I love the way you tackled it, the fabric choices you made, and all of your extra design features. Thanks for showing us!
Ah yes, paper dolls! Did you play with the ones with little tabs at the shoulders to hang the dresses?
Your dress looks such fun and well worth the extra time and pieces!
Wow! This looks great! I love your added pockets!
Jilly, I do not know if this is how to reach you. I have seen your completed Koos Van Den Akker skirt made with pattern V2791. I read your post avidly and tried to follow the hints you have given to complete this skirt. But alas I am at a loss. If you would care to help me out you can reach me at my email: judysalb@gmail.com. I am in a pickle with the last few steps. My brain cannot wrap itself around the geometry of this pattern.
Regards, Judy Salb
Post a Comment