The stuff of life has left me rather stitchless and blogless for the past couple of weeks, but I finally had some sewing time the last 3 days, and I dove head first into Style Arc Land! Three patterns down, and more to come...
 |
| Island Ali Top |
- Fantastic, personal customer service. If you aren't sure what size to order (the patterns are one size only, not multi-sized, so you need to order the right size) just e-mail your measurements to Chloe & she'll help you out.
- Really well-drafted patterns, with RTW fit
- Great style!
- Patterns printed on heavy white paper (or even heavier card stock)
- You get one FREE pattern with every order
- Fresh new patterns are available every month.
- Sparse - REALLY sparse, instructions (Side Note: I understand that they are now adding more detailed instructions, with drawings - Yay!) (Side-by-Side Note: I emailed Chloe with some comments & questions about the instructions, and received a delightful & timely response, with examples of the new instructions. Great News! They are REALLY listening to the concerns, and are not only making an effort to include wonderfully detailed instructions, with illustrations, but they will be going back over their older patterns & updating the instructions on them, as time allows) Actually, this is the only 'not-so-good' I've found so far. Oh no wait, one more, but it really has nothing to do with Style Arc, per se...
- The patterns are relatively heavy (see above), and postage from Australia can really make you blink fast & think twice about how much you're spending!
Bottom Line:
- Style Arc is a pattern company that deserves to succeed. With patterns as stylish and well-drafted as theirs, and the passion for serving the sewing community they exhibit, they just flat out rock!
Back to Island Ali: This top is really a pretty easy one to sew up, but I spent a ridiculous amount of time figuring out the little details that weren't in the instructions. Some of the instructions are written on the short instruction notes, some of them are on the pattern pieces themselves (so you need to keep the pieces handy while sewing), and some are left to your own imagination, or experience.
Here's the top:
 |
| Cute, eh? |
Step 1. is "Lay pattern on fabric and cut" Really? With everything you leave out, you had to include that one? Sorry, I'm being snitty. I LOVE this company, I really do, and I will definitely be ordering more patterns (probably many more), but there were so many OTHER steps I wish you would have included instead of this one!
Step 2. is sewing the shoulder seams. Yup - logical & in total agreement here. I did stabilize the seam with Stay Tape, as I always do with knits, but that isn't a step I expect the pattern maker to include.
Step 3. is sewing on the neck band. I have only minor comments on this - the instructions say "Fold the neck bind in half and join and then stitch to the neck, turn inward to the wrong side of body and top stitch down with a 1/4 inch stitch". Now, if you're really trying to follow instructions, this befuddles me a bit - if you have any experience sewing bindings, it's no problem....just do it your way, but if you're a beginner....well, I would be lost already. Maybe it's just me (I do like my pictures guiding me!) I stitched the ends of the binding together, and then folded & pressed it, so that the seam is totally enclosed. A tiny little detail that COULD be written is "sew the binding to the Right Side of the neck, then turn inward" I know, I know, it's a niggly little thing, & it does become clear when you read on, but still.....I'm just being all anal & detail-oriented here, so bear with me!
At this point I thought there was a lot of bulk at the seam line, so I pinked the raw edge before turning it.
 |
| Binding Pinned in place |
 |
| Edge pinked, and excess fabric snipped away from seam crossings |
You now have a binding that's about 1/2" wide - if you top stitch at 1/4" (which is where I thought it best) you have quite a bit of extra fabric between the stitch line and the fold of the binding. I would cut the binding a bit narrower next time (yes, there will be a next time - I do love this top!)

Moving on to Step 4. "Edge stitch the outer flounce edge." I thought about this one, & read through the rest of the instructions, & realized that this was the only finish given for the hemline edge of the sleeve/flounce. I decided to go ahead & edge stitch it (at 1/4" - this line is indicated on the pattern piece) & deal with the hem later. This was my first mistake, but only because the pointed ends of the flounce are enclosed in the side seams, so any hemming needs to be hand stitched at those points. You're better off, for a nicely finished look, to do any hemming at this point. Later on, I did a rolled hem with my Featherweight, pictured below:
 |
| I hadn't used my rolled hem foot on a knit before, but I was happy with the way it turned out. When you do a rolled hem with one of these vintage feet on a bias cut, or curves, it can easily go wonky & wavey on you, but with the knit fabric, and on a flounce than can handle a bit of waviness, it actually worked quite well! :) |
Step 5. "Stitch the flounce to the front body starting at the waist...." (bold added by me) This was my second mistake. The waist referred to here is indicated on the pattern piece, and it is NOT the waist seam (where you join the skirt to the body of the top & add elastic....which is going to sit at your waist.....) I stitched the flounce on from the bottom of the front to the bottom of the back, where the elastic seam would be. Not a big deal in the long run, but the look would definitely be more refined if the flounce started and ended where the pattern marks indicate it should.
Really, I do rather like having the seam allowances marked on the pattern pieces, but could we have a little mention in the body of the instructions when you're supposed to match up some notches that are not otherwise obvious? Thank you. (again...hope I'm not sounding like a grinchy bitch here...really, truly, I DO love these patterns!) Mostly, I'm making notes for my future sewing of this, and hoping to help any other sewists (particularly novices) avoid the mistakes I made.
Steps 6, 7 & 8 are about joining the side panels, the front & back body pieces, & the flounces, then attaching the skirt pieces. All pretty clearly written...no issues here (*whew*) :) Oh wait! I remembered another point - the underarm edge (which is at the top of the side panels) is left raw. If you want any sort of finish on it, do so before you attach the side pieces to the front piece.
Step 9. is "Cut and join the elastic to your measurement and stitch to the waist/hip seam" Maybe they mean to stitch the elastic directly to the fabric, or maybe they just expect you to do it your own way... I dunno. But I don't care for elastic that isn't actually inserted inside a casing, unless it's underwear (& even that is questionable)...maybe that's just me...at any rate, this is what I did:
 |
| Cut a strip of fabric 3/4" wide (the elastic is 1/4") & sewed one side to the seam that joins the body to the skirt. I then trimmed the seam close to the stitch line. |
 |
| I folded the casing along the stitch line, up towards front & back pieces, & stitched the other side of the casing (leaving the top edge raw) I then inserted the elastic in the casing. |
 |
| This shows the casing, side seams, and the bottom of the skirt with a rolled edge hem. Note: I didn't like the waviness of the rolled edge at the bottom, so I ended up turning the bottom hem up & straight stitching a hem. |
There is no mention about hemming the bottom, or any more finishing on the flounce edges. If you look at the drawings, you can see topstitching indicated along the side front & back seams - no mention of this anywhere in the instructions. (I didn't do it on this top, but it could be a nice look).
One change that I plan to make next time is to cut FOUR sleeve/flounces so that I can line them. I'll join them RS together, turn & top stitch the outer edge. Since the inside of the sleeve is visible, this would give a nice, finished look & you won't need to deal with that exposed edge/hem.
One change that I plan to make next time is to cut FOUR sleeve/flounces so that I can line them. I'll join them RS together, turn & top stitch the outer edge. Since the inside of the sleeve is visible, this would give a nice, finished look & you won't need to deal with that exposed edge/hem.
I think that's it.... hope my notes are helpful to anyone else wanting to try this top - I really think it's worth it, and it's actually a pretty quick & easy top to make, once you know what you're doing!
The results:

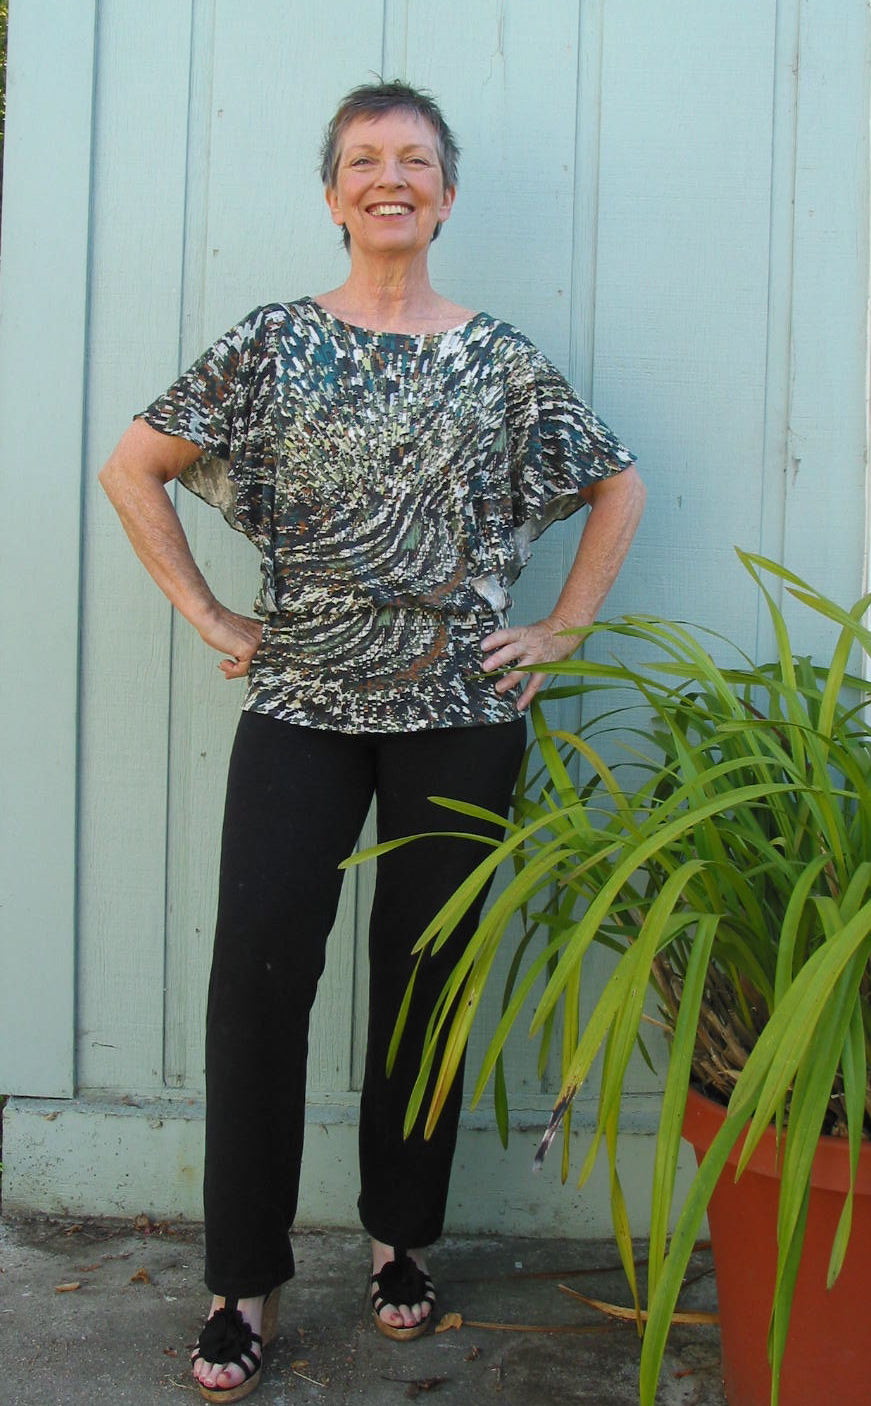
I tried it tucked in & belted. The lighting is poor on this shot, but I think the look works just as well as worn loose. I actually also played with hiking the shirt up so the the elastic rides higher on the body, and that was a good look too, so there are wearing options here!

Next up (when I get some pics taken): the Style Arc Fabulous Freda, and the Bali Bindi top
14 comments:
Love it! I've been undecided whether to buy this pattern for my daughter or not. I'll definitely be buying it now. :) Thanks for all the details and things to watch for.
Hi, love your top and fabric choice, it looks great. I'm on a roll with StyleArc too and have just finished 3 versions of the Creative Cate top (the free pattern with my order)... the Emma cowl neck dress is next in line.
Just beautiful on you. Thanks for the tips on making the elastic waist casing. I agree, elastic raw on the skin generally doesn't feel nice, or look finished. Your top looks fantastic!
Love your fabric choice for this one, JillyBe. The print seems to flow with the style, and both flatter you. You're rockin' it, girlfriend!
This looks great on you, JillyBe! Really great! I like it better than the drawing. :)
Thanks everyone! I've been wearing the top all evening & it feels sooooo good on :)
shams I have you to thank for the fabric! I was working in the City after you reported that Fabrix had a huge load of knits in, so I checked them out - this was one of the $3 or $4/yd pieces that went into the (large) bag I left with. :)
What a lovely top. It's a pleasure to read this extensive post on construction, really informative.
I love your results, and your thorough dissection of the pattern and instructions is very helpful. I really must learn to master the rolled hem foot on my Featherweight. There are cases, like this, where it is just the ticket.
Turned out great. Shame about the instructions-I hope they have seen your suggestions! I like the sound of card patterns- much better than those pesky paper ones- (although I transfer mine to cheap card immediately)
Your top turned out to be fabulous. It is frustrating to have to disect instructions. A person actually has to know how to sew, to be able to follow a pattern. It's backwards! Especially with foreign patterns. I love HotPatterns, but their instructions drive me crazy sometimes.
Thank you Rosesred - I've learned SO much from helpful folks in this community; it's nice if I can be informative in return :)
Andrea DO play with that rolled hem foot! I'll really try to see if I can get a video tute done.....one of these days.....promise!
Don the Style Arc folks are VERY responsive. They're fabulous pattern-makers, but they worked in the industry for years, and this company is still pretty young, so they are learning about what the home sewer wants. They're changing all of their instruction sheets & I really want to support them!
Thank you gwen - you are so right about needing to know what you're doing before trying to do it lol!
I am intersected in these patterns. They are modern andlookmeasy to wear. I like your top
Yikes my ipad corrected all my typing! Sorry for those misspellings.
This top and fabric choice looks great on you. Very stylish. Thanks for the detailed review really helps.
Post a Comment