It's about exploring and sharing my creative adventures (mostly sewing these days) ~
~those activities that sometimes obsess, usually inspire, occasionally frustrate
~and always provide a delightful maze to wander through.
Showing posts with label welt pockets. Show all posts

Sunday, June 5, 2011

Welt Pockets Phase Four - The Curved Single Welt - (an Eye-glazing Tutorial)

There is this UFO that's been living in my sewing room for, um...let's just say over a year now.  More about that later, because I'm just going to jump right into the welt pocket.  This UFO would be the jacket that got me started on experimenting with welts, studying, practicing....even feeling pretty good about them!

Until I decided that what said UFO (Decades of Style Tulip Jacket) really wanted was a curved welt.  I had the vision, I knew exactly what I wanted....and I wasn't finding any good instructions on how to do it, so I put it off, & put if off...... until I couldn't take it anymore and decided I just had to figure it out on my own & do it.

Three practice welts and three days later (and more than 3 new grey hairs) I have my pocket!!!!  I'll take you on my journey, but I warn you, this is not for the faint of heart, I cannot in all good faith recommend that you try this at home (I think there's a reason I couldn't find any instructions on how to do it...), & if most welt pocket instructions make your eyes glaze over (like they do mine) then, well....just don't say I didn't warn you...

This is the dress form garment that's been glaring at me for the past several months, wondering just when I'm going to dust it off & finish it:
That's the general shape of the welt, pinned on, that my mind's eye saw as a beautifully finished curve.   A single welt, no visible pocket seams, unconnected to any other seams, just a bag pocket.  Is that so much to ask?    Well.  The closest instructions I found for what I wanted to do (except for the curve...I was flying blind on that part) were from Judy Barlup - her welt instructions are here, and  here are my three posts detailing my prior experience using her method, Anna Zapp's method, and Ann of Gorgeous Thing's method..

I knew I'd need to make a practice pocket.   Or two.   Or three.   And in the process, I ended up realizing that I needed to make notes.   Copious, detailed notes, with accompanying drawings.   I did this, and I STILL ended up finding & making new mistakes every step of the way!   I did not get the engineering gene that allows you to automatically see that Tab A does not fit into Slot B without first sliding it through Slash C, backwards and upside down.   And for all of you who DO get that, my hat's off to you.  Seriously.  Who knew that an engineering degree would be helpful in pattern drafting?  Silly me.... I always thought all you had to do was drape!

Anyway, back to the welt....  After my first disastrous attempt, using practice scraps, I thought I had sort of a handle on what I'd done wrong & decided to use scraps of of my fashion fabric.   Here are the pattern pieces, which, amazingly enough, actually ended up being not too far off for the final results.
Step 1.  Make up your pattern & practice (prefereably on scraps of your fashion fabric):

I'll just skip how many times I interfaced the wrong side of the welt, & stitched up the wrong edge (see my notes on the pattern piece that makes it very clear which side to stitch, & which side to leave open?)   I was so pleased with myself once I finally figured that out.

2.  Interface Welt (if necessary, and sew together, leaving the bottom edge unstitched.  Press and turn and press some more.
FINALLY, I had the welt stitched up to be facing the right direction, ready to go....

And then another botched attempt before the AHA!!! moment finally kicked in, & I realized that I had to be matching an outside curve to an inside curve!   Yeesh.   Getting to that realization was MUCH harder than actually doing it!   By now I'd completed most of the practice pocket & figured I was ready to make it work on the real thing.   Every step that follows was checked, triple checked, hand basted, and machine basted, before doing the actual stitching.

3. Sew Welt onto Pocket.  (Or, in this case, Pin, then hand baste, then sew).
Outside curve of welt pinned to inside curve of outer pocket  (yeah, there's the outer pocket, the inner pocket, the outside curves, the inside curves, the pocket facing, the wrong side/right side of everything.....are you still with me?):

4.  Determine your stitching line on fashion fabric (FF), Interface Wrong Side of FF where the welt will go, baste pocket & welt onto fashion fabric.
I thread stitched the placement line onto the jacket (Note:  the welt has been basted on to the outer pocket, in this picture it's the LOWER edge of the welt, already stitched to the pocket, that's going to be stitched onto the jacket):

5.  Baste & Stitch the pocket & welt onto the FF.
Welt & pocket basted onto the jacket (again, matching outer and inner curves):

Since everything is being done upside down & backwards (literally!!!) I actually pressed the welt into its final form....just to be sure.....    Seriously, with all the potential for mistakes, triple checking everything for accuracy was crucial!  ::whew::: it's looking OK so far.

6.  Place WS of Pocket facing on the RS of the Inner Pocket.  Stitch the lower edge of the facing onto the pocket. 

7.  Butt the tops of both pocket pieces up against each other, with the Pocket Facing next to the FF.
In this case, we have (of course!) one more inner/outer curve to match & sew:
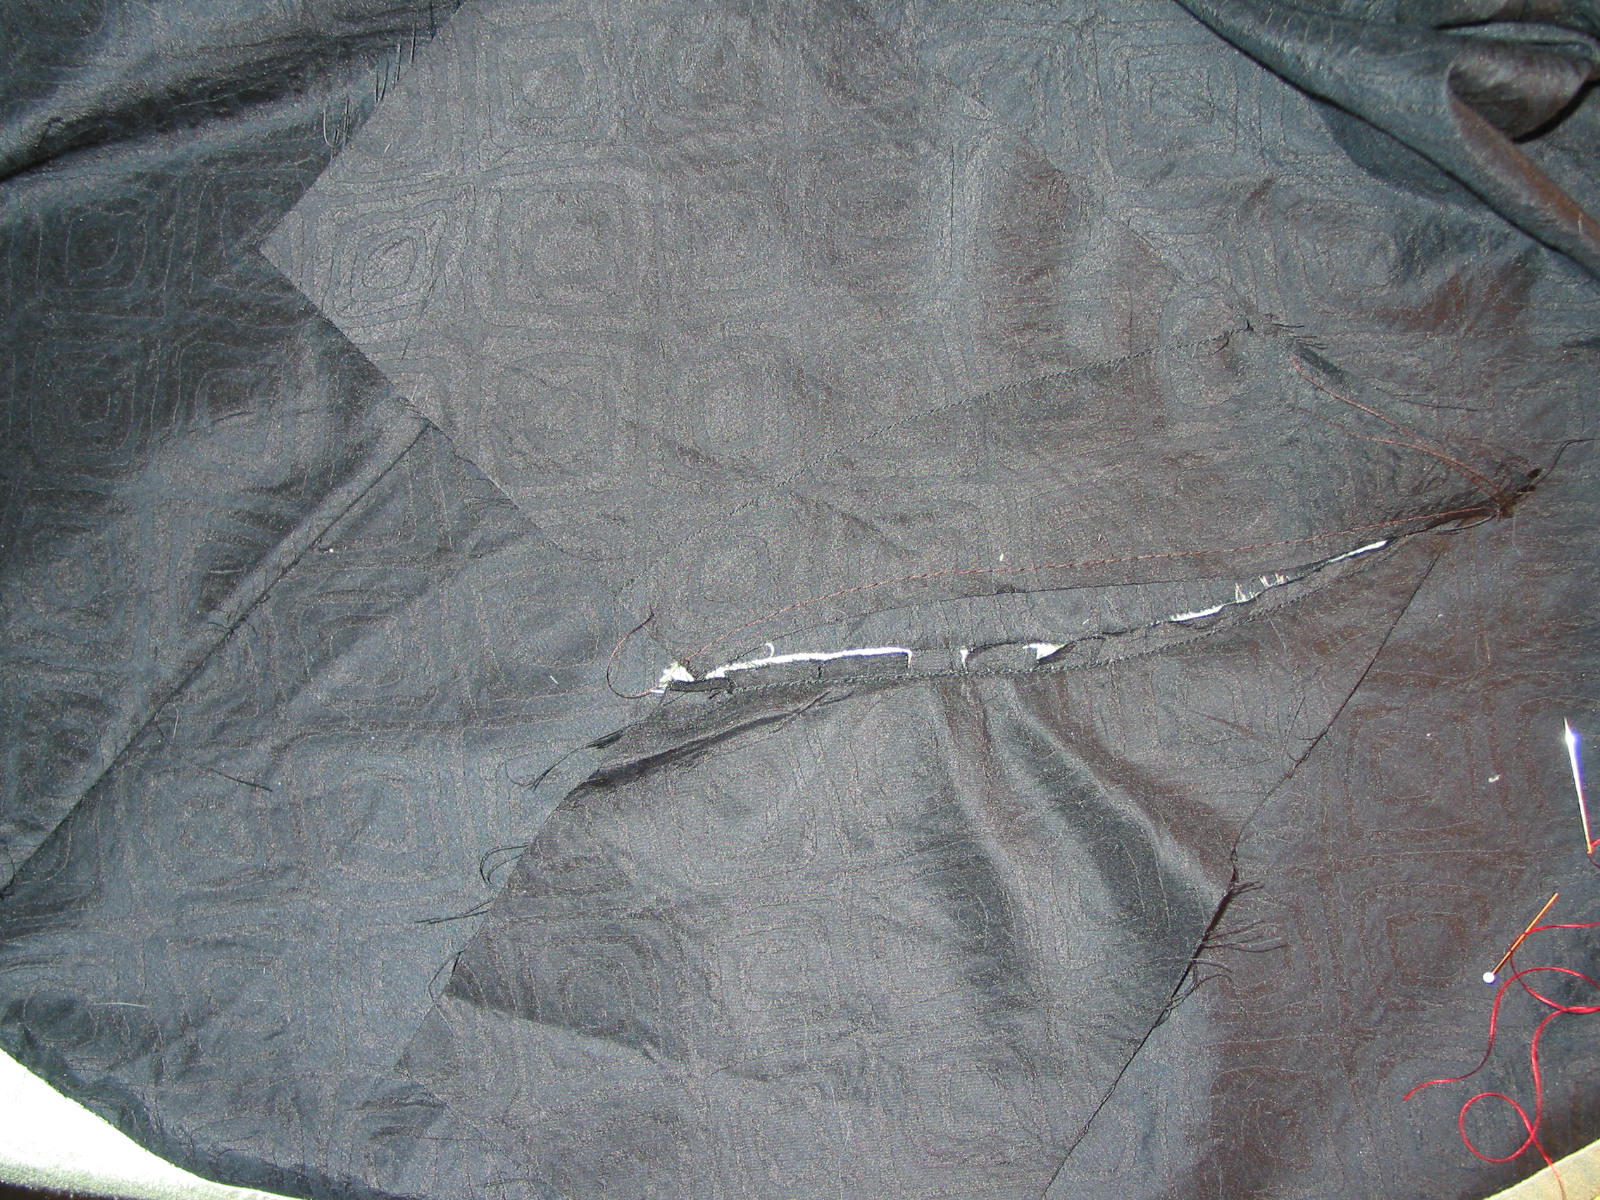
8.    Baste, then sew, the Inner Bag to the FF.  (Have I mentioned yet that you should still be double & triple checking your placement with every step?)

9.  Mark the edges of your stitch lines, in order to know where to (gulp!) slash your FF.   I am NOT giving details on exactly where to end your stitching lines, & where & how to slash.   This is detailed beautifully in Judy's directions (linking above) & most other welt tutorials as well.   And I had to fidget & fuss & fret & fine tune this several times (due to the curves & points & oddities of my particular peculiar vision here...*rolls eyes*....)  
One Important Note!   Make sure that your welt, when folded up & in place, covers the stitching line you just made on the inner pocket!   If it doesn't, adjust something.   Hey, I was definitely flying by the seat of my pants at this point!   (& where did that silly saying come from???)

10.   And now.....(have I mentioned that you really really really need to have everything triple checked here?), it's time to Slash Your Fabric.    It was late at this point, & was, as mentioned, doing all sorts of little futzy fine tuning trying to get everything to lay flat & work together, so pictures at this point were sort of meaningless.   You slash, you clip your corners to the end of the stitching, you fold over your V's, you make sure everything is reinforced.......trust me, (if you're still with me), you will have already studied or done this on straight forward, rectangular welts, and you don't need to see the gory details of how I muddled through this!

And.....ta DAH!!!   This finished product!!!!  It is less than stellar, and like an aging beauty queen, the harsh artificial lights show every wrinkle & pucker (yes indeed, I did end up with the dreaded corner puckers...*sigh*), and I think I need to redo that topstitching on the end,  but from just a bit of a distance, and in context with the rest of the jacket,  it looks ...dare I say it... fantastic!   

Bottom Line?  Would I do this again....mmmmmmmmmaybe.  Sort of.  Definitely I would do an odd shaped welt, but I think I'd leave the shaping to the top edge of the welt only, & just use a straight line for the bottom edge & slash.  & avoid sharp points.   By the way, odd shaped welts surrounding a straight slash; i.e., double welts, where you can see the inside portion of the welt - not a problem!   In this case, it was the single welt without a visible opening, and a curved opening, and the pointy point, that created the problems.   At least for me.   Maybe, if you have that engineering degree........

At any rate, that's enough for one post.  Next up is the finished Jacket - Yay!!!!!

Wednesday, February 16, 2011

Welt Pocket Construction Methods - Phase Three (Judy Barlup & other general notes about Welts)

I'll start with some short notes on what I've learned so far, a.k.a. "Welt Pockets for Dummies", or "Welts 101".  The welt is the strip of fabric that is attached to the slit that forms the pocket opening.  The welts formed by the previous two methods are really designed to be pocket openings in an area where the pocket bag is held in place & stabilized by a waistline, or side seam, like you would find in trousers.  Judy Barlup's method involves attaching the pocket bag during the welt construction, and the bag is firmly attached to the welt opening itself - so this is more suited to a jacket or other garment where there is no waistline or side seam to stabilize the pocket bag.   Nope, I didn't realize this when I started, and none of my reference materials had the Dummies opening paragraph....I hope I'm not the only sewer around who dove into welts with so little knowledge, and that my little 101 paragraph will be helpful to some kindred souls.....

Onward now, to the third version.  (And yes, I did again peek at the Vogue book, and my old Singer book.   And again, my eyes glazed over & my brain started getting fuzzy, so I put the books down & just replaced them back in the bookshelf this time.)

I wanted to try Judy Barlup's method - another rather complicated method, but it promises less bulk because there are no seams at the edges of the welt.   Judy Barlup welt pocket tutorial

I'll start right off with a pic of the finished pocket, since there aren't any actual photos in the tutorial, and I wasn't clear about what I would end up with.  This is actually a single welt pocket, with some topstitching showing on the outside.  It is necessary to construct and install the pocket bag during the welt construction.    This phase is very picture heavy, and is sort of a companion to Judy's tutorial.   What I've added is a way to make your own welt pattern based on the size you want.   What I've left out is a lot of the fine tuning details of the actual construction, or else I'd be typing all night.   And I'm too lazy.

Note:  This welt is over an inch high, & 5" wide, so the balance is off, IMHO.   But hey, it's just a practice piece!

This is a step by step tute on making the pattern for your a welt, using whatever measurements you want.   I used a 5" x 1" welt, just because that's the size I used for the other welts I made, although this one is halved like the others were. 

1.  Draw a rectangle, using the measurements for your finished welt.  Extend the lower line by a couple of inches in both directions.  (No need to be exact on any of the extended lines)


 2.  Draw a 45° line at each of the top corners of the welt, extending to the base line, and extending upward a bit.

3.  Draw a line parallel to the your long welt sides, the same width as your welt (1" in this case)

4.  Add your seam allowances.  Here I used Judy's suggestions, but it actually messed me up a bit later.  I would suggest being consistent all the way around.

Finished Pattern.  You will need to cut a piece of interfacing the size of the welt area.  (Barlup calls for interfacing the SA below the welt as well...I don't know why this would be necessary; it just adds bulk, imho). Note the cut off corners at the bottom, and the dotted fold lines.   This is where it's helpful to have your SA's all the same - the dotted fold lines need to intersect the corners of the welt, and if your clipped corners match up to the top line when the piece is folded, it's easier to know that the fold is in the correct place.

I cut the pocket bag pieces, according to Judy's suggestions.   The Stay & the Facing are 2" wide, and the width (i.e., the long side) of your welt plus 1-1/2".    The pocket bags are also the width of the welt plus 1-1/2".   The depth of the bags are up to you, but the Outer Bag will be about 1" shorter than the Inner Bag.   (Note:  I ended up using silk organza for the Stay instead of a thicker fabric, as suggested)

Welt, interfaced, with fold lines showing.

Flipped over, folded & pressed.

Open edges stitched, 1/4" from edge  (this is assuming 1/4" Seam Allowances)

Press this seam open, using a point presser.  (Don't skip this step!)

Turn open, & press.

Mark the pocket placement line on your garment, and pin the Stay to the wrong side.  Mark your stitching line on the back side of the welt.   (Note:  See the two lines on the welt?  Judy suggests bowing the center of the stitching line just a bit away from the folded edge, because even a perfectly rectangular welt has the appearance of the ends being wider.  I'm not so sure about this.  I stitched mine on the bow, but I just ended up with a welt that looks wider in the center!   It may be because my welt was so wide in the first place)

Welt stitched in place.  It's definitely a good thing to refer to Judy's instructions from here on out - hers are MUCH more detailed than what I'm writing here; I just have some added visuals.

Outer Bag placed over the welt

Outer Bag stitched on, stitching from the back.

Inner bag (with pocket facing already attached to Inner Bag) butted up against the Outer Bag, ready to stitch.

NOTE:  (Later addition)  Here are Barlup's Step 10 instructions:  With facing right side against garment right side, butt inner pocket bag to outer pocket bag. Stitch through facing and pocket bag 1/4" from edge, beginning and ending about 1/2" shorter than lower row of stitching on outer pocket bag. Backtack at each end. See illustration 10, stitch #5. By making upper row of stitching shorter, seam will not extend beyond the edge of the finished welt.

I got utterly confused here in a later project.  What's missing is  (in blue) With facing right side against garment right side, butt inner pocket bag to outer pocket bag. Edges of bags need to be butted against each other; do NOT sew through outer bag, DO sew through INNER bag.  Stitch through facing and pocket bag and garment 1/4" from edge, beginning and ending about 1/2" shorter than lower row of stitching on outer pocket bag. Backtack at each end. See illustration 10, stitch #5. By making upper row of stitching shorter, seam will not extend beyond the edge of the finished welt.

Bags stitched on, Inner bag & facing folded over.

Now, finally, it's time to cut the fabric!  

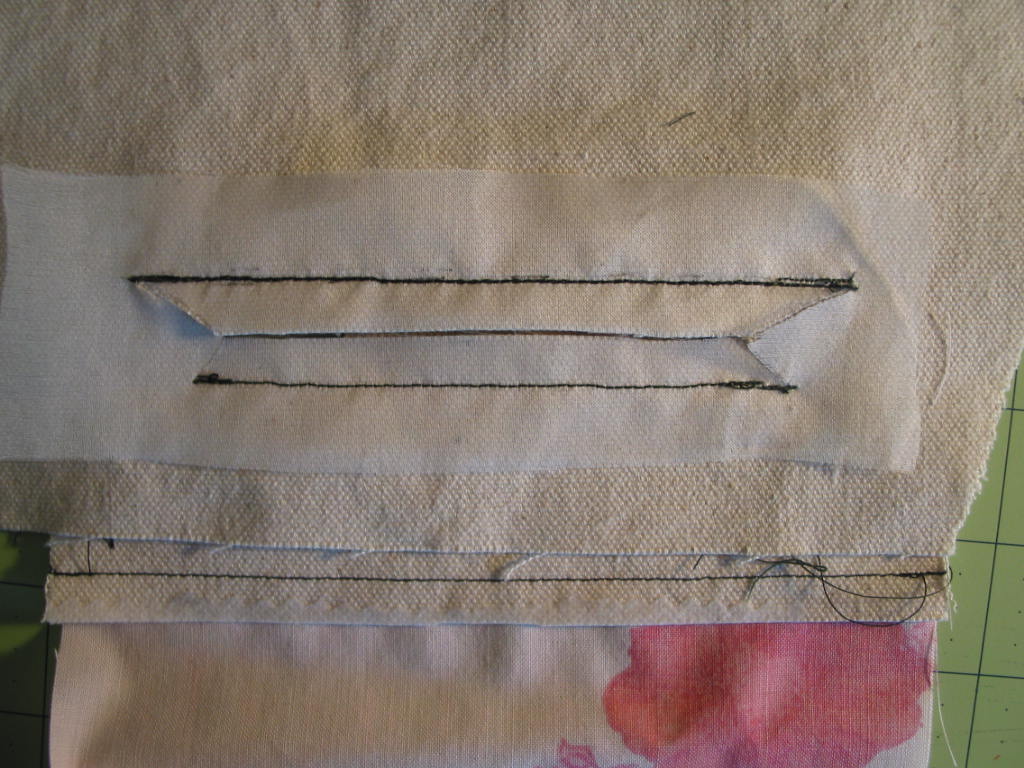
Note that the stitching line on the Inner bag is shorter than the stitching line for the Outer bag & Welt.  When you cut the fabric, the cut will be about 1/2" shorter than the shortest stitching line.  Clip your "V's"  (which 
are lopsided - that's OK) exactly to the end of the stitches.
 

Again, I'm deferring to Judy's instructions for this entire last half....way too many words for me to redo!  If you're still with me, this is just meant as a helpful add on to her tutorial.

Judy wants you to open out the V's & stitch them down on the facing, claiming that this creates less bulk, and that the V's & the stitching will not be seen.   It's sort of true that they won't be seen, but that's only if you don't look under the welt.  I would clip the ends of the V's off a bit to make sure they don't show up.  Also, my stitching here is a bit of a joke....getting tired, it's just a practice welt, yadda yadda......

Now you fold your welt back to the outside, top stitch up & down the ends
and you're ready to stitch up the edges of the pocket bags & be finished!

CONCLUSION

For an all around, good looking, easy to do welt pocket, Anna Zapp's method wins, hands down!  (See the prior post for instructions on this....)

Ann of Gorgeous Things has, imho, definitely improved on the traditional method of creating the opening and then inserting the welts.   Adding the ease of stitching up the center of the welts ahead of time makes things MUCH easier, and I think this method would be great to use in cases where you want to create some unusual shapes, or curves, or you have a patterned fabric that you're being anal about what shows up in the welt, or matching it to the garment fabric.

Judy Barlup's method is very time-consuming, if you don't have your welt pattern made up already for a standard size.   She has a whole different pattern for an angled welt!   Although I tried both a horizontal welt and an angled welt on the other two methods, I had no desire to go through all of that with Barlup's method!   However, if you're working with very bulky fabric, and/or only want a single welt, her method does create less bulk, so it could certainly have its place.    Also, until I find a better method for a jacket pocket (i.e., no waistband or other seams to secure the pocket to), this is certainly a good option.

Next up:  I'll be practicing adding the pocket bag to Zapp's welts, and then it's on to the Real Thing!  (which, btw, happens to be a jacket with an angled opening.....ummmm.......Judy?  I may be practicing your other welt yet!)

Welt Pocket Construction Methods - Phase Two

My second method of trying out welts is from Ann of Gorgeous Things.    I won't copy everything, since she's already done it so beautifully here:  Gorgeous Things Welt Pocket Tutorial

My first welt is made following her instructions.   On the second one, I tried a slightly different technique, with much better results!

I thought that marking the lines on the fusible interfacing, not the fabric, was brilliant!  Fusible interfacing is pressed on the wrong side, (with pinked edges), and organza, the same size as the interfacing, is pinned onto the outside.

All 4 edges stitched, through all layers (interfacing, fabric, and organza), using tiny stitches on the corners & ends, longer stitches on the long edges.

Fabric cut, including "V's".  Ann calls for the V's to be marked 1/2" from the ends, which makes more sense to me than the 5/8" called for in Zapp's method.

Pull the organza through to the wrong side, and press, press press!   Theoretically, you now have a perfect rectangular opening.

Here's where I think the issues (i.e., lots of opportunities for messy errors) can happen.  You baste the welts in place, then sew the welts onto the garment fabric, near the original stitches.  My results are far from stellar:

Oooooh, you can see my mess on the inside!


Next Day:  I had another go at Ann's welt method, making two major adjustments from my first attempt, and got MUCH better results.

The first major change I made was laying one welt on top of the other, right sides together, and stitching them together straight up the center.  Then fold each welt back & press open.   This holds the center, where the welts meet in the pocket opening, together while you're stitching the welts in.   BIG help in keeping everything straight!!!

The second change I made was in the basting.   I was actually doing everything yesterday with printed instructions & no pictures.   This does not bode well for a highly visual person like me!   This time I basted by just picking up a few threads at the edge of the pocket opening fold line, & on the welt close to the fold.

Inside view, with welts pressed open & basted in place:

Finished pocket ~ MUCH better than yesterday's!

Inside view ~  again, big improvement!

Up Next:  Judy Barlup's Welt w/ Less Bulk!

Tuesday, February 15, 2011

An Exaltation of Welts (Welt Pocket Construction Methods, Phase One)

Welt:  Strip of material stitched to seam, border, or edge.

I've been putting it off long enough - the whole welt pocket thing.  A beautiful jacket has been hanging on my dress form for nearly a year now, awaiting (among other things) a welt pocket.  So I committed to Perfecting The Welt this month, and I've been gathering info & getting ready to put that info into practice.

It's time!

The first thing I did was look at my Vogue Sewing book (the 1982 version).  My eyes glazed over, my brain started getting flooded with memories of my former sewing life - a time when I remember constructing horrid looking pretenses at welt pockets, & decided they were just.  too.  hard.   I put the Vogue away.

Luckily, a new (used) copy of Anna Zapp's "The Zapp Method of Couture Sewing" arrived just in time!  (I got mine through Amazon - there is a HUGE wealth of info in this book.  Highly recommended!)  I took a look at her section titled "The World's Easiest Welt Pocket" and decided that would be my first go.   Here are the results.

Step 1.  Mark the pocket placement on the right side of fabric with 2 lines, 1/4" on each side of the center line.  (NOTE:  Instructions call for drawing 2 parallel lines 1/2" apart; it was late at night when I made this pocket & somehow I translated that into one line in the center, which you will see in the first pic below....it worked, but this is a case of do like I say, not like I do....)  In my defense, I think that while Zapp's overall method (and results) are fabulous, her instructions do not go in the category of Sewing for Dummies.   I'll actually try to dumb down her instructions a bit for the rest of us.....

Mark, with dots, the corners of each welt.  These should be 1" apart.

Step 2.  Press fusible tricot or other interfacing to the wrong side of the fabric, extending c. 1/2" past the marked areas for the welts all the way aroung.

Step 3.  Press fusible interfacing on the welt fabric, and cut 2 strips the length of your pocket plus 1-1/4", and 1" wide.  These can be cut crossgrain, lengthwise, or bias.

Step 4.  Fold the strips in half lengthwise, press, and mark the center 5/8" from each edge.

Here is the marked fabric (with only one line in the center of the pocket), and the 2 welts, pressed and marked.  Note that I'm making this pocket at a slight angle - the pocket is on the bias.  My welts are cut on the crossgrain:

 Step 5.  Place the welts on the garment front, line up your dots.  The raw edges of the welts will meet in the center.  Baste in place.

Step 6.  Stitch down the center of each welt, from dot to dot.  Use small stitches, and secure each end with backstitching.  (Note:  this is where precision is important!  Your dots need to be exact, and the stitching needs to end right on each dot)

Step 7.  Check the back of fabric, making sure your stitching lines are exactly 1/2" apart, and exactly the same length, with the ends lined up.   If they are not, determine which line is right, and correct the other one.

Step 8 and 9.  On the wrong side, mark a dot centered between the stitch lines, 5/8" from each end.   Cut ONLY the fashion fabric (not the welts) down the center, stopping at each dot.  Cut a V from each dot to each corner, using a very sharp pair of tailoring scissors.   Your cut should end exactly at the end of the stitch line.

Step 10.  Pull the welt to the inside of the garment.   Turn the corner "V" inside and press (press press press!)  Grade the layers, leaving the longest layer toward the outside of your garment.  

Outside after pressing.  Not too bad for a first attempt, if I do say so myself!

Inside after pressing:

Step 11.  On the inside, fold back your garment fabric and stitch through the "V" and the ends of the welts, securing the short ends of the welts.

Step 12.  Hand baste or zigzag the welts together, in preparation for sewing the pocket bag.   Leave this in place until the garment is finished.

Inside view, with graded layers.


Okay.  So now I'm feeling pretty good about this whole welt thing, and it's time to look at another method.   I picked up the Vogue Sewing book again.   Again, my eyes glazed over & my brain fogged up.   I put the book down.

Practice session No. 1 is over, but I've found some adjustments that may make Ann's method more do-able.    I have 2 or 3 other methods lined up to try as well, so hang in here with me; I'll be back....