It's about exploring and sharing my creative adventures (mostly sewing these days) ~
~those activities that sometimes obsess, usually inspire, occasionally frustrate
~and always provide a delightful maze to wander through.
Showing posts with label Style Arc. Show all posts

Monday, August 25, 2014

Dressing for Yoga (not actually DO-ing it...)

Yoga pants are a good start to a practice, yes?  No?   I used to practice yoga, once upon a time - semi-regularly, even, but now....well....how about if I just make a pair of yoga pants?

Style Arc's Becky Yoga pant

I have a number of Style Arc pants patterns, and absolutely love every pattern I've used!   Mine are all size 10, which fit well before I lost a few pounds this year, so I wasn't too sure about the fit of the yoga pants. When I laid a well-used pair of yoga pants on the flat pattern, it looked like the 10 would be a good fit though, so I cut them exactly per the pattern (even though all of my other SA 10's are currently a little bit on the loose side)

Thank goodness I didn't order a smaller size!   With the negative ease, coupled with a pretty sturdy and semi-stable knit, these pants are snug!   Very snug.  Snugger than I'm usually comfortable wearing, but with a long top they're great :::whew:::.   They were actually a perfect fit when I first made them, but I've gained back a few of those pounds on my healing journey, so now...well, did I mention how very snug they are?   A healthy dose of vanity makes me almost leery to post the pics, but here goes:


What I love about this pattern:


  • The now-famous Style Arc fit.  (weight loss & gain aside...)
  • Super quick & easy make!
  • One simple patch pocket, perfectly sized and placed.
  • Just the right amount of flare at the hemline.
  • Just the right width of the waistband.
What I dislike:

  • Ummmm......nothing?
There's really not a lot more to say.   This is, simply put, a simple and perfect yoga pant.  I'll make it again in a fabric with more give, which should give a slightly looser fit, and I'll probably make it again after that.   And again.   It's that perfect!

A note about the shoes I'm wearing - I went on a bit of a shoe-buying binge last January, and in order to bring an order up to the free shipping category, I added these Campers .    The link goes to gravitypope, and they still have this style!  By the way, if you keep your eye out, you can occasionally find a coupon sale for gravitypope, which will discount even the sale prices further - that's what I did & actually got a reasonable price.

Campers is a brand I've never had before, but it got great reviews, and for good reason!  Reeeeeally comfortable right out of the box.  And better than that, check out the motif!!!   Love love love!!!!
(pardon the garden dust - I could have cleaned them up before taking the pics, but...well... I didn't.)


Maybe I'll go do a little yoga.    

Tomorrow.

Sun salutations in the morning, anyone?

P.S.   For those who are wondering, I slept right through last night's 'quake, and nary a picture on the walls budged a bit.   I do know a few people north of the immediate Bay Area who experienced some damage and would appreciate some positive thoughts coming their way, but we've experienced far worse than this...and survived quite nicely :).

Sunday, February 24, 2013

Jalie vs. Jilly (Jeans, that is)

Last year I made my first pair of jeans from the hugely popular Jalie pattern.  I was very happy with my results (some tweaking was involved), but I definitely wanted to give the Style Arc Jilly Jeans a go, because their pants, in general, fit me very well.   And they're JILLY jeans, I mean...hello?

First off, I need to get the Operator Issues out of the way.  (the Operator would be me, of course...)  There were a lot of them.  I referred a lot to my set of posts about the Jalie Jeans - this is one of the wonderful benefits of blogging!  Having your own experiences documented in words and pictures that you understand is priceless.  :)    I just didn't heed my instructions quite well enough at the beginning, which was one of my downfalls :(

Mistake #1:  I tested thread and needle on the fabric, but one quick seam over 6 layers of fabric to determine what needle and topstitching thread would work did NOT mean that same needle and thread was going to be optimum for most of the stitching that needed to be done.   In fact, there are precious few spots where I'm actually going over 6 layers of fabric.    :::rolleyes:::.
Mistake #2:  I made a quick muslin using the denim I had made the Jalies from, and it took me way too long to realize that the new denim I was using behaved WAY differently - thinner fabric, more stretch, not nearly as stable.   So I was using topstitching thread that was too thick, a needle that was too large, and using a relatively unstable fabric, not treating it as carefully as I should have.   All of this resulted in atrocious (really!) topstitching (wavy, too small a stitch length...not attractive.   Not at all attractive.)

I did, however, carry on anyway and finish the jeans, and. I'm happy that I did.  In the end, I do have comfortable jeans that fit fairly well right after a good hot wash & dry, but sadly, they stretch fairly quickly into a bit of a baggy mess.  Comfy, but baggy.  :(  And  I won't be showing off any of that topstitching with any sense of pride.....

Lessons learned:
  1. When researching and practicing topstitching, seam stitching, needles and thread, try ALL of the different thicknesses and grain directions you'll be using to determine what's needed for what. 
  2.  Remember that not all denims are created equal.   Practice.  Test.  It's worth taking that extra bit of time until you know what you're working with!
  3. Bright gold topstitching on very dark (almost black) denim may not be the best choice.
  4. You don't HAVE to start now and use the threads you have on hand....sometimes shopping and waiting for the right ingredients is worth the wait.

General Notes on the Jilly instructions:   Not for beginners, and probably not a good idea for someone who has never made jeans before.  Unless you want to follow instructions from a completely different source.   Style Arc pattern instructions are designed for people who do not need to be told construction details, and although you can email and ask questions, and you will get fabulous response and help, I would strongly advise you to not try this pattern as your first attempt at jeans!

Style Arc notches:  If you see a notch, mark it!  You'll probably need it.   Notches do not necessarily match up with other notches; in many cases a notch marks the spot that will match a seam - this is great because you don't need to make any marks that might disappear by the time you need it!

I'm not going to write a lot of construction details here, since I did that in my Jalie posts, and the front pocket details, posted here.   For the most part, after I read through the Jilly instructions, I just set them aside and followed the details in my Jalie Jeans posts.

Jalie vs. Jilly

One of the first notable differences is the leg width - Jilly is much wider in the rear leg, with a narrower front leg.  My Jalie pattern is cut in between their high and low rise - the Jilly jean is closer to my preferred rise as is (although I did cut about 1/2" off the front piece, angled from the side seam to 1/2" at CF).   Both jeans have a very similar circumference at the bottom hem; Jalie angles in at the knee, then back out again, Jilly is straighter all the way.

In the next pic you can see the differences better at the top.  Note that I chose to use Jalie's cut-on fly extension - Jilly has a sewn on fly.   Jilly has a lot more room in the butt area; I actually ended up angling this in, removing nearly 1" at the top.   BOTH patterns required gaposis darts in the back yoke and waist seam.

Jilly has an option for a curved waistband or a straight one - a VERY nice touch!  I drafted a curved band for the Jalie, and added darts (at the pattern level) in the Jilly curved band - this ended up creating a waistband with a pretty deep curve in the back.

Another difference is that Jilly's back yoke is taller.   What I did NOT like about this is that the pockets ended up being placed lower (I also shifted the placement of the pockets to be more angled, which made them lower still....this was another big Operator Error Issue, because they are now WAY too low on my butt!)

The front pocket has a deeper curve on the Jilly - it's comfortable for getting the hands in the pocket; some may prefer the shallower curve.

One more major difference is in the zipper.  Jilly has the zipper placed in the center of the front, rather than being off set like most jeans are.  I completely ignored the Jilly zipper instructions and followed those from my Jalie post.

On to some pictures.  The unfortunate disclaimer here is that I've been wearing the Jillys for two days, so the sags and bags in this stretchy fabric (only 2% lycra, but 9.4 oz. weight...just much flimsier than the Jalie fabric I used.   FWIW, I got the Jalie denim at JoAnn's, and I bought a pile of different weight denims from Fabric.com when they had it on a big sale last year.  I'm now not so happy that I bought as much as I did, but hopefully the heavier weights that I got will please me more.  To get a fair representation of the fit differences, I really should have taken the photos right after a wash & dry, but the truth is that this is what the jeans are going to look like most of the time :(

Jilly on the left, Jalie on the right.  The rise is very similar (remember that I re-drafted the Jalie to be in between their low & high rise, and cut down the front of the Jilly by a bit).   That gathering at the knee of the Jilly doesn't go away no matter what size heel I have on, so I think it's a combo of the flimsier fabric and the straight leg.  The Jalie goes in at the knee.  (The Jalie denim is pretty dark; hope you can see the details OK.)

You can see here how much further forward the side seam is on the Jilly.   This I like!  You can also see how much lower the back pocket site on the Jilly.   This I don't like :(

Just to show how much ease this stretchy fabric has..... :(

Another side view - on this you can see that the inside seam ends up being further forward on the Jalie.  The crotch point on the Jalie is further forward.  Overall, I much prefer the leg seam placement on the Jilly.

I don't remember offhand (and I'm too lazy to go look it up) whether or not the Jalie called for the 2 belt loops at CB.   Jilly calls for only one; I prefer 2, but when I got to that stage I didn't feel like cutting a new piece just to have the extra loop.   Even though the sagging of this fabric means that I need to wear a belt more often!    Also, I didn't sew down the bottom of the belt loops on the Jilly Jeans; I did on the Jalie.   Looking at the pics this is something I WILL do while the thread is still in the machine - hate that loopy look!   I think you can't quite tell in this pic how bad the pockets look on the Jillys - they really are placed too low and end up in a little fold at the bottom. SO not a good look!  I mentioned above that I adjusted the pocket placement, and really should have left it alone - where they have it would have been better.

Bottom Line:   I would like to make another pair of jeans while the info is still fresh in my head, and I would redraft something in between these two patterns.   I think they both have a lot of good aspects - I like the leg seams on the Jilly, although I might narrow them at the knee more like the Jalie.  I also prefer the narrower back yoke of the Jalie.  Both jeans have a comfortable fit on my body (after some tweaking, although the Jilly took way less tweaking!).   Both needed a gaposis fix.  The curved band on the Jilly is very nice.  I like the pockets on the Jilly, although I might try the method of extending the pocket into the fly next time - sounds like a great way of adding support to an aging belly!  ;-)

My biggest lesson here?   All denims are not created equal, and my personal preference is for something a little beefier, with a little more stability.    Oh, and in my quest for sewing a better topstitch, start with the appropriate needle and thread right off the bat!

Next up is a super fun piece of frosting!   I know I said I was going to focus on more practical items, and I am....really, I am....but this particular flavor of frosting just ambled on to my sewing table and it was love at first sight!   Sneak Peek:

And you?   Are you focused on a nutritious main course or frosting right now?  Happy Sewing all!

Saturday, February 23, 2013

Style Arc Jilly Jeans - it's about the Pockets

Huzzah!  I've completed my second pair of jeans!  Style Arc Jilly Jeans (which of course I needed to make).  I'll compare them to my first pair of Jalie jeans next (photo session isn't done yet, because frankly, I'd rather be sewing than taking pictures & blogging....)  

For now, it's all about the front pockets.  Jilly Jeans Pockets for Dummies, if you will.  There aren't very many reviews for this pattern, and I suspect that is mainly because of Style Arc's infamous lack of hand-holding instructions, coupled with the fact that making jeans really kind of of needs a bit of hand-holding, at least the first time through.  I hope to provide a bit of hand-holding, because there are aspects of this pattern that I really like, and hope that more people try it!  A few reviewers said they couldn't make any sense at all out of the front pocket instructions, but I was determined to muck through it and figure them out, and in the end, I do like their method!

The pocket bag is all one piece, folded over - I like the simplicity of this!  The instructions, however, are anything but simple...or maybe they're too simple... at any rate, if you've never done this type of pocket before, here's the 101 for dummies hand-holding pictorial version.

1.  Finish the curved edge of the pocket facing (I serged it)

2.   Sew WS of front pocket facing to RS of pocket bag along all edges of the facing.

View of pocket facing sewn on from the back
Note:  the facing is visible after jeans are finished, so this is denim.   
The pocket bag I cut from cotton flannel - warm and comfy :)  :

3.  With RS together, sew the curved top edge of the pocket opening on the jeans front to the matching curve of the pocket bag (the other end of the pocket bag from the end you just sewed the facing on to)  
Note:  I opted to do a cut-on fly, so my jeans front pattern piece looks different than the Style Arc piece.

4.  Turn WS together, press and top stitch the curved pocket opening:
View from reverse side:

5.  Sew the coin pocket to the right side pocket facing (the pattern has notches indicating the placement of the coin pocket)  I made some notes on my coin pocket pattern piece, since it wasn't immediately clear to me while cutting it out which side was up:


6.  Fold pocket bag in half.  Sew the bottom curved edges of the pocket bag together; finish (serge) the seam:

That's it!  Not hard at all.  Once you know what you're doing....

The finished jeans, and my comparison of the Jillys to the Jalies is coming up next...

Sunday, June 24, 2012

Name That Skirt!

The Basklecloth Skirt?
The TableStArc Skirt?
The BobbieShams Skirt?


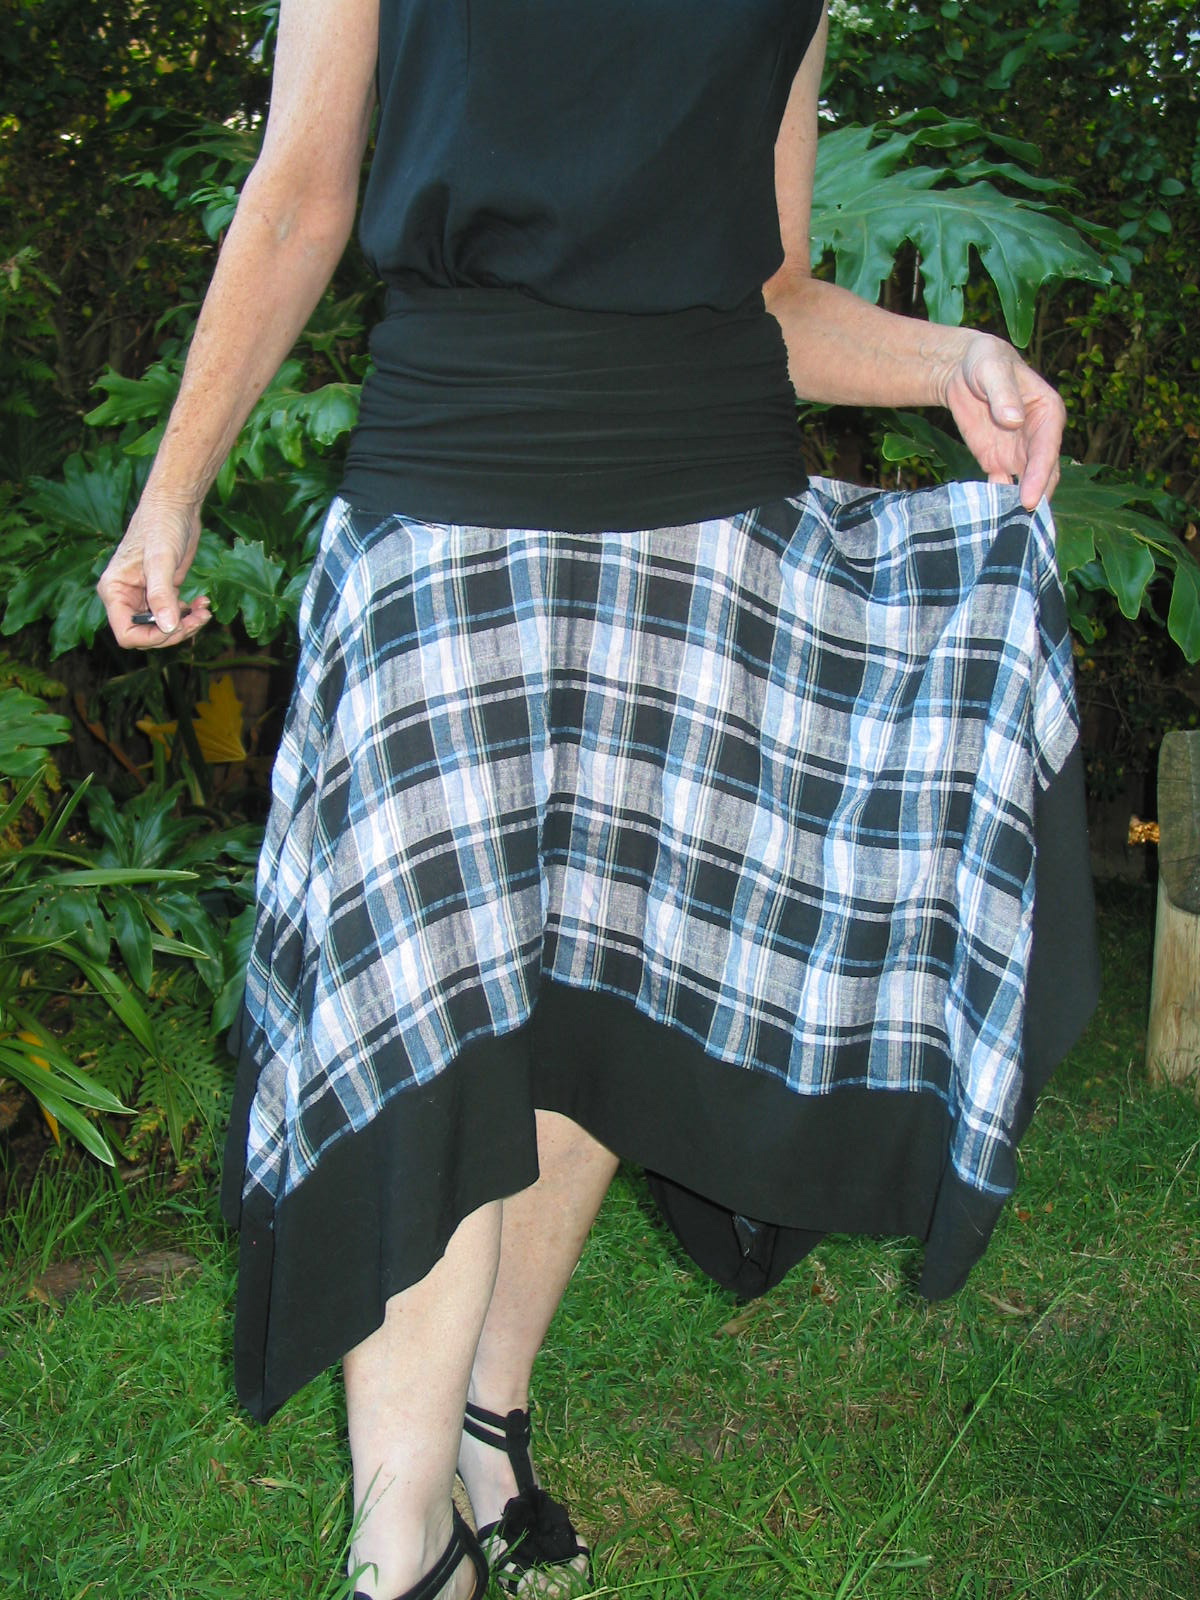
Here's the back story:  I was cleaning up the sewing room, after the multi-project flurry of late, and came across my first (failed) attempt at shams' Tablecloth Skirt.  I had cut the waist hole too large.  WAY too large.  It was sort of throw-away fabric; I'm not sure where it came from, but I think it might have been part of a free FabricMart bundle.  It's a very light weight crinkle plaid - almost a voile.

I looked at the black in the plaid, and looked at the black modal knit I've been working with, and one of those oddly shaped light bulbs in the brain started flickering...and I found myself thinking "Frankenpattern!"

Here's my review of the Style Arc Bobbie Bask Skirt.
And my review of the Tablecloth Skirt
And a link to shams' Tablecloth Skirt Tutorial

I took the pattern pieces for the bask from Style Arc's Bobbie Bask and sewed it up using the black modal, and then married it to my failed tablecloth plaid.  Since I was combining a stretch with a woven, I wasn't sure how well it would work, so I wanted to get those two pieces together before deciding if a) it was worth continuing, and b) if rectangles of the modal would work on the bottom edge or if I should find another option.
The Bask, sewn, and the cut "tablecloth" square.
For reference, I'm about 5'4"; hips at the widest point are about 38",
and the Bobbie Bask pattern is a 10.
This slides easily on and off.


Here's the skirt before adding the bottom rectangles:
Looking good so far!
Since the circle of the center hold in the plaid is mostly on the bias, it was easy to give it a bit of a taut hold while sewing it to the stretch modal, so the seam blends together quite nicely.  As an afterthought,  I wanted to add a hidden pocket.  If I had planned this ahead of time, I would have given the modal more stretch in the pocket seam area, with less plaid fabric, because I had a bit of a baggy result at the top of the pocket.  I solved this by adding a snap:

The pocket is nicely hidden under the folds of the bask 
Just big enough for a cell phone or some necessary odds 'n ends :)
Everything was working well, so I went ahead and added a strip of modal at the bottom.  The rectangles are 40" long, matching the width of the plaid square, and the finished depth is 5.5".  This makes the "points" at the corners of the skirt less pronounced....I do like them a bit more dramatic, but this skirt was an experiment, and I didn't want it to be any longer than it is.

Sewing the modal to the cotton at the bottom edge was a bit tricker than the circle above.   By using "taut sewing", giving the cotton a bit of a tug while feeding it through, and placing the modal on the bottom, above the feed dogs, they went together quite well.  I'm loving working with, and wearing, modal!  It has a good amount of stretch, but I would consider it a fairly stable knit, and it has great recovery.  So far it's behaved itself very nicely when marrying it to other fabrics, both knits and wovens.   A good press took care of any waviness.

All in all, a successful experiment!


I even have a lovely periwinkle blue raw silk that's a perfect match for the blue in the skirt, so it's destined to be a matching top :)

So....what DO I call this concoction?  Have you Frankenpatterned lately, and was it good for you too?

Saturday, June 16, 2012

I'm Wearing Skirts! And Liking it! Style Arc Bobbie Bask

Sometimes even a die-hard pants person has to admit that skirts can be...well....kind of fabulous.   Especially on a hot summer day.   And cooler weather too, worn with boots.   And as I sew more, and age more, and become a bit more body and fashion conscious, I'm finding that skirts are starting to have more of an appeal.

One of my all-time favorite articles of clothing just happens to be a skirt, in fact.  This one:
This is a cotton batik that is SO soft, and SO comfy to wear.
It's missing a button, and has a few small stains, but it's true love,
and imperfections can be glossed over, right?
I don't really wear it all that often any more, but it once was my go-to travel skirt, beach skirt, knock-around-the-yard skirt, so it has stayed in my closet for a very long time.   Last year I bought Style Arc's Bobbie Bask skirt pattern:
because it reminded me of this beloved skirt, and finally...finally!...I made it up.
Seeing it on the hanger gives an idea of the drape and construction,
which definitely looks different on the body.

And now I want more!

It's a bit shorter than I usually like (short leg syndrome = needs longer skirts, + aging legs syndrome = vanity, + knees that have never ever been an attractive feature on me = more vanity), but I thought it might make a good biking skirt:
And it does!  Here I am with Matilda Joplin, a bit windblown after a jaunt to the pet food store :)
The knit actually clings to the knees in the wind, and it's a good length,
not long enough to get caught up in anything.  
Success!
Not only that, if I ever DO want to dress it up with heels (not likely, but still....), I can:
I know, the shoes are not the best choice,
but it's what I have.
Truth be told, this is playing dress-up games for me.
It was fun for the 10 minutes it took to put this look together & snap a few pics ;-D
Close up of the bask.
The pattern suggests that you can take a few hand stitches
to hold the folds where you want.
Side view showing the gathered seam
I would have made the skirt longer, but I used every cm of length I could squeeze out of what fabric I had left.  And now I'm fine with the length, since I discovered it's so good for biking!  I left it unhemmed, again, to keep every mm of length, but I may hem it now.  Because I have this "thing" about unfinished edges, and it'll drive me batty sooner or later.

Pattern and Construction Notes:

  • This is not quite a circle skirt, and made up in a drapey knit it has wonderful movement and a lovely soft fall.   The gathered midriff hugs the body, but in a much more flattering way than a single layer of knit.   Well, flattering to those of us who no longer have youthful, fit and firm tummies.....
  • As is the case with most Style Arc patterns, instructions are minimal.   Even the pattern pieces gave me a pause - instead of saying "cut 2", they say "1 Pair", and my feeble brain needed to take a good look at all of the pieces to make sure "cut 2" was what was meant.  The basic information is all there in the instructions, (thank the sewing goddesses for drawings - I would truly be lost without them!) and it's a fairly simple pattern, so you can figure out the details even if the instructions don't quite make sense.
  • There is an inside and outside "bask" (the gathered midriff section).   The outer one is gathered at the side seams, then you match the seams to the seams on the inner bask.   I gathered the seams by sewing a long stitch, pulled and gathered the stitches to length, and tied the ends to hold the gathers in place.  Next time I'll do the classic 2 rows of stitching, and backstitch at one end so that I don't have any slippage while I'm gathering, then pull the threads to create the gathering.   Then stitch down the center to secure it, using a smaller stitch.
  • There is elastic at the waist - you sew this on to the inner bask, at the waistline seam.  I meant to take a picture of this, but I conveniently forgot; it's not my proudest moment in the neat sewing category....  In my defense, I made a teeny tiny seam here (trying to eek every mm of length from the fabric), & trying to keep that seam folded under the elastic was not an easy task!  
  • The only tricky part of the skirt (for me, anyway) (well, other than the aforementioned elastic...), is matching the seams of the outside and inside bask pieces and sewing them together along the gathered seam.  I think that if I do my gathers as mentioned above, and WAIT to pull out the 2 rows of gathering stitches until after I've sewed up this seam, it will be easier, and have a neater finish.
Slow Sewing Required Here
This pattern really has a lot going for it - there is virtually no fitting required; just start with the right size & it pretty much stretches to fit.  It's fairly quick & easy to sew up, & even forgives some sloppy mistakes because of all the gathering.  There is a lot of hemming - I guess I have to admit to myself that I am now a confirmed Lover of Knit Sewing, so one of these days I'll justify a coverstitch machine....maybe.   And a felting machine.  And a straight stitch industrial.......

Maybe.

Did you ever convert from skirts to pants or vice versa?  Are you an equally bi-pantskirt wearer?  What do you love or hate about either one?

For me, it's really all about comfort.  I cannot imagine that I would ever be comfy in a tight pencil skirt, nor would I want to go anywhere in a big poofy conflagration that would brush both sides of any doorway I passed through.   Just let me breathe deeply, and walk freely.  What's different for me now that I've started sewing again is that I want to feel that I look my best while doing it :)

Saturday, October 1, 2011

Style Arc - Linda Stretch Pants (at LAST!)

Did you see the movie "The Sisterhood of the Traveling Pants?  It was a story of four girls, with four completely different body shapes, and one pair of magical pants that fit each girl perfectly.  With all of the reviews of these pants coming from women with utterly diverse body types, and pretty much unanimous rave reviews about the fit, I can't help but wonder if there's something magical going on...

So of course, in continuation of my Style Arc binge, I simply HAD to include this pattern, in the hopes that it would fit me as well as it does everyone else.


The suggested fabric (and enclosed fabric sample) is for a stretch bengaline, which is a woven fabric with just a small amount of 2-way (not 4-way) stretch.  It is apparently easily available in Australia, but not so much in the U.S. (at least in good quality), so us poor non-Aussies have to make do....  I had a mystery fabric that was a nearly perfect match for the sample, albeit a bit thinner & with more drape.   Sadly, my (nearly nonexistent) fabric cataloguing methods left me totally clueless about what this fabric was :::eyeroll:::  Especially since it really is a great fabric for these pants!

I swear I'm going to change my ways.   Definitely.  With my next fabric purchase.   For sure.

The first thing I did was compare the pattern (size 10, in my case) against my best-fitting pair of RTW stretch pants.  The most notable difference was that the Linda pants had a much wider back piece, and a longer crotch curve in the back.   Was this the magical fit secret?  The overall sizing appeared to be good for me, so I carried on, & cut them out exactly per the pattern, except for the length...

Note on the length:  I'm 5'4" (almost) & my legs are proportionately short, so I chopped off almost 3" from the length.  (they allow for a 2" hem)  I did not allow for how much fabric would be taken up by my *ahem* thighs, so I ended up with less than an inch for hemming - I'll leave more next time!  (Yes, there will be a next time)   I would say the length allows for a 5'5"-5'6" person; if you're taller, or have long legs, definitely add more!

There are 3 pattern pieces:  Front, back, & a folded waistband that is the same for front & back.  There's a nice little tip about the recommended stitching sequence in order to "improve the crotch shape".   (Sew the inside legs together, then the crotch seam - back to front, then the outside leg seams)  I'll believe their method, because something sure seems to work!

They do say to use a "stretch thread" - I'm pretty sure what this means is a "stretch stitch".   I used the zig-zag lightning stitch on all of the leg seams, and a long stitch, followed by serging, on the waistband.

The waistband calls for adding 2" wide elastic (optional).   Given the stretch of the fabric, you could possibly get away without using any elastic - I considered this, but ended up using 1-1/4" elastic.   Partly because I didn't really want elastic THAT wide; partly because that's what I had...you know how it is....

I stitched it into the top fold of the waistband, like so:
1.25" elastic & folded waistband

elastic placed near the fold

elastic stretched & pinned in place 

Stitched along the top fold
I then basted the waistband in place, to check the fit - pretty darn good already!  The waist sat a little high on me, but then my waist to crotch ratio is on the short side as well.   So I trimmed 1/2" off the back of the pants, tapering to 1/4" in front.

These pants could easily be a quick evening project, start to finish, but of course, if you follow my sewing progress, you know by now that I'm going to find something to do to make it a little more challenging....

In this case, the RTW pants I was comparing these to had a little hidden zippered pocket at the waistband, and I decided that would be a fun addition.   Which is why, instead of finishing these in one evening, they took 3.    The fuzzy brain that goes along with late night sewing was a contributing factor in taking so long to figure out the logistics, but I did end up with a workable pocket.  Finally!

If anyone wants to tackle it, (or improve on it - please do let me know if you find a better way of making a pocket like this work) here's what I did (apologies for the fuzzy photos):

  • I used a C&C invisible zipper (it's what was available on short notice - next time I'll find a sport zip w/ lighter, smaller hardware; this was too bulky!
  • I cut a length about 4.5" - too short by the time I secured the end & had it sewn in.  5.5" minimum next time!
  • Sew the waistband on with a long stitch (to be serged later) & leave an opening for the zip.
  • Sew one side of the zip to the waistband, the other to the pants top


  • Cut one piece of fabric for your pocket - I serged the edges
  • Sew the top of the pocket to the waistband seam and the zipper tape, so that your seam is made with the following layers:  the 2 raw edges of the waistband, the zipper tape, and the pocket top

Pocket laid in place

Pocket flipped up
  • Serge the waistband to the pants, making sure you don't catch the lower zipper tape in the stitching.   It got tricky around the zipper pull (note the blank, unserged area), but I figured this would all be nice & secure when I topstitched the SA in place.
  • Note:  I really should have used a wider serge stitch -  it wouldn't have helped my issues of getting around the zipper pull, but it would have helped with the topstitching!
  • Clearly, I need to learn more zipper techniques to avoid this issue in the future!


Finished Zipper, open....

And Closed.
Next, I just sewed the pocket in place around the edges - you can see the stitching on the outside, but it's pretty subtle with a good thread match.  There is a bump where the zipper pull hardware is; I want to check out some other zipper brands, since I think this whole technique could work well once I get it figured out.   I would also place it a little more towards the center, so that the zip pull doesn't sit right  above my hip bone.

The 3-finger pocket.
I don't think any pickpockets are going to pull a fast one on me with these pants!  ;D
I would definitely want to add an inch in width, but still, the pocket is big enough for a key & a credit card, or even a cell phone :)
And....ta Dah!   The finished product:


This is not how I would normally wear pants like this, (shirt tucked into stretch pants = not such a great look) but I wanted to show the fit details, and it's not like anyone but my closest web friends will ever see this picture, right?

Bottom Line?  The Sisterhood of the Traveling Linda Pants has been carried on!  I'm very happy with the fit overall.   (My tummy is a different matter, & it isn't even Thanksgiving yet....rats....But that's what stretch pants are for, right?)  I'm not really sure how I can improve on this fit - if anyone sees any solution to the existing wrinkles, do let me know, but overall, they're super comfy & I WILL be making more!  I'll definitely cut them a bit longer, & will try them in a slightly heavier fabric.    And I won't bother with the pocket in all of them, although I do like my pockets.....

I think it may be time for a bit of Style Arc break for awhile.

That is, unless my Jilly Jeans arrive tomorrow.   I mean, JILLY Jeans?   What choice do I have, really? I know they weren't really named after me, unlike the shaza pants, which really WERE named after our very own shams.

Which makes me wonder, has anything ever been named after you?   Any interesting stories out there about your namesakes?